This blog is about how to install the auto-present door handle (and the soft close unit) in the 2021 Tesla model 3 RHD (Right Hand Drive). I guess the 2022 is similar but not quite the same on the older models.
In the nutshell, here is what you got to do.
1) Take apart all your 4 doors, including glasses, yeah.
2) Take out the OEM door handle units and transfer the OEM hall sensors to the Hansshow units and put the new ones back in.
3) Swab out the OEM latch units with the Hansshow's (if you're also doing the soft close).
4) Plug the old electrical harnesses for both the door handle units and the new soft close latches.
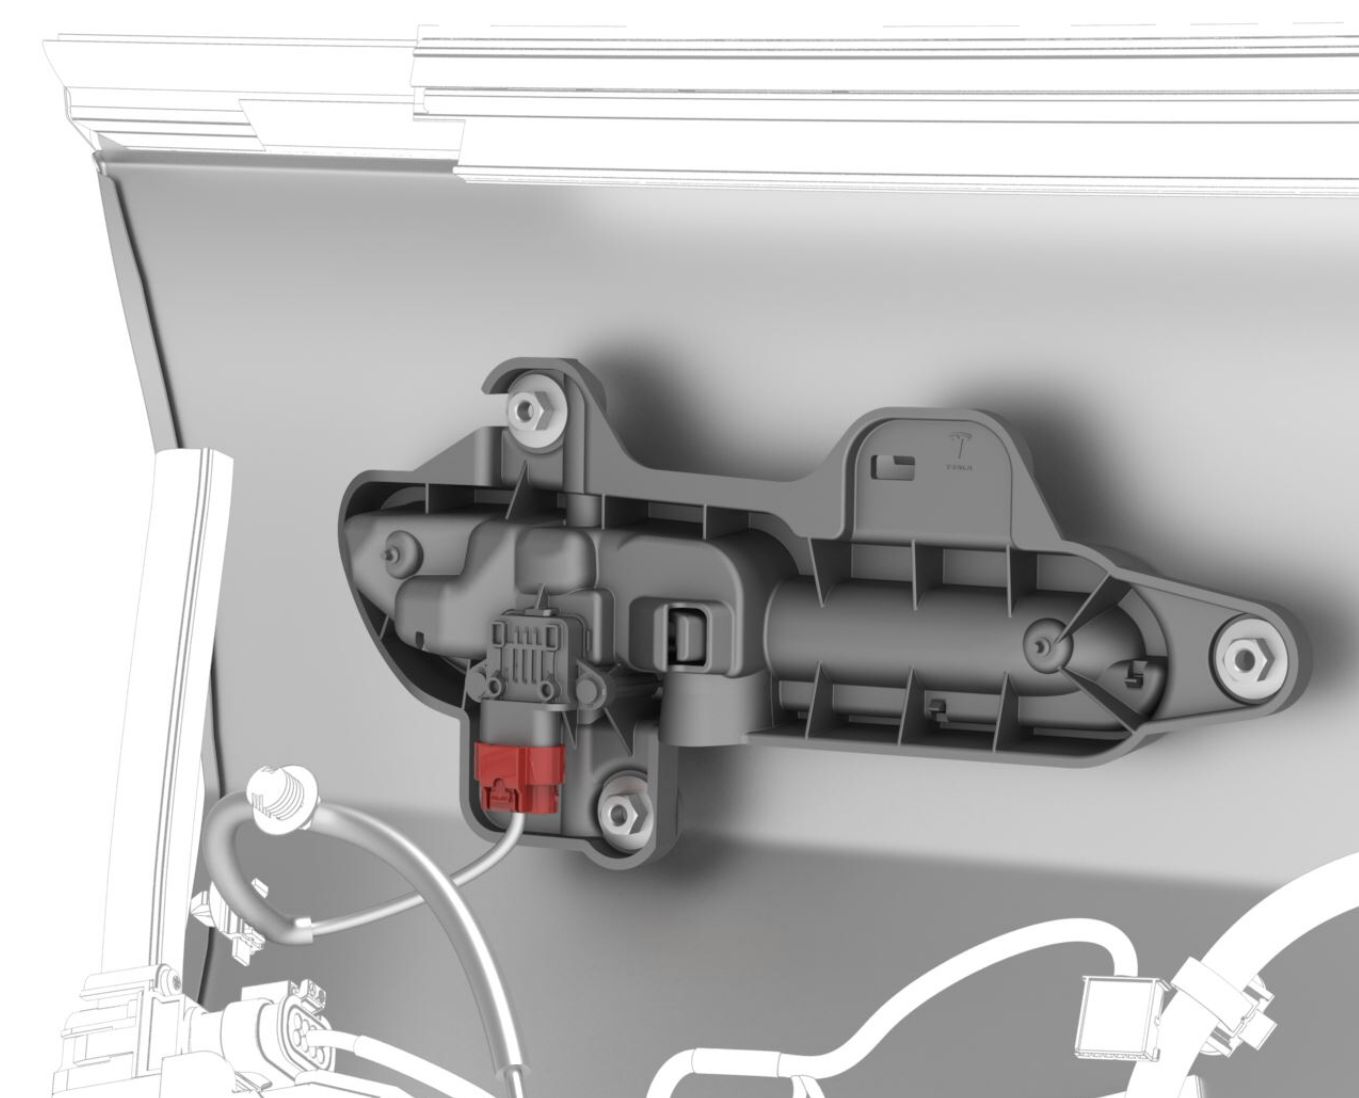
5) Wiring all new handle units on each door to the control unit.
6) Connect the control unit to the car's CAN bus and the 12V DC supply.
That's it, 5-6 easy steps, to get you to feel like you can do it. Now let's go into the details.
Introduction
My Tesla is a 2021 Model 3, made in China, right hand drive (RHD) with Intel Atom CPU. You'll need to know your car model, year and CPU when you buy these accessories. I bought my auto-present door handle kit from Hansshow (www.hautopart.com) for $469 which included S&H (to Bangkok Thailand). I also paid a custom duty (about $18). I didn't know any professional Hansshow installers in Thailand. I asked the technician at the company who imported my Model 3 (from the UK) - Wasutha group and they said that they have never installed one. The last time I cracked my passenger window, they charged me THB 3,000 or roughly $88 for installation/labor fee. That's not much in USD but in Thailand, that's a lot. I heard some professional installers in the US will charge $800-1000 for installing this auto-present handle.
The whole thing started when I saw Brian (i1tesla) youtube's video - the one said - My TESLA SUCKS it's Doors closed! and it's inspiring because he made it looks so easy. After watching so many videos about soft close door installation, I'm pretty convinced that I can do it.
The reason that I like to have a soft close is because Tesla model 3/Y doors are made of aluminum (most of it) like ones in my Mercedes C350e, so they're light and you'll need a nice swing to get them closed. It became harder for the rear doors after I put on the white seat cover last year and that cover added another layer of skin to the rear seat which rubbed against the doors when closed.
After I ordered that soft close door which was pretty inexpensive - $237 (for the V.4), then I saw the thing called auto present door and auto present door handle. The auto present door (the whole door, open to you like in model X) is NO-NO for me - too much, I don't think I can, or I don't think I'm that interested. I'm worried if it's gonna open and chip or make a dent on something parked next to it. Anyway, the auto present door handle is intriguing and if I am gonna pop open the entire door assembly for the soft close installation, It's probably good to do them all together. By that time I didn't realize that this auto handle kit costs as much as $469. My recollection was that they cost about the same becasue I ordered the soft close kit with Hansshow's illuminated door sills ($179) which made the first order tallied up to $416. So when I ordered the auto handle, which was only a couple days later, I kinda forgot that and I registered that the soft close kit was about $400 as well. Not until I am writing this blog, then I realize that the auto-handle is almost twice expensive. In my view, if the budget is limited, I'd go with the soft close only.
The information about this auto present door handle installation is so scant. Hansshow only gave you 1 single sheet (see below). There's currently no video of this version on model 3. Also, the Hansshow's auto-present handle installation video is not updated. You no longer need to take apart and fabricate the whole door handle unit. This version 3 already came assembled (perhaps, that's why it's $469). All you need to do is to transfer the hall sensors and swap the units which is extremely easy. The wiring part may be challenging but it's totally doable. I hope this blog will be helpful to many others. Too bad, I'm not yet keen on doing videos or I like my privacy. Yyou can email me for any questions regarding the installation (gollygui@gmail.com).
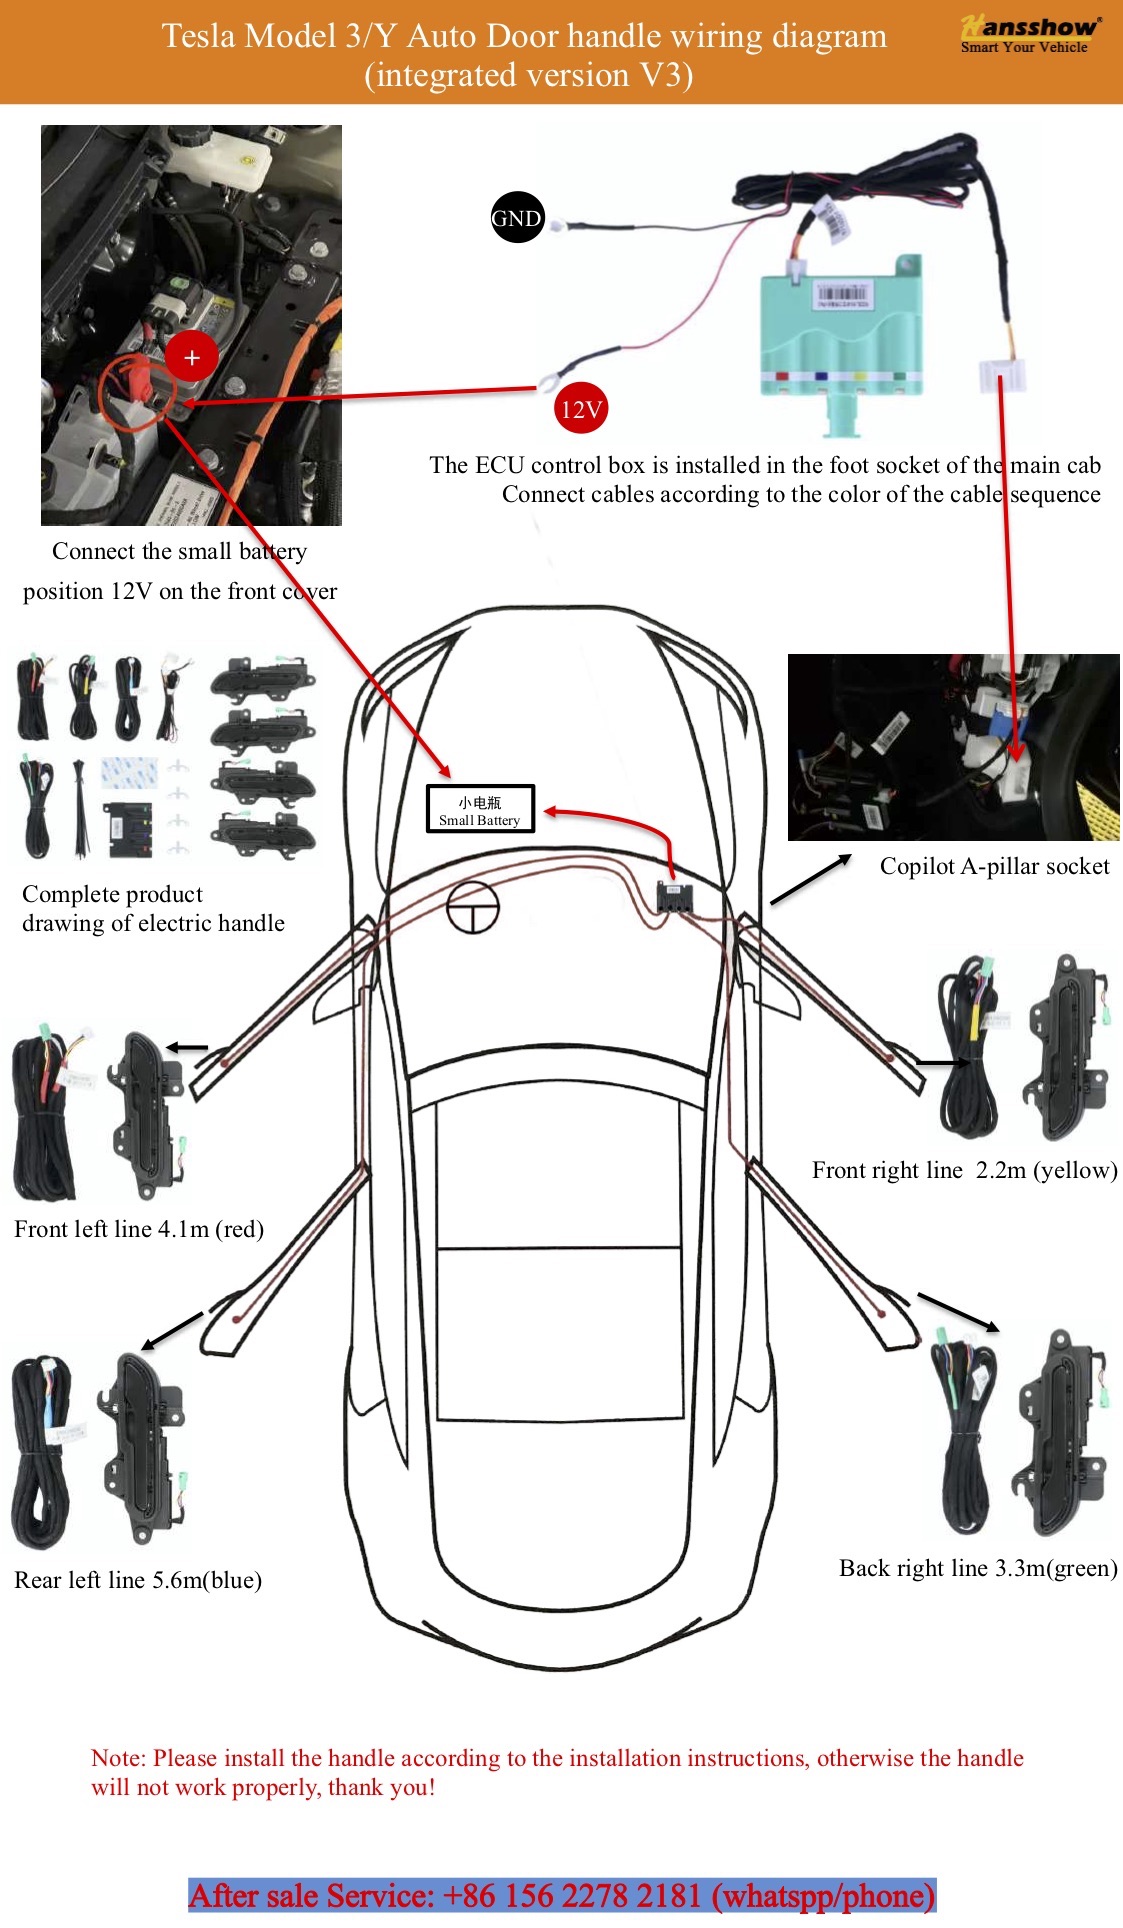
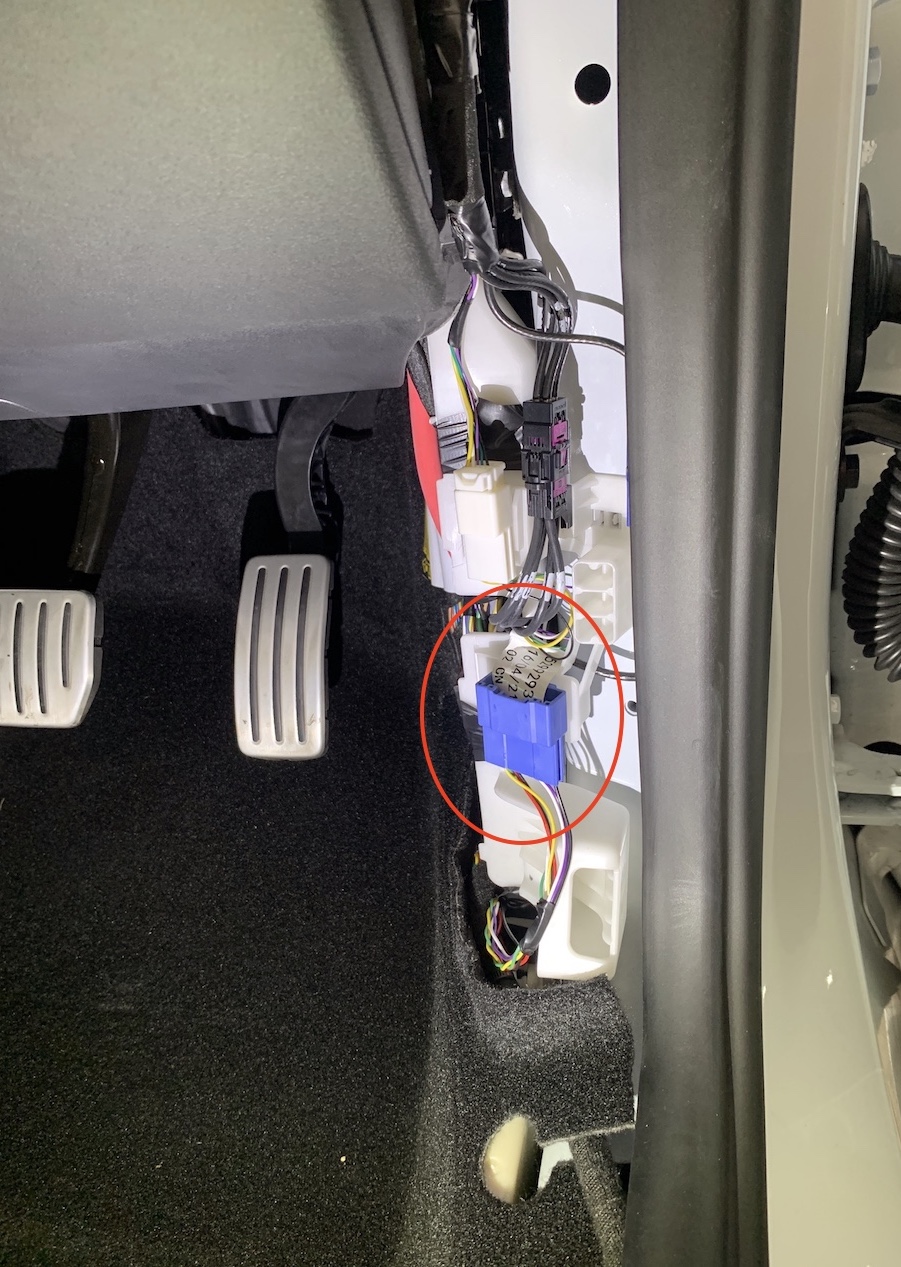
This is the Hansshow's instruction sheet. Thank god, it's in English - not Chinese. It provides an insight and overall plan but no details. So you can read details here in my blog. You can request the pdf from Hansshow, they'll send you one when you order the kit. The picture of the Copilot A-pillar socket (dunno why they call that) is not updated. Mine and the newer model 3 is blue socket, not white.
Preparation and Planning
Since I'm an amateur, I know well that I will need time and patience and have to be very careful. So I devoted the entire weekend to the job. I've learnt that I might take more time than the professionals but my job as a car's owner will be better. You can do it step by step - it doesn't have to be all at once. I did my left front door first - that's the one I cracked my glass last year, the door has been repaired before, so I guess it will be easier to take apart hoping that panel trim clips/fasteners will be loose. The first door took me 3 hours, I did that on Friday's evening from 4-7 PM. Then I did the rest on Saturday, basically 1.5 hr to 2 hr for each door. The whole Sunday, I washed the car, did extra wiring jobs and also reworked the rear right door which had an issue with the new handle appears recessed.
So, you might be more or less of a handyman than me. Once you open one door, try to finish it door by door. Once you close the panel back, the door can be (soft) closed and the handle still can work manually even when you have not wired everything. My setup is at my Condo, so I have no luxury of my own garage, I do everything at my parking space on the ground of my Condo. Luckily, the place is a low to mid-rise bldg and not very busy, people (usually seniors) are nice and not too nosy. Some did ask me what're u doing or even appeared shocked to see the car is falling apart.. You can do this as a one-man job but it's nicer to have an extra pair of hands. You will need a safe place to lay down that window glass once you remove it, I found the best place is in the car's trunk because it's carpeted and you can close the trunk, not worrying about the damage.
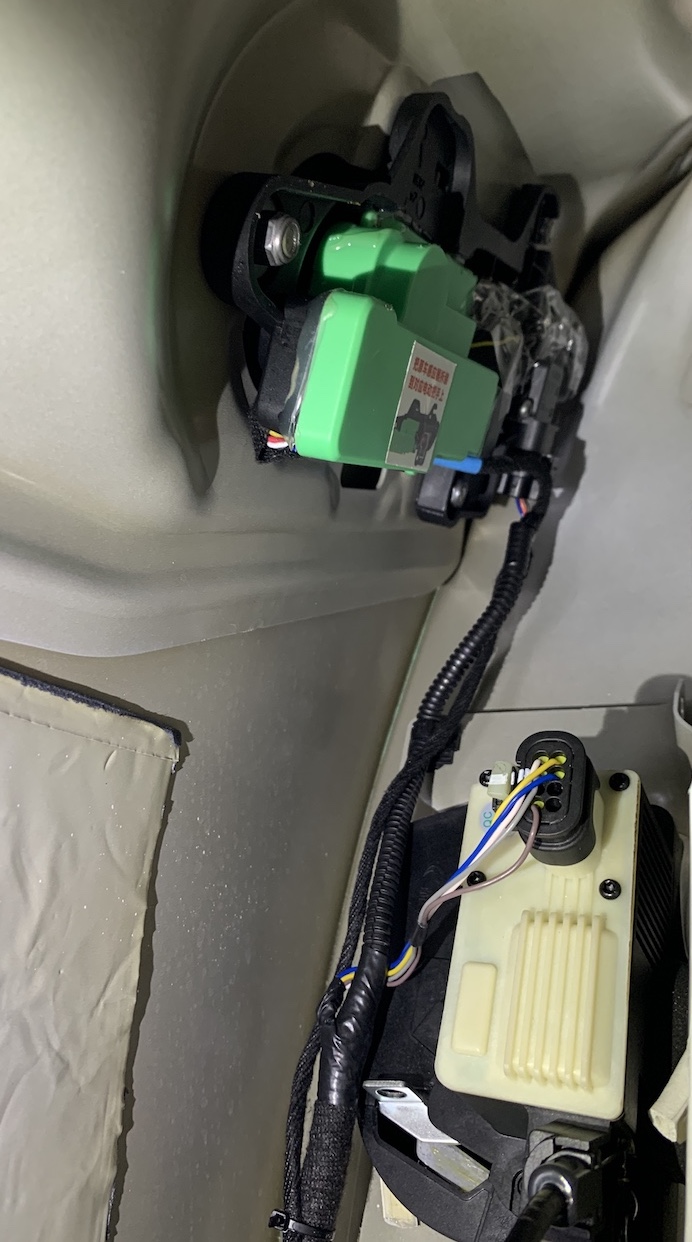
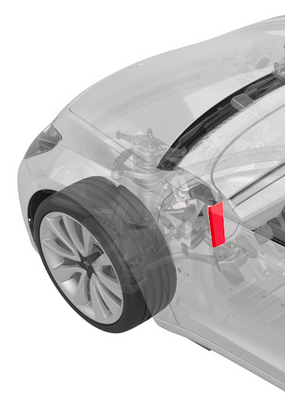
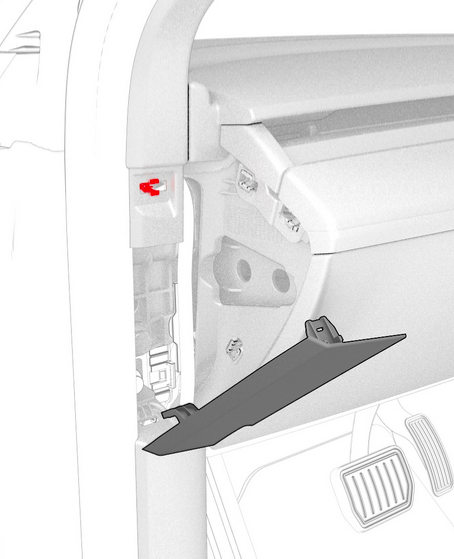
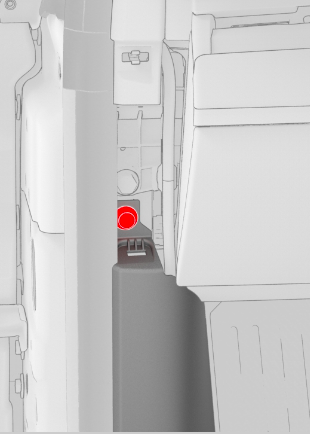
My car is RHD which is unlike the drawing (car in China is LHD - just like in the US and many other countries. I got this pdf long before items arrived because the soft close kit was out of stock, so I have almost 2 weeks to plan for all this. My first question to Hansshow is - where's that Copilot A-pillar socket in RHD car. I believe that where the controller get the signal from the car's CAN (Controller Area Network) bus to synchronize all the door handles. I didn't get a response from Hansshow besides a request for a video of my question !. So before all items arrived, I just explored the panel trim to check and I also need to find where to tap the 12V DC supply.
Turns out, regardless of RHD/LHD, that CAN bus socket is always on the right side A-Pillar and it happened to be the driver's side in my car. Well, that side is so cramped because the footwell got both brake and accelerator pedals and lots of wirings on that side (including the big red wire). If you don't mind working through those, your installation will be exactly like in the pdf.
Well, I decided not to, the panel trims that form the roof of the footwell on the driver's side are multi-pieces, harder to remove and put back (3-4 pieces, air ducts, with one screw) while removing the trim of the passenger's footwell is easier (just 3 push pin holding a single panel). Keeping the controller on the left side in the RHD will results in flipping the wiring mirror-wise. Another problem is the wiring from the control unit to CAN bus is not long enough. So I have to lengthen it by cutting the wire and solder another 1.5 meter wire in between. The wirings from the control unit have to be exactly like they mapped in the pdf because the length from the control unit to each door has been specifically made. So I keep the wirings in the same order but I have to re-color the label on the connector for the controller. For example, I need the longest cable for my right rear door - and it has to be the original blue line. So I use the blue line for that door but on the connector that plug into the controller, I put the green tape on it. Are you puzzled by this? Well, it's not that hard to figure out and if you keep your controller in the right footwell, exactly like in their original pdf, you don't have to change a thing. I show my installation map down here.

This is the diagram of what I did, since I decided to keep the controller unit on the passenger footwell which is much more spacious and easier to access. But the socket is on the other side (the socket is always on the right side), so I have to extend the wire. Then I have to flip the designated cables because of the length differences. Meanwhile, when routing each cable to the controller unit, they still need to go into the corresponding door. So the blue cable (the longest) represents my right rear door which will need to plug into the green socket on the controller unit. At this point, I applied the green tape on the cable over the factory's blue tape to prevent confusion. If you happened to have the RHD like mine but you decided to keep the controller unit on the right footwell like the original pdf, no need to flip the cables around. Just have to work in a tiny space.
You will need...
1) Pry tools.
2) Torx screw bits (T30, 25, 20), Hex sockets (8 mm, 10 mm, 13 mm)
3) Adjustable impact driver, 1/4" handle or wrench. (preferably, torque wrench). You can do it manually, but the electrical driver will save you time and labor.
4) Others i.e. gloves, floor mat, cable ties, fishing wire, silicone spray, flat screw driver, torch/LED lamp
Before you go
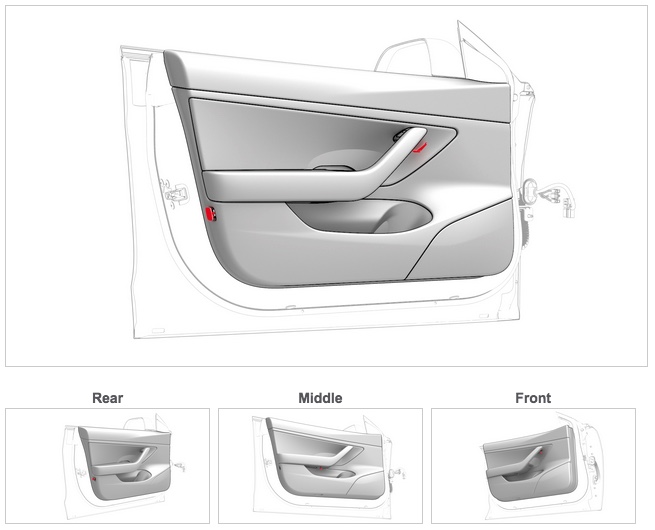
You need to understand what you are going to do. Basically, we have to remove both the OEM door handle and the OEM latch lock box and replace them with the Hansshow's. There are some differences between the front and the rear door. Funny thing, most people on youtube installation videos (including the Hansshow's one) will explain only the front door but didn't mention anything for the rear door. I found one video from Tesla DIY very useful, especially on the rear door installation. Since it seems like everyone starts with the front door, by the time they move on to the rear door, they do it so quickly. Anyhow, you can start on either door. The front door is simply larger, there will be more screws, clips and fasteners and of course - a bigger glass. The current model 3 - the glass window moving mechanism for the front door is still inside the door - unlike the rear door. The rear door glass mechanism is attached to the panel that can be removed completely - this is also the same design used in model Y. So working with the rear door is actually easier for me since there is not much inside after you remove the glass and its moving mechanism. The glass is also smaller and the wire route inside is also shorter or maybe, I have already done 2 front doors by that time - so the rear door seems so easy then.
If you have RHD model 3 and plan to do the same as me (put controller unit on the passenger's side - left side), you will need to lengthen the 2-wire cable bringing signals from the car's CAN bus to the control unit. The one coming from Hansshow is about 0.75-1 m long and it's not enough to reach the space on the A-Pillar on the other side. By doing this, you have a much easier time to work around the spacious footwell. If you were to put the control unit on the right side (like Hansshow's poster) in the RHD, it's still doable, just only that you have to work in a very cramped footwell, full with wires inside the panel.
What's in the box
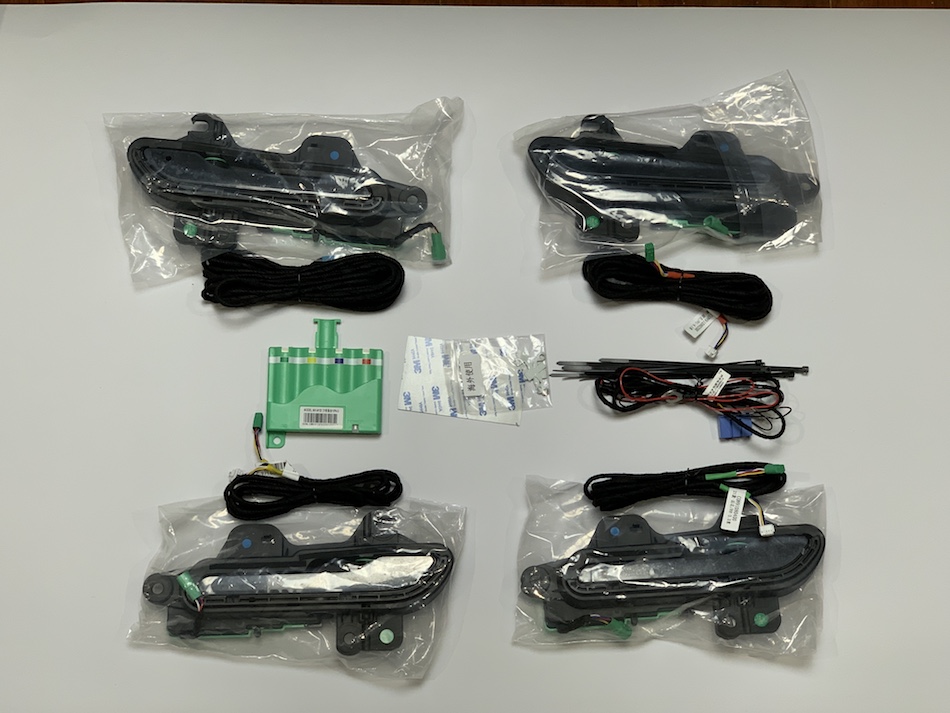 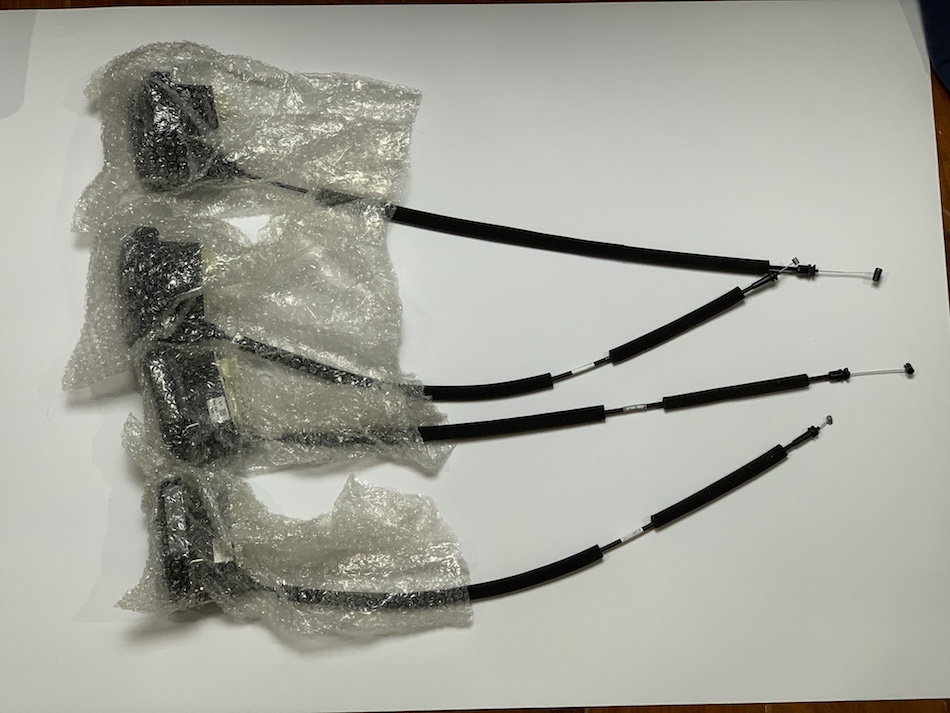
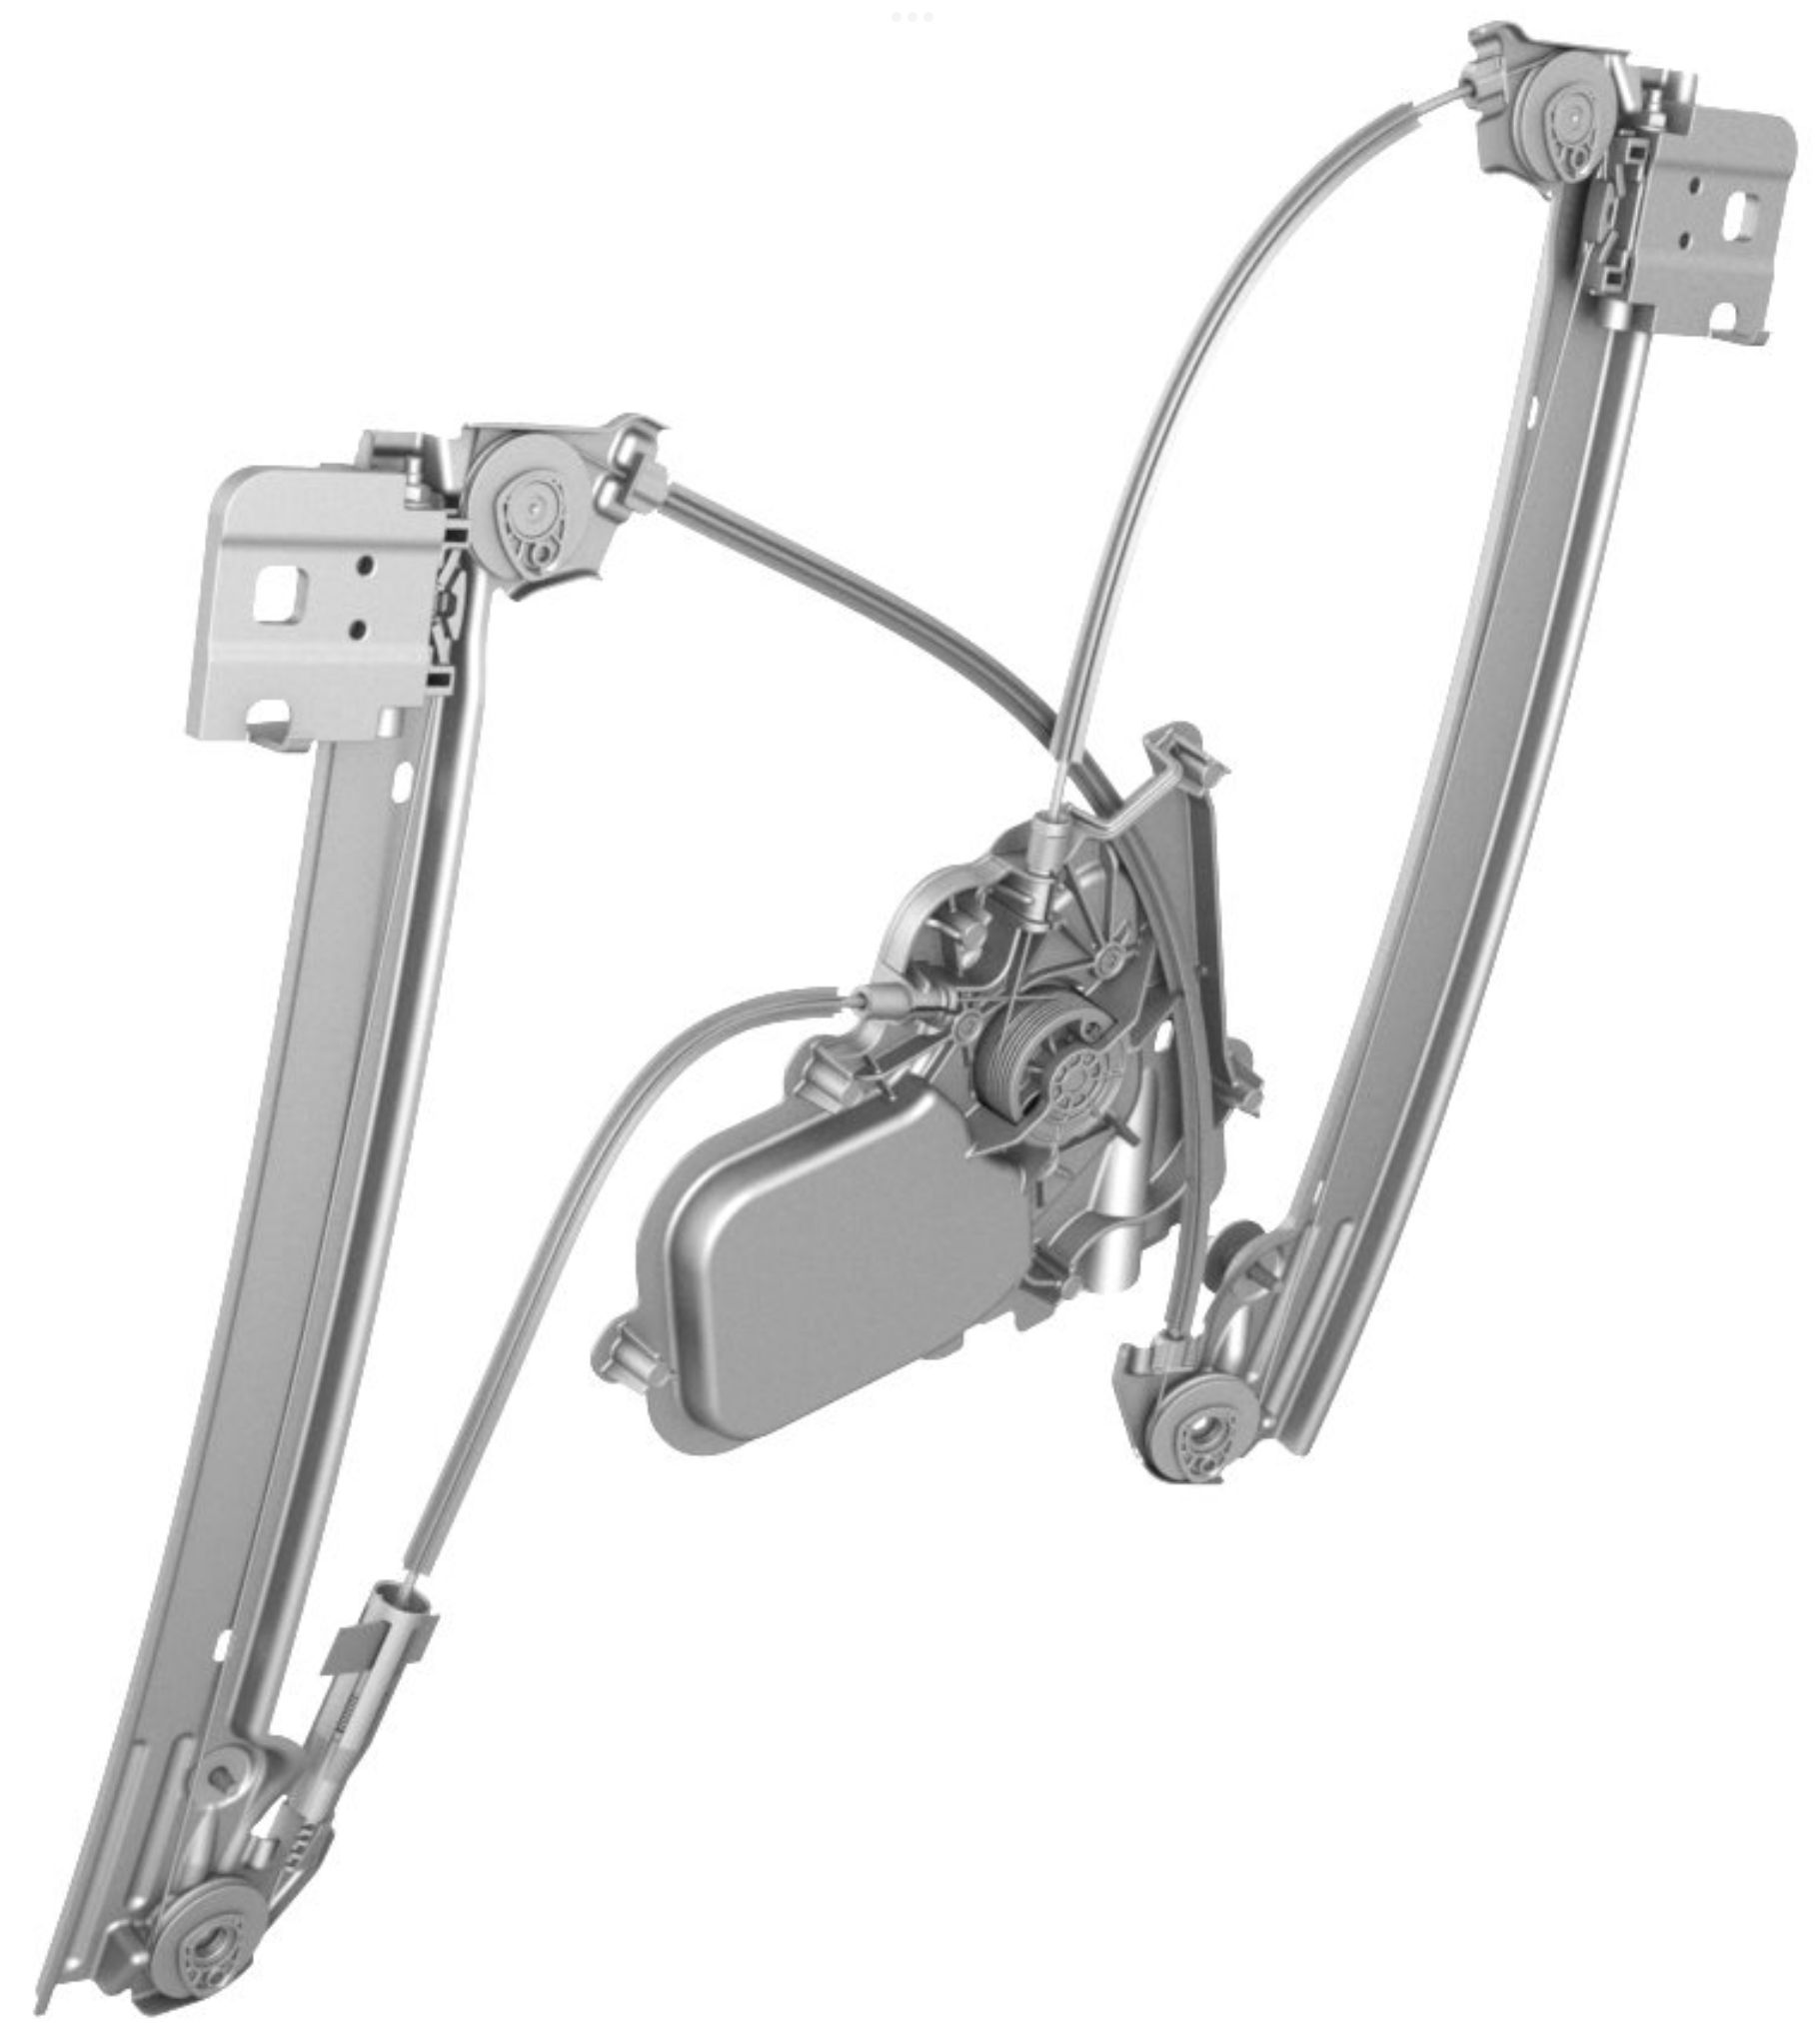
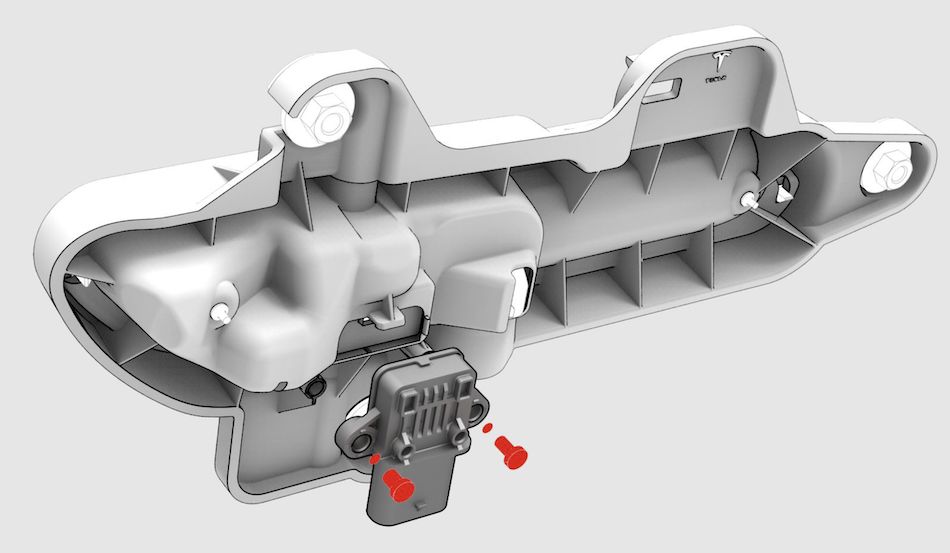
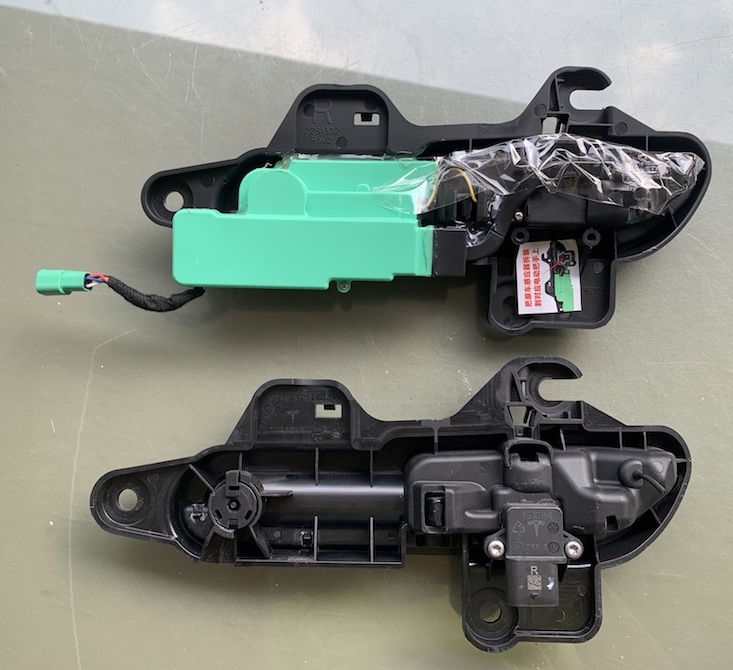
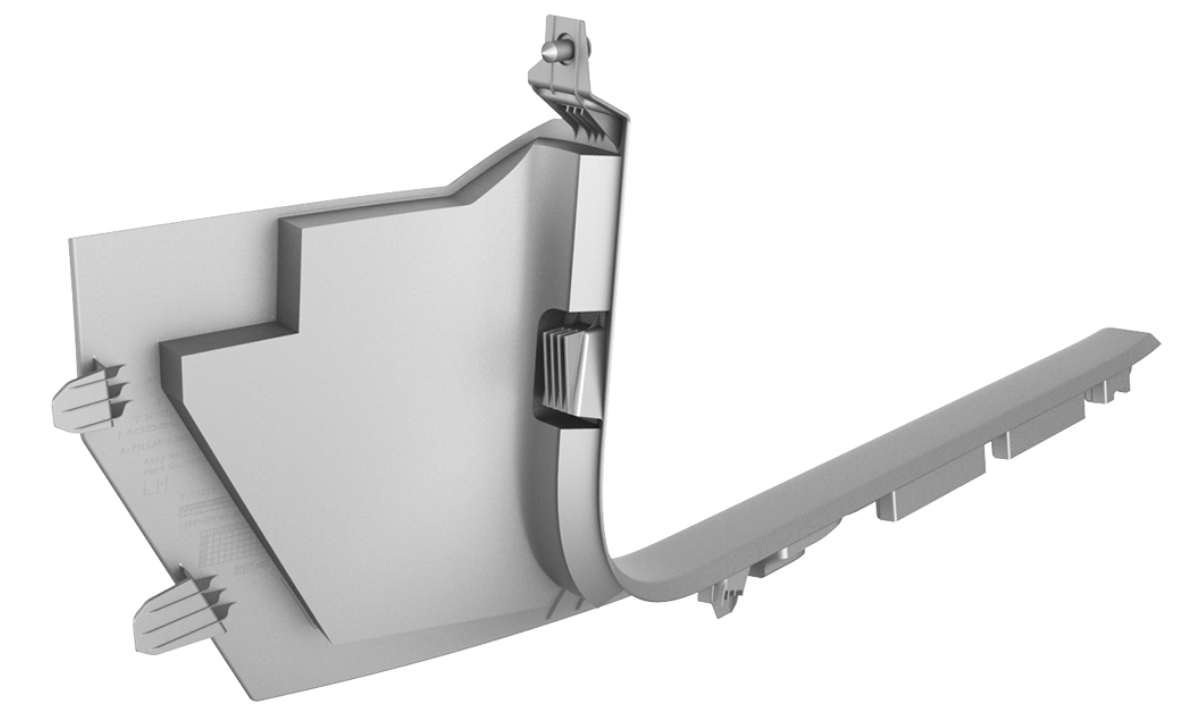
I ordered these 2 kits separately, but you can order them together. For me, the soft close (right picture above) is actually the one that I really want, the auto present handles are kinda gimmicky (and also more expensive). For the auto present door handle kit you will get 4 entire Hansshow's door handle units with corresponding wires, the control box (that green thing) and its wire, the sticky tape and the anodized metal plates (4 pcs). For the soft close, you will get the Hansshow's soft close latch with manual release cable attached *4 for each door. No wiring since you will just simply replace the OEM ones with these units. So the soft close latch is much easier to install. You may be wondering why on earth would the rear door come with the manual release cable since there is no manual lever on the rear door in Tesla Model 3/Y. If you read on, you'll find the answer later.
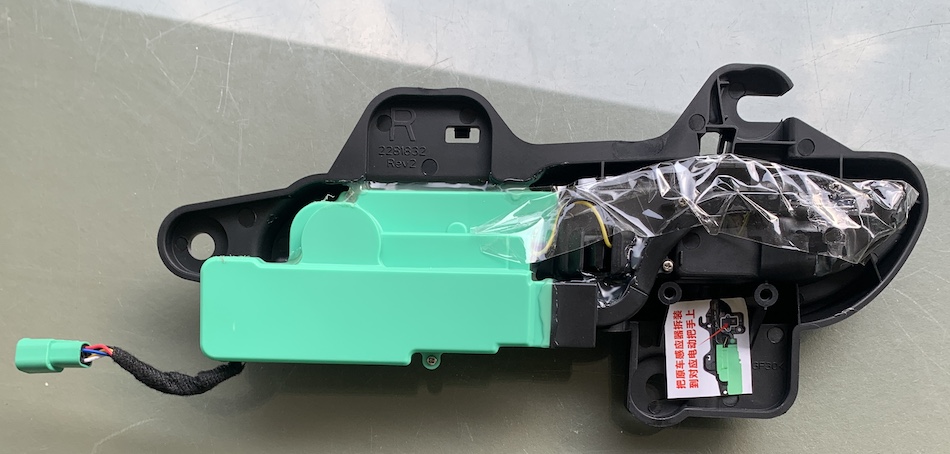 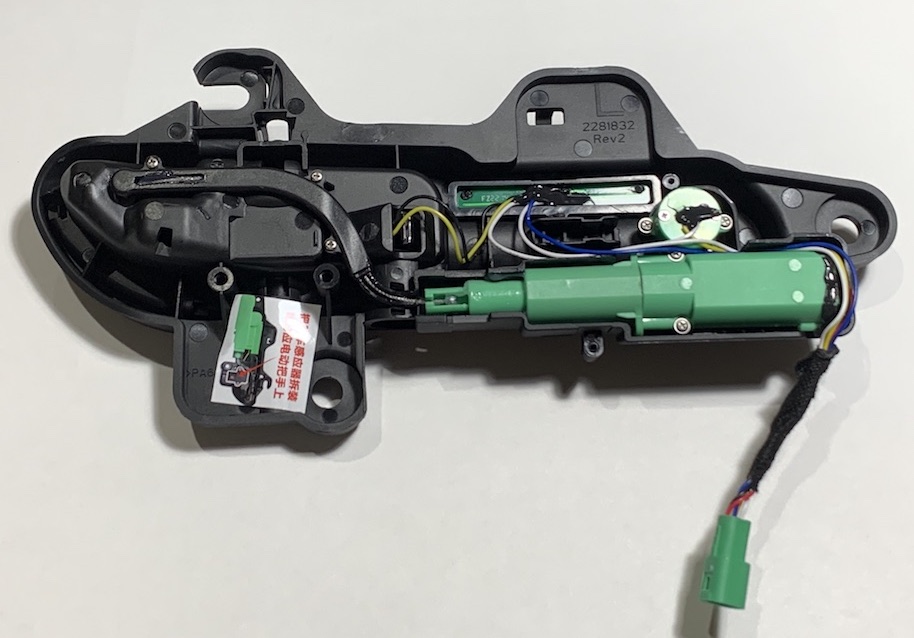
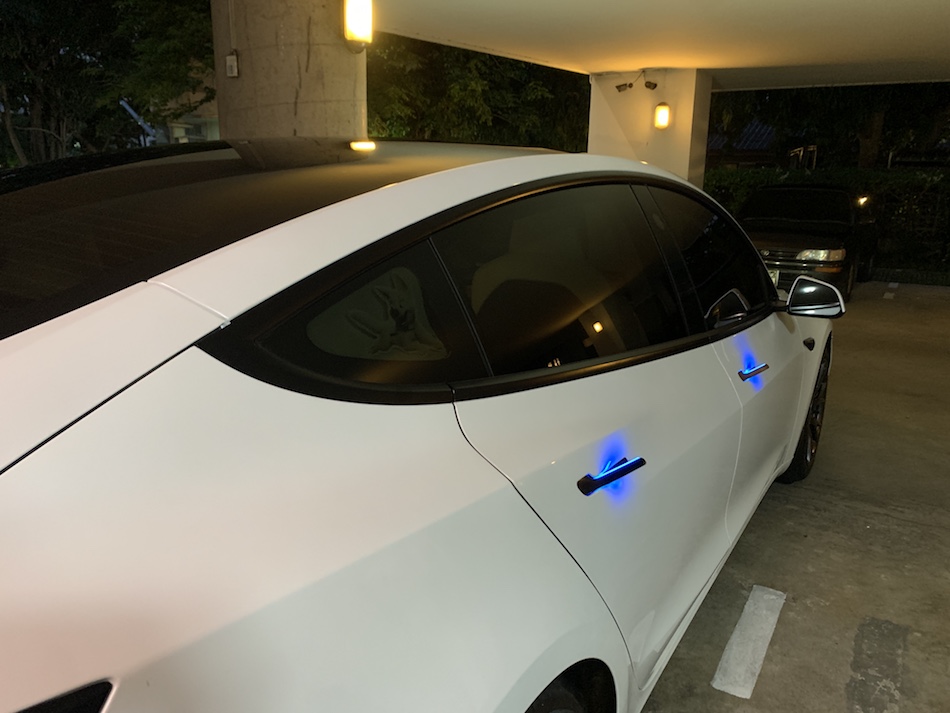
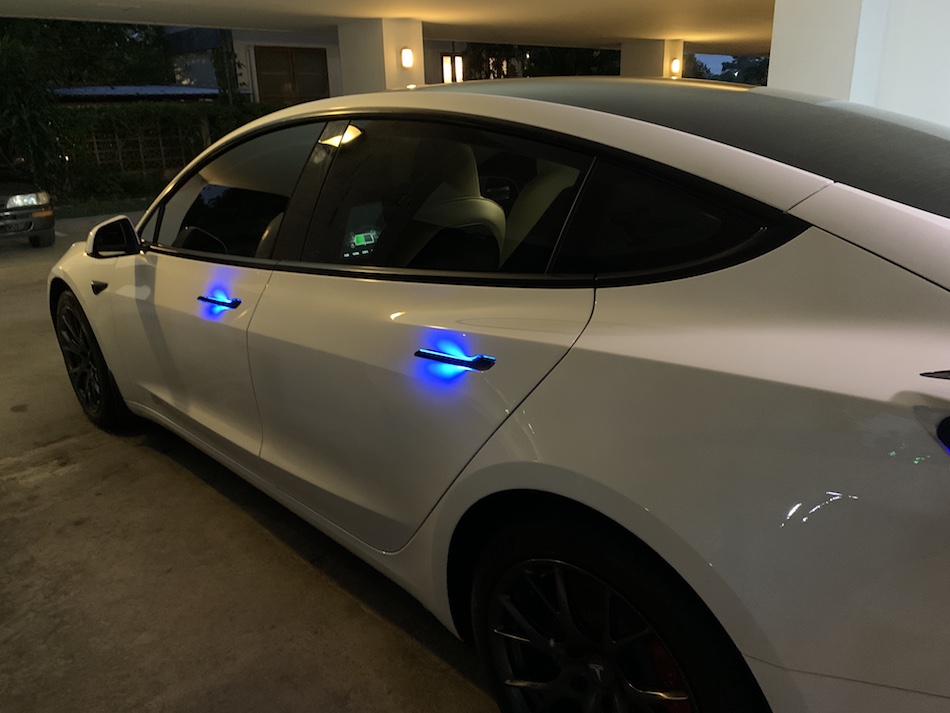
Above picture is the back of the entire Hansshow's door handle unit assembly. You may see that I put a scotch tape over the sling cable - this is to protect this part from water. The black plastic that was made up as housing and the handle is made of high quality plastic, almost identical to the OEM. Unfortunately, the green part doesn't look like high grade plastic. The unit came with a motor and sling cable to pull the handle lever to open up. So it came with a new bunch of wires that you will need to connect all 4 of them together.
Aside from 4 door handle units, you have 4 wire harnesses for the units and 1 wire for the controller, those anodized metal plates and the sticky tape. That's all for $469. Quite expensive... I try to come up with why these cost so much more than the soft close kit. Turns out, the aftermarket soft close door kits are available for many car makes & models. So it might have more production volume than - when compared to the door handle units for Tesla model 3/Y. Not until at least many millions of M3/Y are out there. So if you want this gimmick, this is what you have to pay. You may also see some (look alike) products sold on aliexpress. I have no experience with that but I'll chime in on my inputs on that later.
I tested these door handles one by one using 12V DC power supply converted from 230V AC. All cables and units are working by press open, can't test the functiality with the CAN bus until you install all of them in the car and with hall sensors. At idle, the entire system consumes 0 amp of power, when working (light on and motor whirring) - each consumes up to 0.25A, combined to 1A max of 12V power which is very little.
Exploring both A-pillars and footwells
Since I have about a week or two to wait for my shipment, I ended up watching youtube videos and read instructions(not many, too). Currently, there is 1 video about this V3 door handle just came out 1-2 days after I finished my job. It was an installation on model Y but it's very useful. Since I didn't have much resources back then and the Hansshow's technical guys, English illiterate, aren't very helpful, I decided to explore my wiring location by opening up the side panel on both pillars and the roof of the footwells. There are many videos to show how to open this part - it's very easy, you just need to pop off the little square piece above this and pull out the side wall, it is held by a few clips, easy to remove (read on).
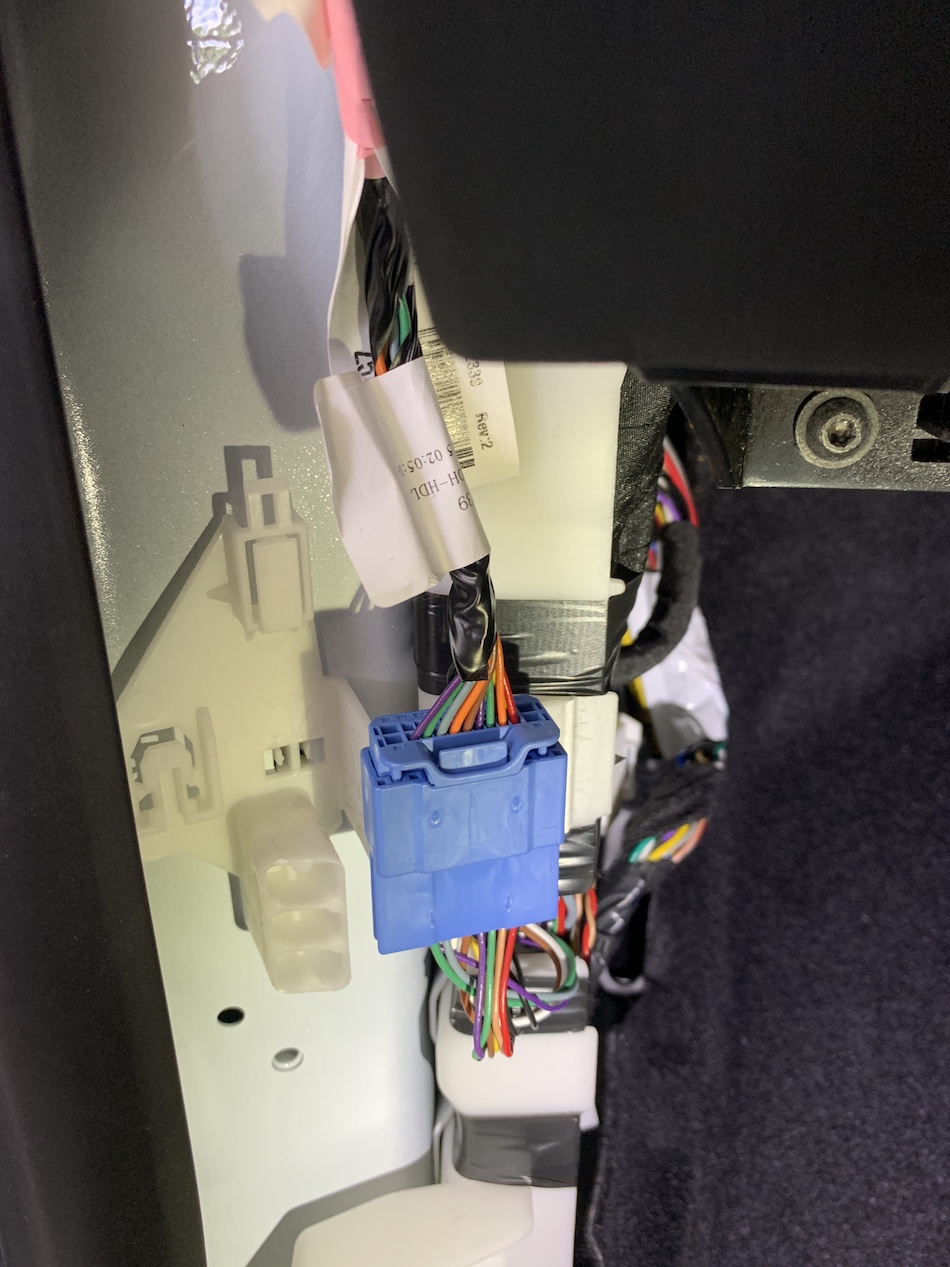 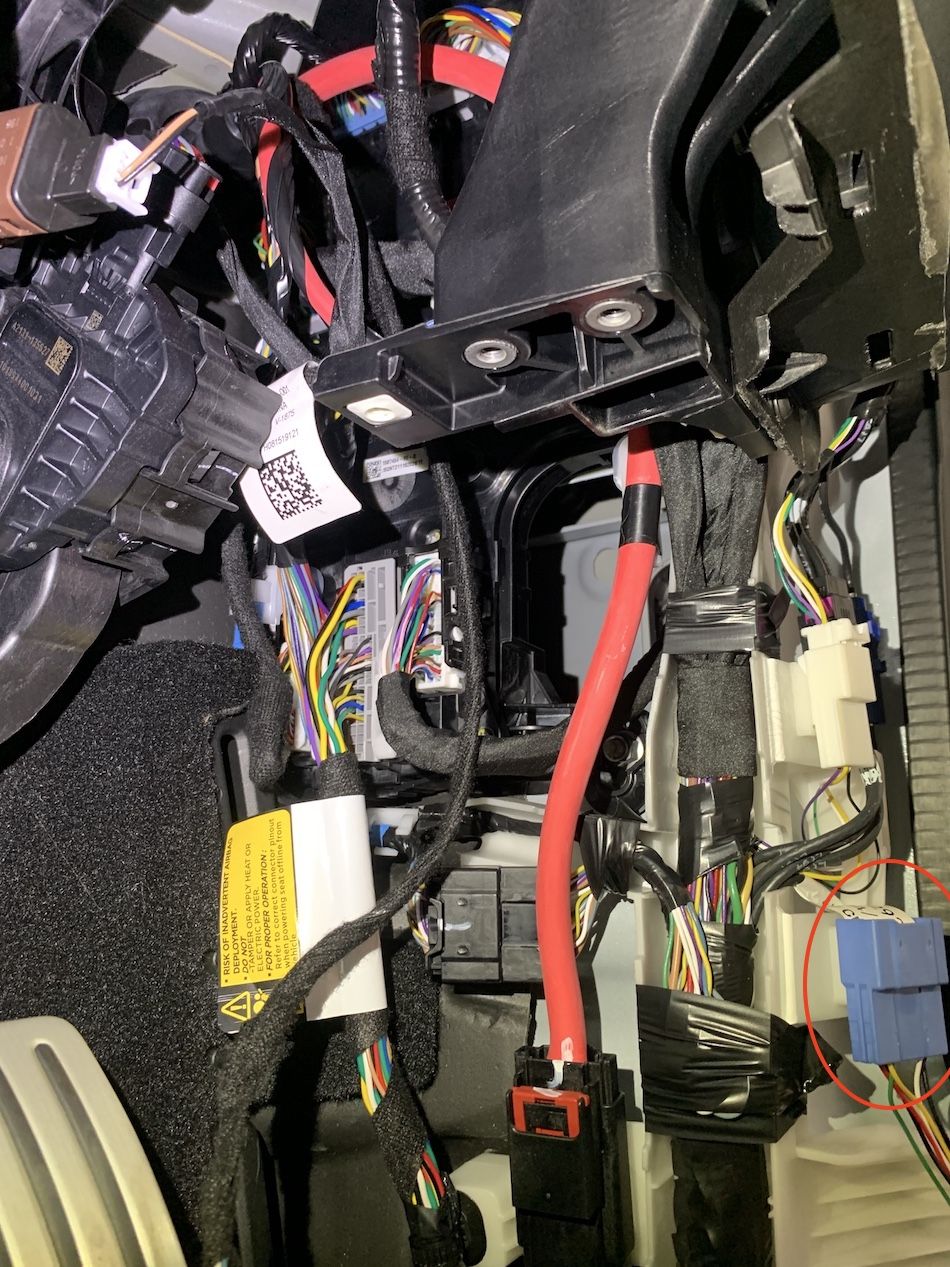 
First, to find where to plug in the CAN bus. The pdf said it's on the right side but the drawing is for the LHD model, is it still on the right side for the RHD?, the Hansshow's tech guy won't answer. So I did find the socket is still on the right side of my RHD model. On the left side (1st pic above) - there is also a socket but there is already a connector in there. Note that the wirings on the right side are extremely busy, plus there are 2 pedals (gas and brake) in the footwell. After seeing all this, I decided to keep my controller unit on the other side which is the passenger side of my RHD. Doing this, you will have to lengthen the cable to plug the CAN bus like I have mentioned earlier.
Planning
Try to dedicate at least 2-3 hours for the first door, the 2nd one -you probably can make it in 1 hour if you do it on the same front or rear door. When you start on the 3rd door which may not be the same (front or rear) door like your first two, it may take another 2 hours and then the last door will be extremely quick. You can perhaps finish it in 30-45 minutes if it's your last rear door. After that, you are not quite done yet. There are wires that need to be routed, 12V DC source needed to be tapped and after all, you got to put back all the panel trims and everything you took apart. So I dedicated my entire weekend, starting from Friday's PM to Sunday's PM. Yeah, it's that much time. You might be speedier than me since you have this blog to read and it should help you a great deal. So your time might be faster than mine and again, you can do it by yourself, but it's much more helpful to have extra hands.
I started with my first job on the left front door, like I said, that one has been opened before and it's next to where I want to place the controller unit. Get a nice mat/plastic sheet or some cushion to lay on the ground. Good lighting and screws (magnet) tray is helpful.
Taking apart the front door
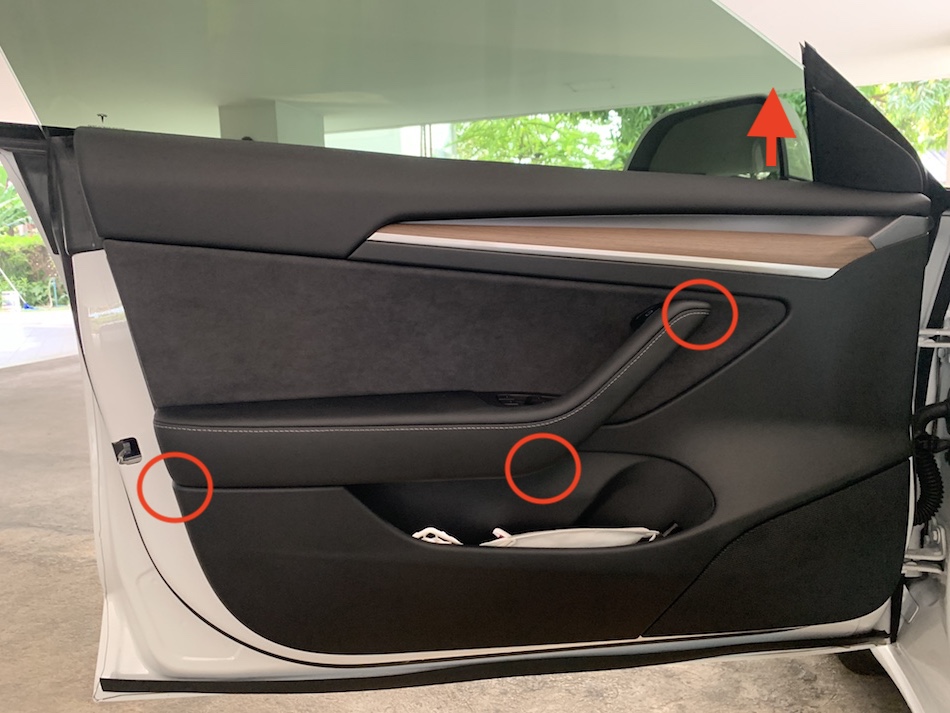 
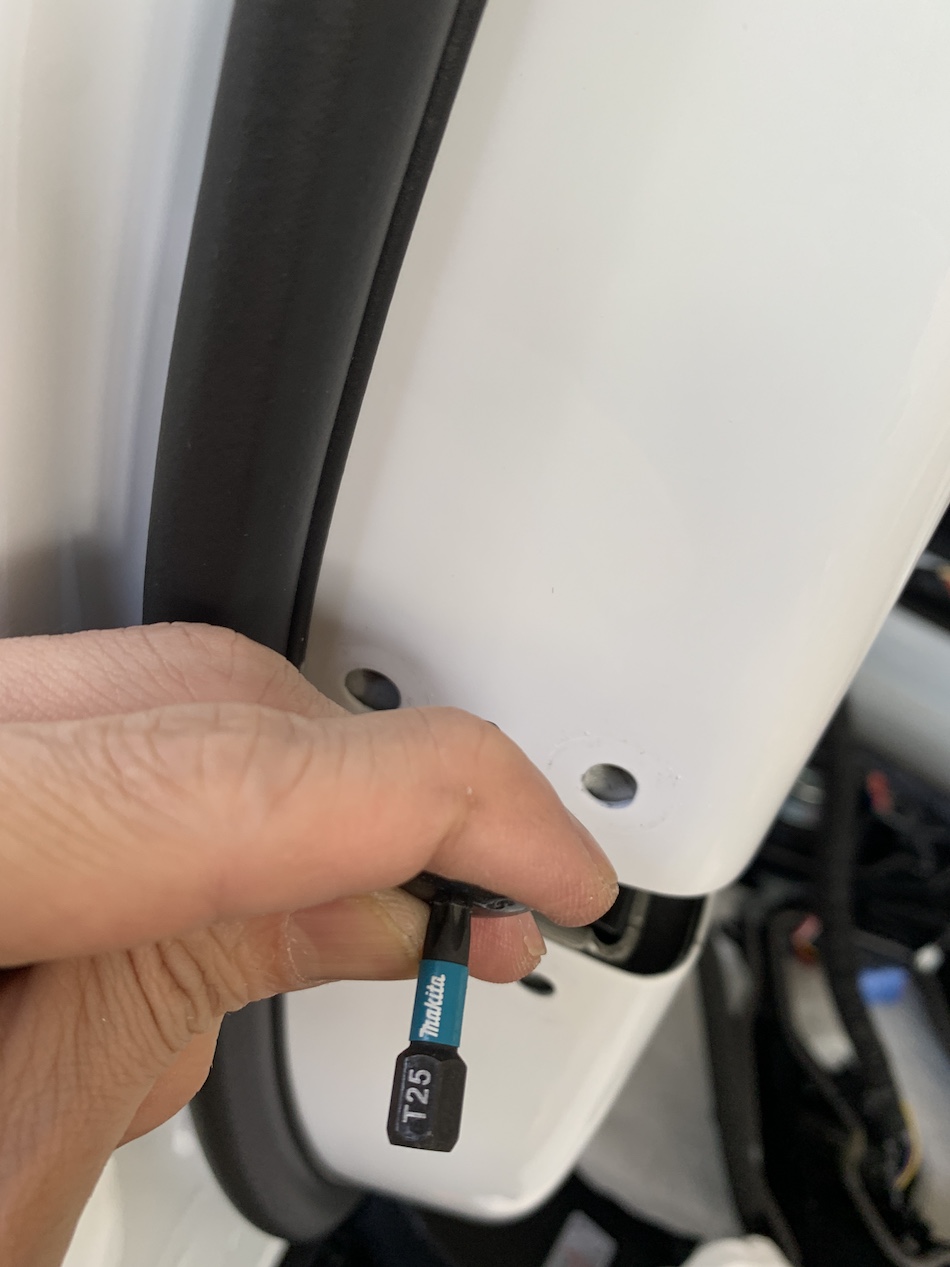
There are 3 screws (Torx 30) holding the front door trim panel. Two of them are at each end of the door handle (you have to look from below). The last one is behind the square reflector (look from the rear edge) - you'll see this after you pop the reflector out. After all 3 screws are removed, pry open the panel which is now held with 8-9 fasteners. it's easier to pull out from the bottom because the top part is kinda hooking on the window edge. After the panel popped you can remove this by lifting it up a bit. You also need to remove the tiny corner tweeter by popping it up and out (held by one large hook, two easy clips at the bottom) and detach the speaker wires.
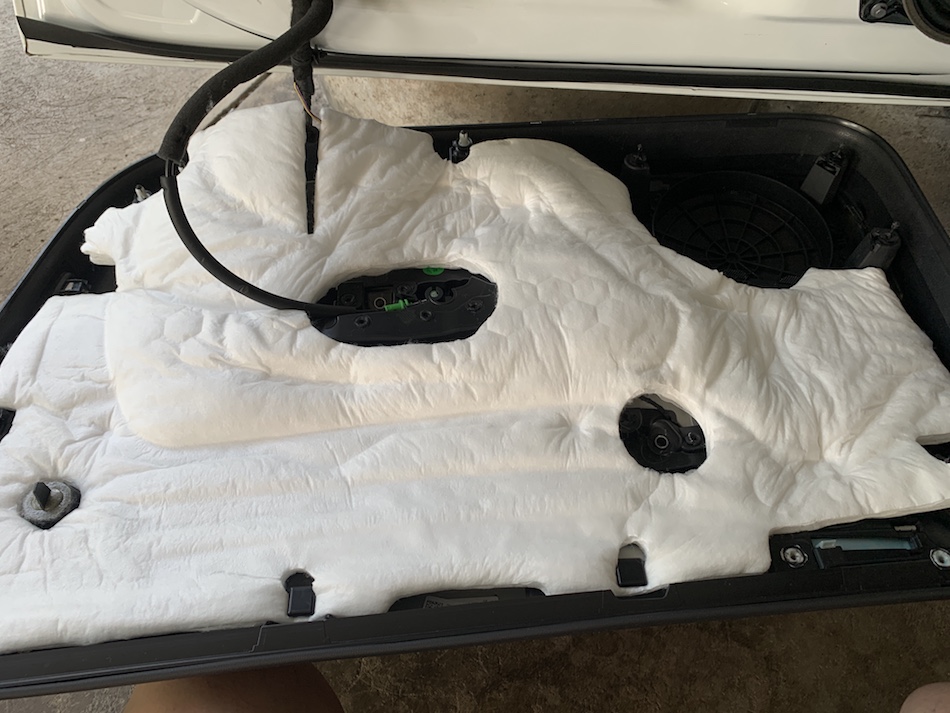 
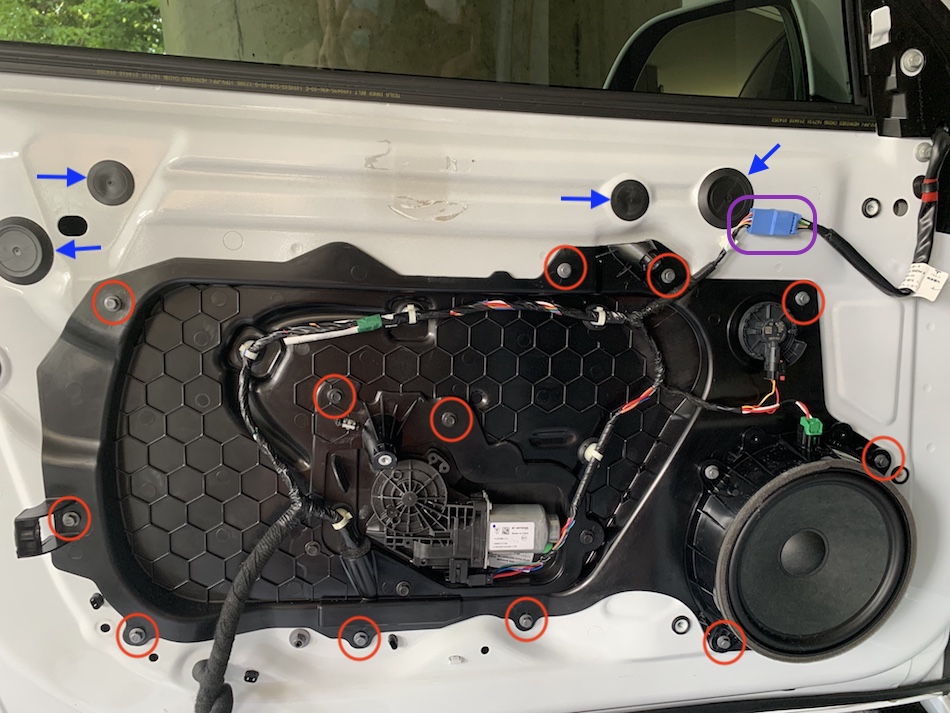 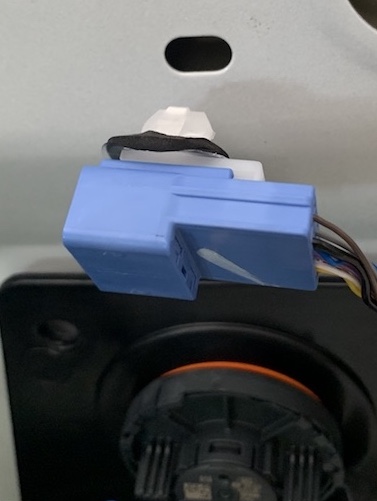
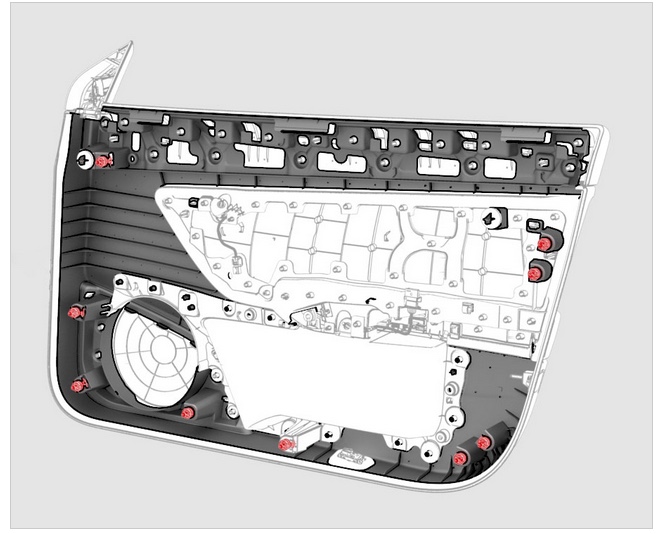
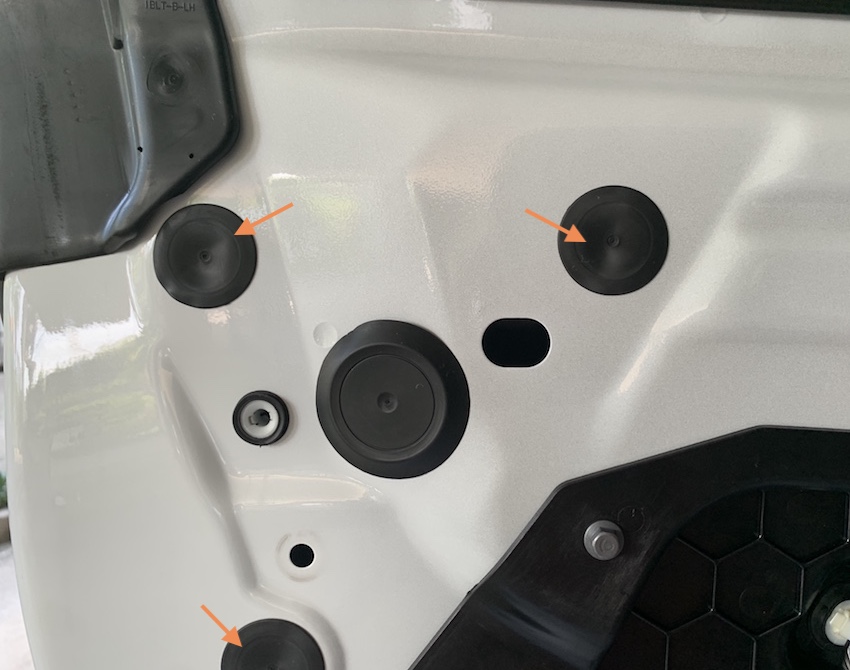
It's your choice to remove all the wire connectors for a clearer access or adopt this technique that I borrowed from the youtuber - Tesla DIY which is to leave the trim panel attached. Those wire connectors are all with locking mechanisms and it's time consuming to unlatch them all. I also find leaving electrical harnesses attached is easier and faster to put things back. All you need is to find a small step stool or a box that's as tall as the car's floor and put the panel down with the white padding up like the above picture (left). On the door - there is a black honeycomb plastic plate (Tesla called -closeout panel - door- front) that also needs to be taken down. It's held by fourteen 8-mm hex screws (in red circles) around the rim and also in the center which hold the motor for the window. The speaker can be left in place (still held by plastic tabs). You also need to detach the blue connector (in purple rectangle) and pop it out from the metal door, then the closeout panel is now attached by a few clips, you can pop it out and lay it face down on the white cushion of the door trim panel that you just removed. Also you need to remove the round rubber plugs (blue arrows- 2 big ones, 3 smaller ones). The large ones are for the glass clamps (Tesla called regulator isolator clamps), the smaller ones are for accessing the door handle.
 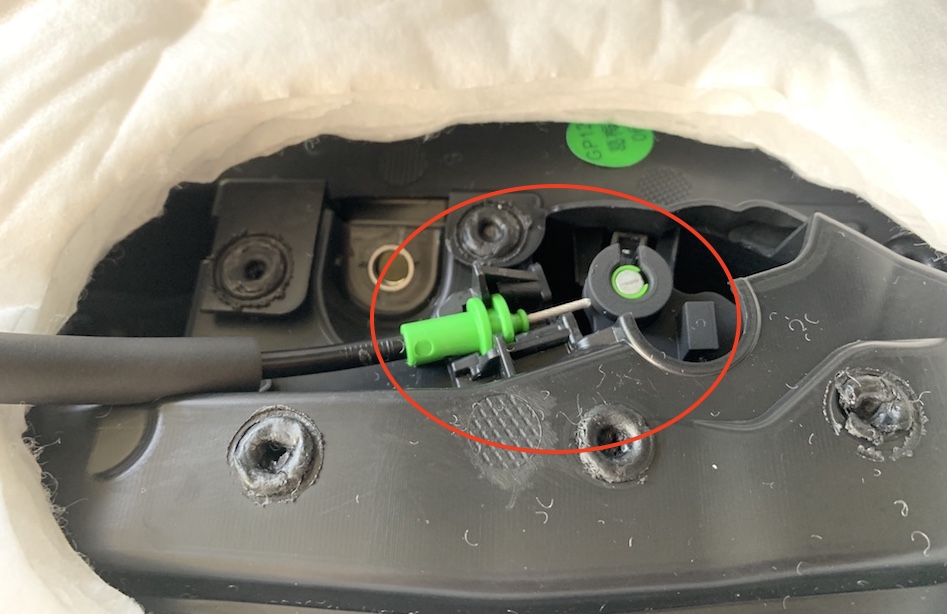
We need to remove the manual release cable collar (for manual door release). So we can remove it along with the OEM latch.
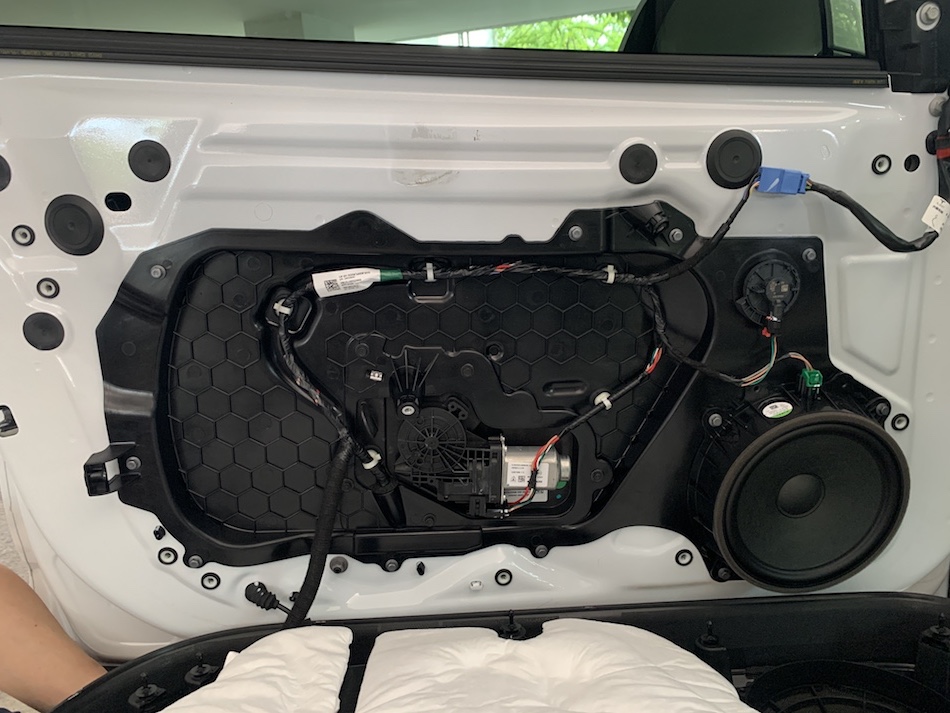
After taking out the black closeout panel, the window motor is now resting inside the metal door frame. You can rest this closeout panel facing downward, make sure it rests on the white cushion in between and the speaker is carefully facing downward into its own housing. The drawing above (right) is the Tesla M3 front door window moving mechanism which contains 2 pillars and motor and sling cable in criss-cross fashion (Tesla called this window motor/regulator assembly).
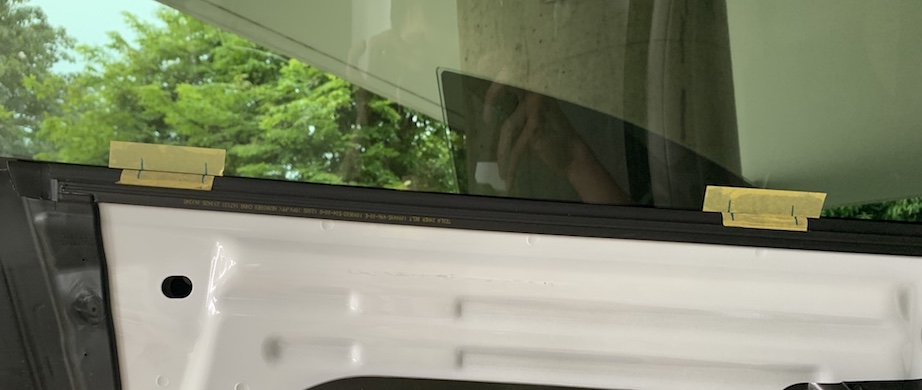
Mark the location of the glass before removing it. There are some glue residues on the screws but they still can be loosened without heat. After screws are removed, you can see the rectangular opening of the glass clamps (Tesla call this -regulator isolator clamps) are much wider than the screws and this is very roomy for the glass to be adjusted. When removing the inner belt seal, the rear part (right picture, above) got 3 rubber fasteners which can be easily broken if you pull too hard/too quick. Try using the pry tool and gradually and gently remove this part. The rubber part is in continuity to the inner belt seal (with felt) - that part needs to be lifted up from the metal frame.
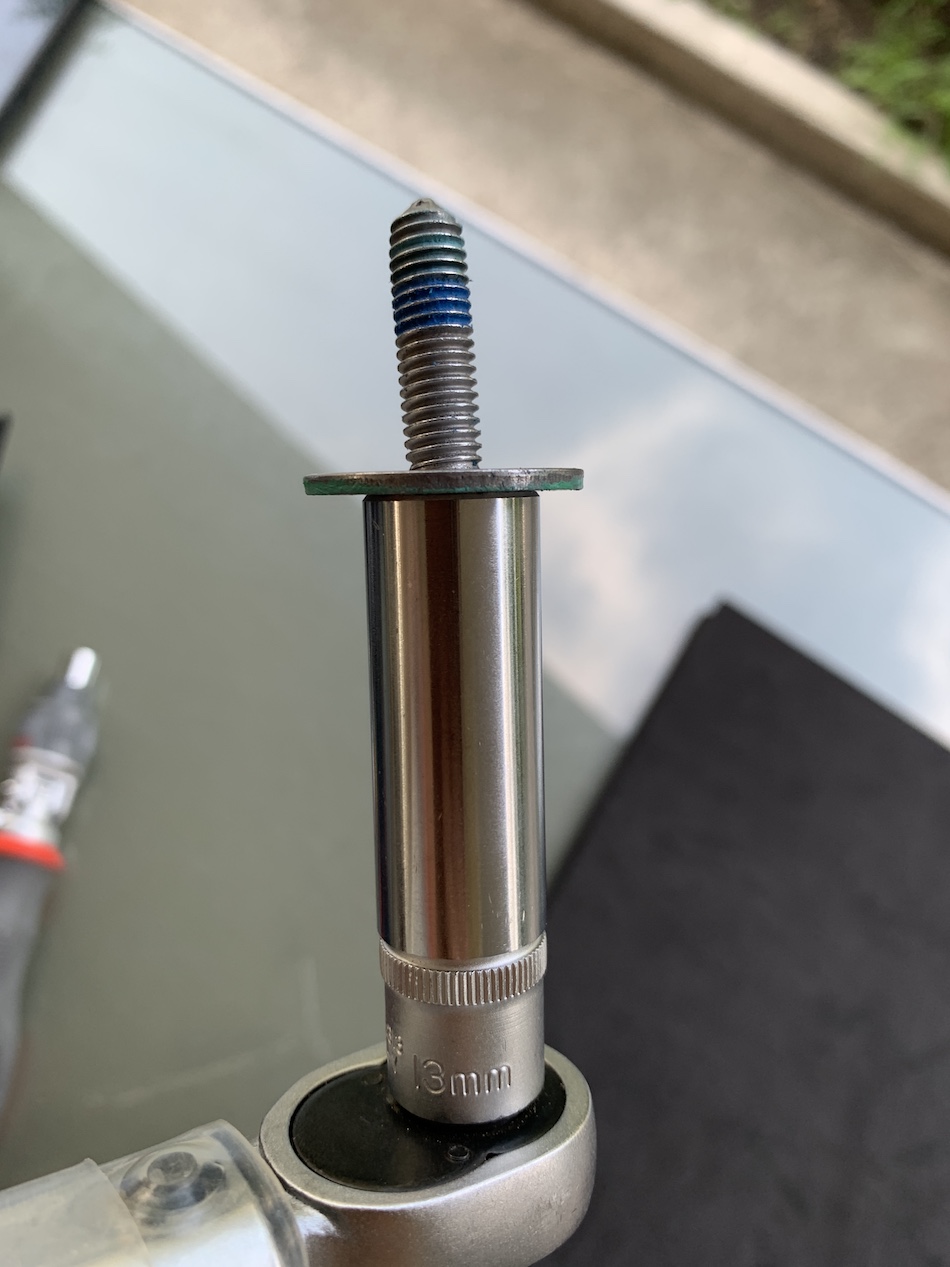
Here comes the scary part, you will need to remove the glass. The front door's glass is double-pane and it's bigger, much bigger, than the rear. It was held by 2 patchbolts (13 mm hex with large washers pierce through the clip and the grommet). In order to remove the glass, the window need to go all the way up and there are 3 ways to do this, first - unplug the puddle light (that's how I cracked mine many months ago), 2nd - you can fool the latch using a screwdriver shaft as a striker, push inside the latch to make the car thinks that the door has closed and lastly, the most direct, just press the window up - if you leave all electrical harnesses attached, the button is right there on the door handle. If not, you can ask your assistant to press the button on the driver's door handle. After the window goes all the way up, you can see both screws appear in those round big holes. Before you unscrew these, I highly recommend marking the glass location by putting tapes on the edge and writing the vertical mark with a Sharpie. This is, again, borrowed from Brian and the Tesla DIY. This will ease much pain having to re-calibrate and try to get the glass back to the exact same spot. Without any method to guarantee the same locations, you could have the newly installed glass too low, too high, too front or back or even tilted in a very weird angle.
Once both patch bolts are removed (Tesla, recommends throwing those away and using the new patch bolts - we ain't gonna do that), the glass can now be easily manipulated. You can gently lift it up, and it needs to be slightly curved inward toward the car in the same direction that the door is kinda tilted to the roof. Do not wiggle the glass back and forth, it will go up easily if you go up in the right angle- up to the point you can see the curve of the glass come above the rubber edge. At this point, you may need to remove the inner belt seal if you haven't done so because the seal is tightly snugged with the glass but the clips (for glass harness) will get stuck underneath. You can try removing the glass without taking out the inner belt seal but it'll be much harder and very scary that you could break the glass. Keep in mind, the double pane glass is not laminated and since it's double pane which means that each side of the glass is about half thin. It won't take much force to crack it, the good thing is that once it's cracked, it will stay in shape, not crumbling down like the laminated one because of the glue and the other side is still intact, unless you really hit it hard or hit on both sides. See the differences between these on this youtube. I found the best place to lay down the glass safely is in the trunk, close the lid and stop worrying.
   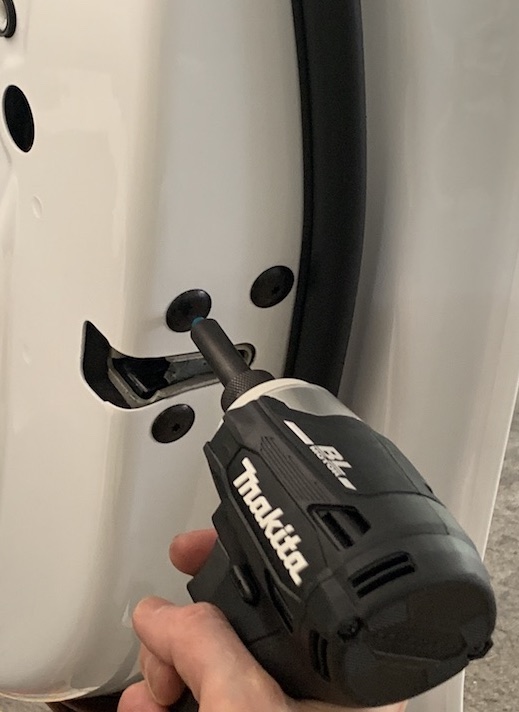
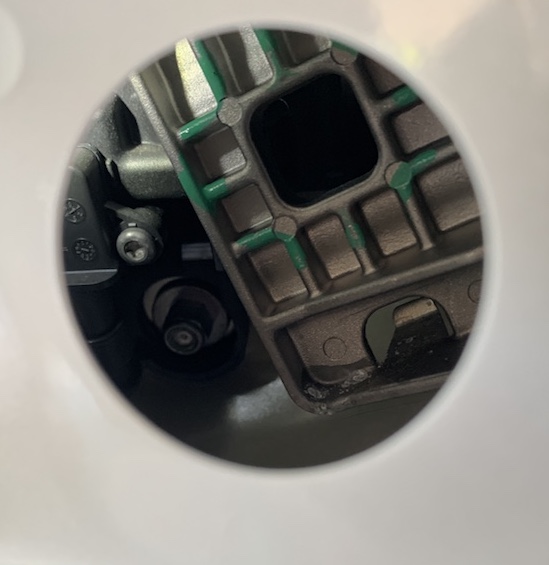
You will need to free up the rear pillar of the window motor/regulator assembly from the metal frame to get more room to remove the OEM latch. This is done by unscrewing the 10 mm hex flanged nut in the red circles in the picture above(left) - the top screw is inside the metal frame, the bottom screw is on the frame. The OEM manual release cable with grommet has to be removed from the frame and the OEM latch can be removed by loosening the Torx 25 screws. These 3 screws are very tight - I use no 2 on my Makita driver(Tesla recommended 10 Nm - but I didn't use my torque wrench on this). The OEM latch has an electrical connector that needs to be removed as well. Keep in mind that the OEM screws can not use on the Hansshow's unit because they're longer - so after you remove the OEM latch box, put those 3 long OEM screws back on them to prevent mistakes.
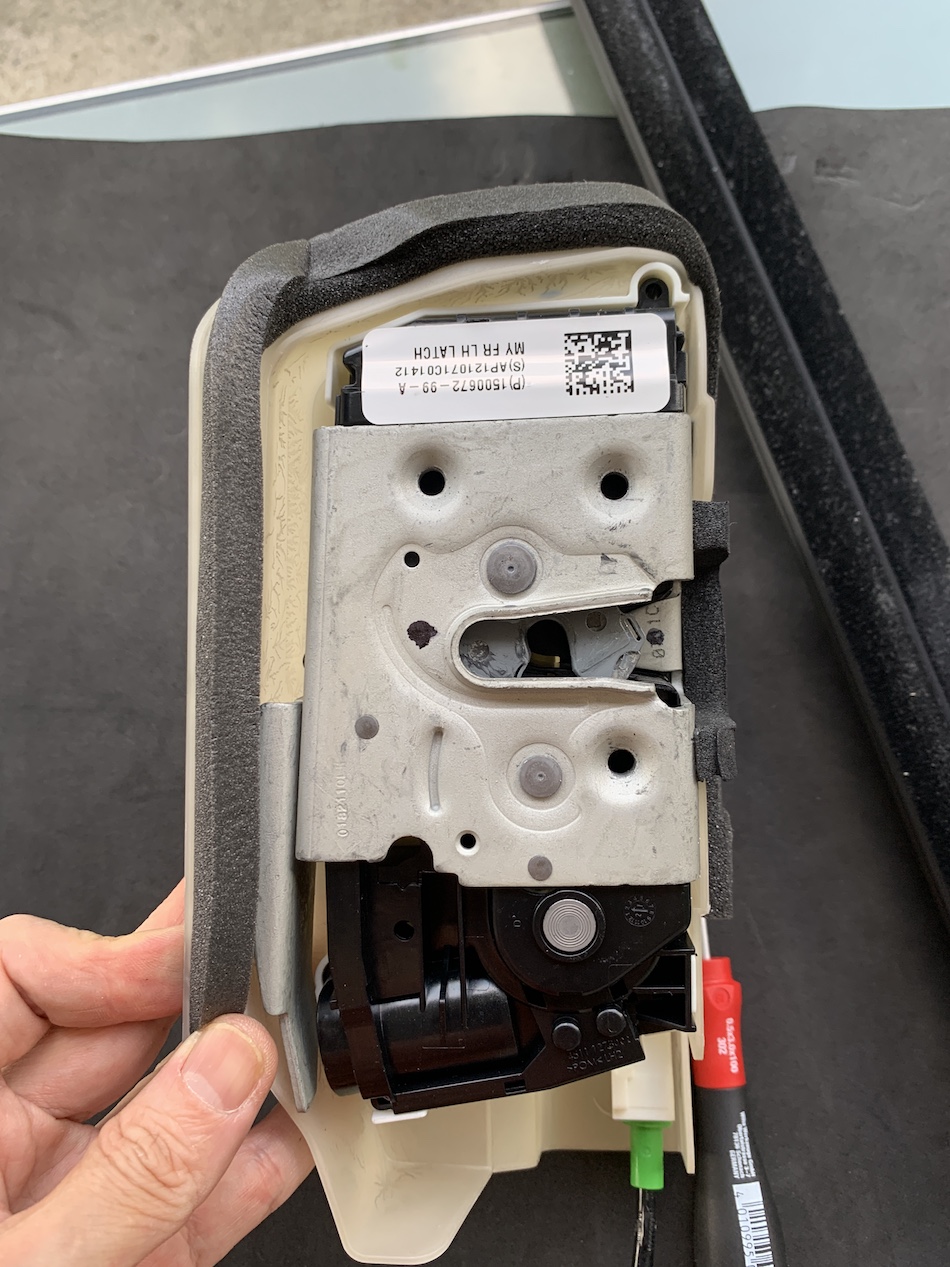 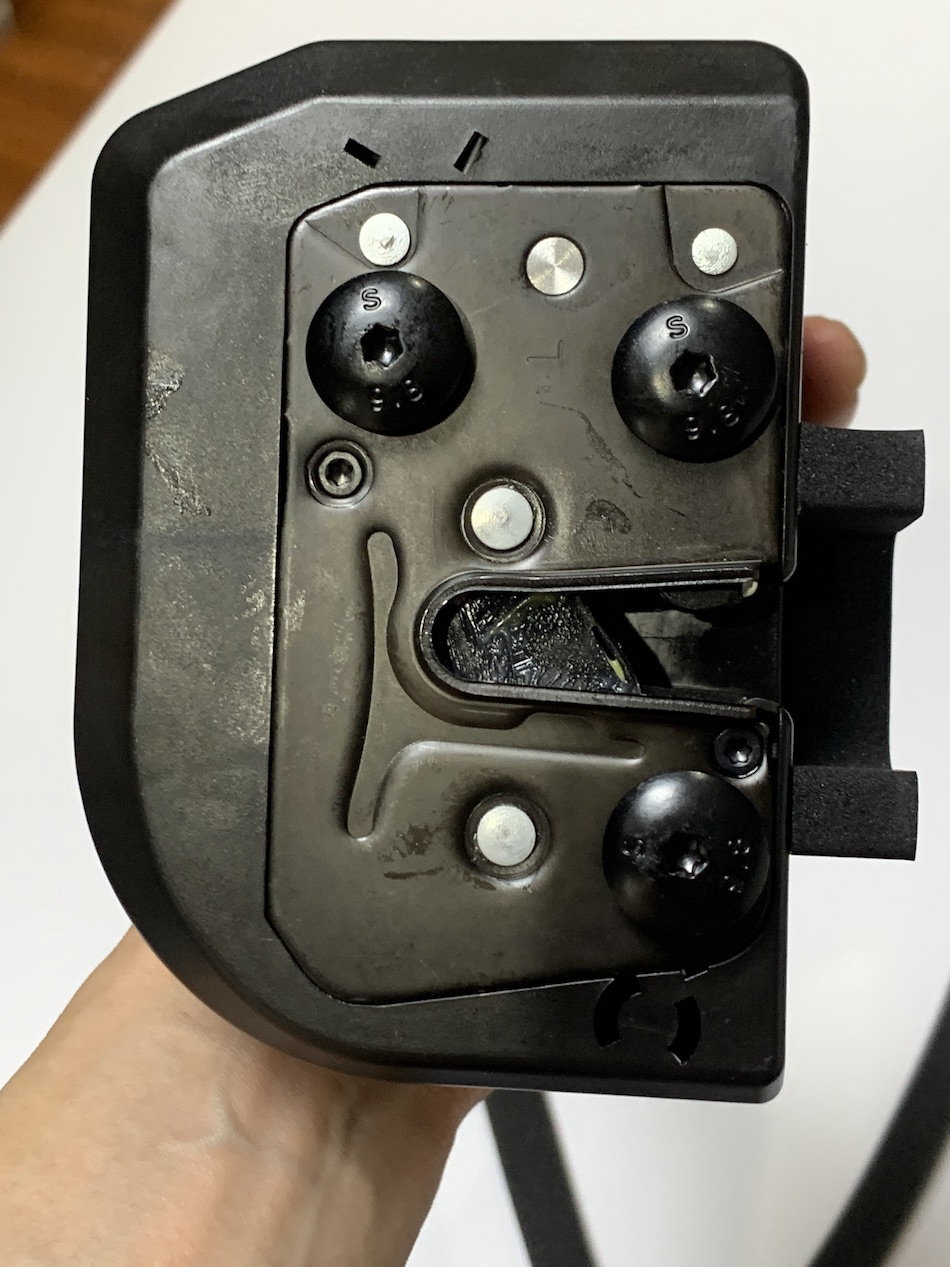 
The OEM latch (left picture) is quite large compared to the new one (middle), which came with its own screws (same Torx 25, but shorter). The Hansshow's one came with a thick rubber gasket around the latch but not on the box like the OEM. So I managed to put my own cushion around the box similar to the OEM (see right picture, you may see a tip of white sponge cushion). That connector for the latch is quite hard (for me) to remove.
After the new soft close latch box went in, screw it tightly by hand (I use no 2 on my Makita) and re-route the manual sling release cable to pass through the same hole on the door frame which will later be put back to the same spot on the front door trim panel. The Hansshow's manual release cable doesn't come with the rubber gasket, too bad, I can't remove that from the OEM without cutting the sling. So only the tubular sponge now. When you're done with this, it's pretty much done for the soft close. If you are not installing the auto present handle, you can finish the job and put everything back in reverse. But I'm not done, the next part is the door handle.
Auto-present door handle installation on the front door
 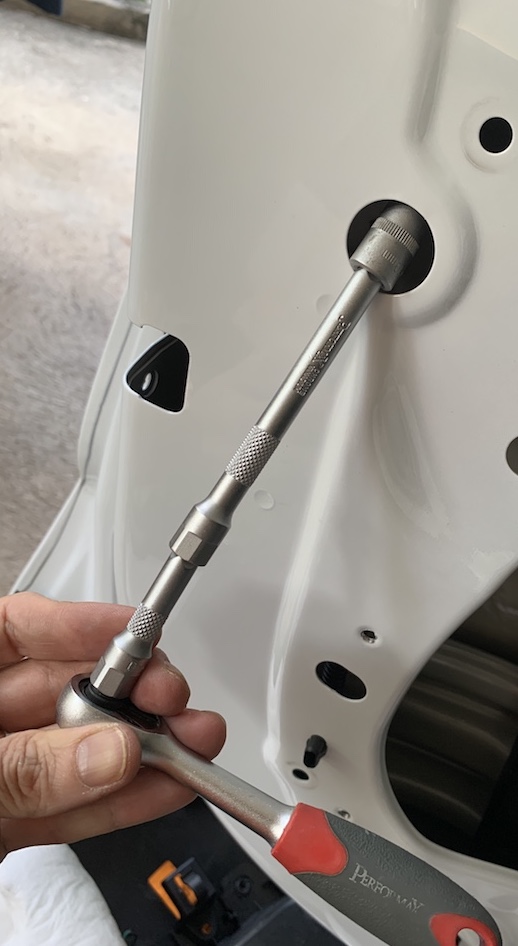 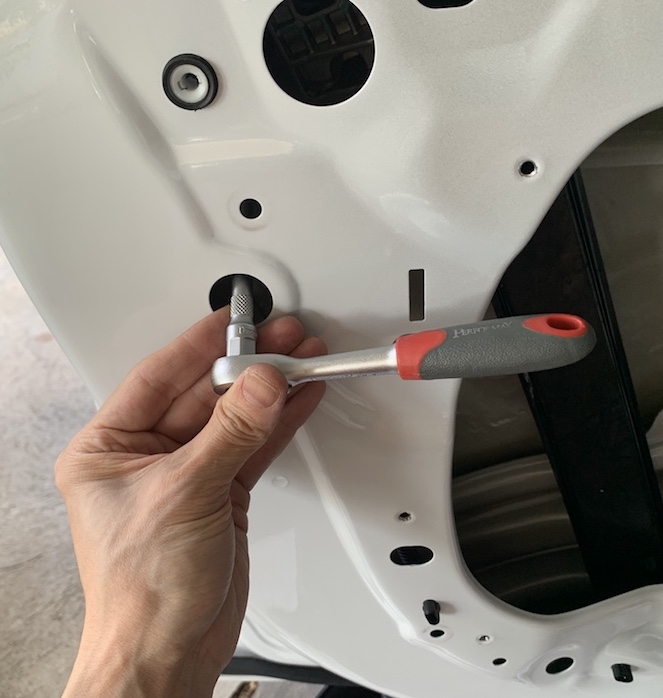
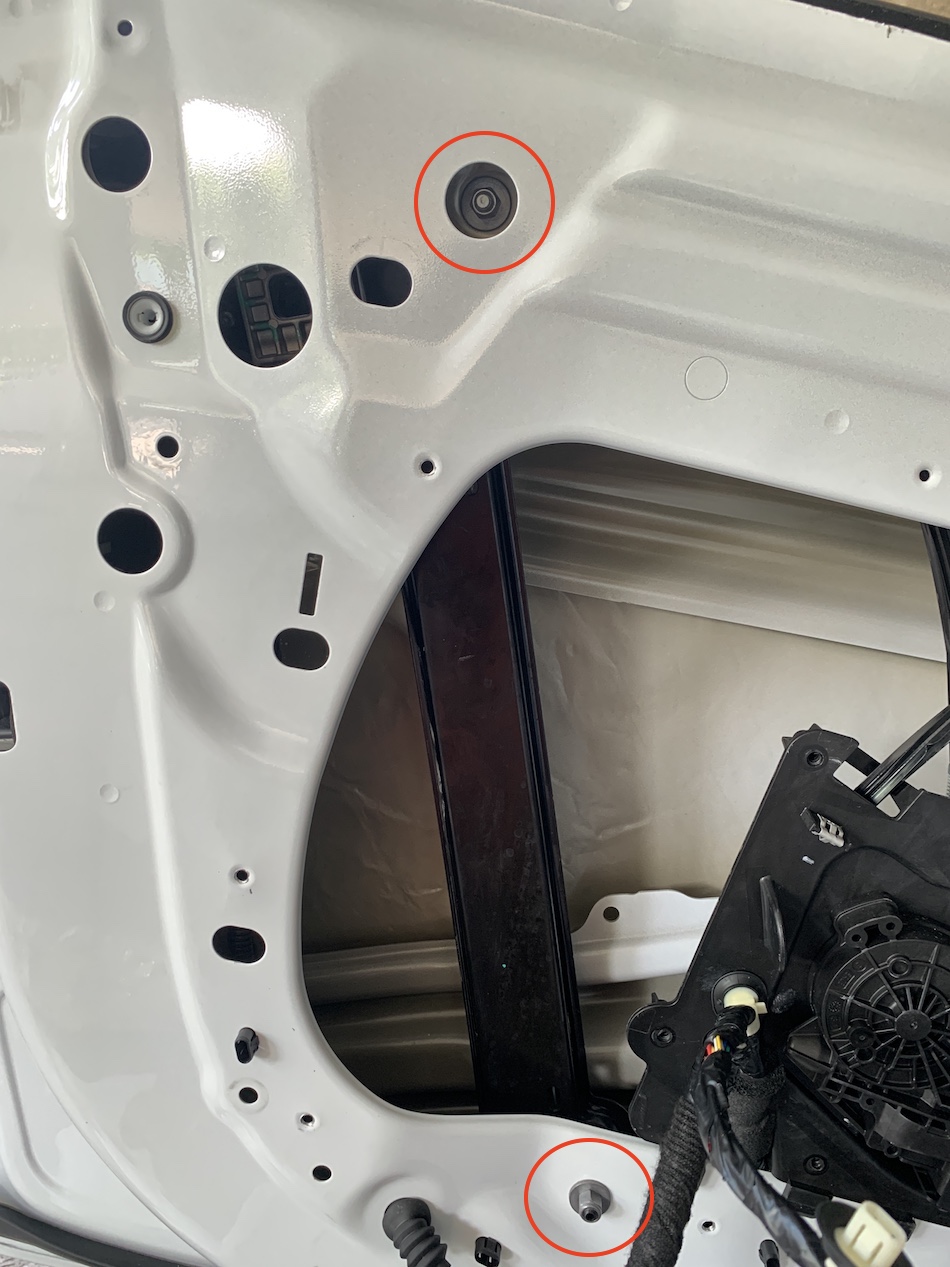
On the top rear part of the door frame, the round rubber plugs must be removed to gain access to all three 10-mm nuts for the door handle. There are 2 ways to unscrew the nuts, the easier way is to find the long extension - at least 15 cm long, so you can reach the screws with the handle outside. Or you can use a very short socket, go low profile, and work from the inside which is cumbersome. Also, the bottom screw can be reached better after you unplug the hall sensor connector.
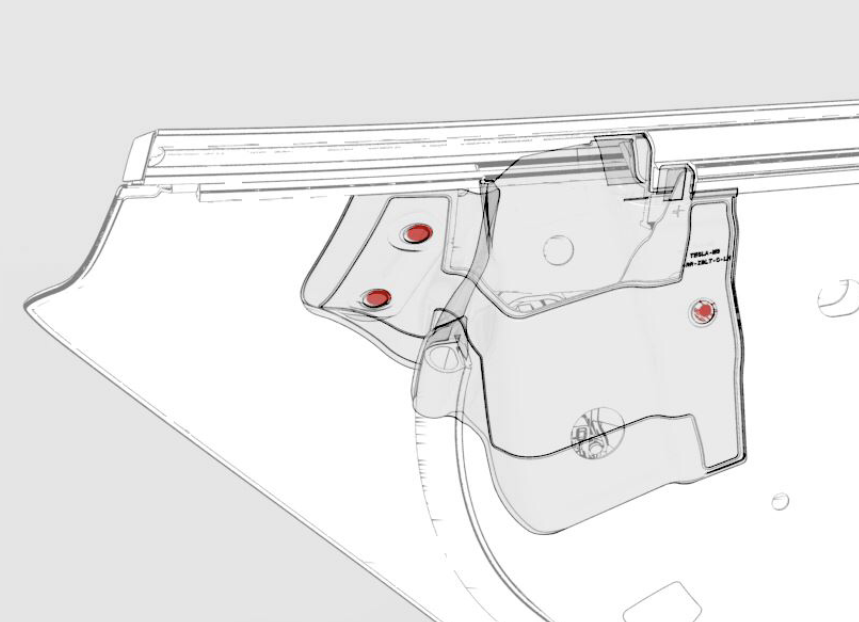
The drawings illustrated the OEM handle unit, 3 hex nuts (10 mm) hold it secured to the screws stem from the inner rigid metal frame. One set of wire goes to the hall sensor.
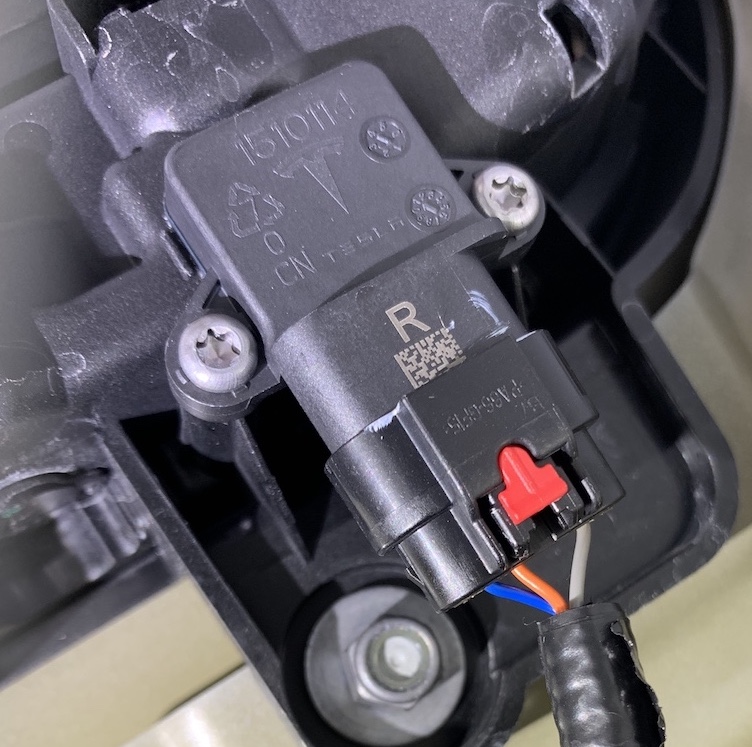 
The 3-wire, 4-pin connector is slightly in a way for the bottom screw removal. Use the flat screwdriver (or your nail) to release the red plastic lock and pull it out. The hall sensor is held in place with two Torx 20 screws.
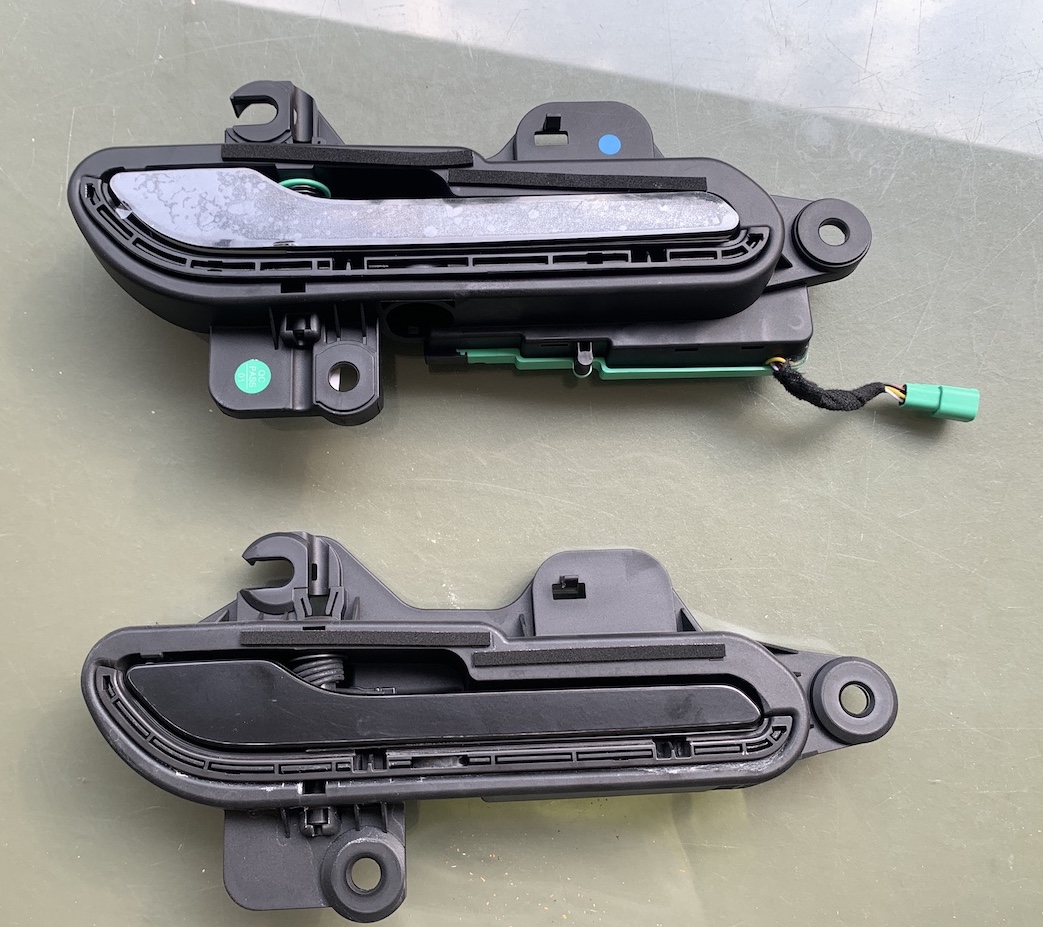 
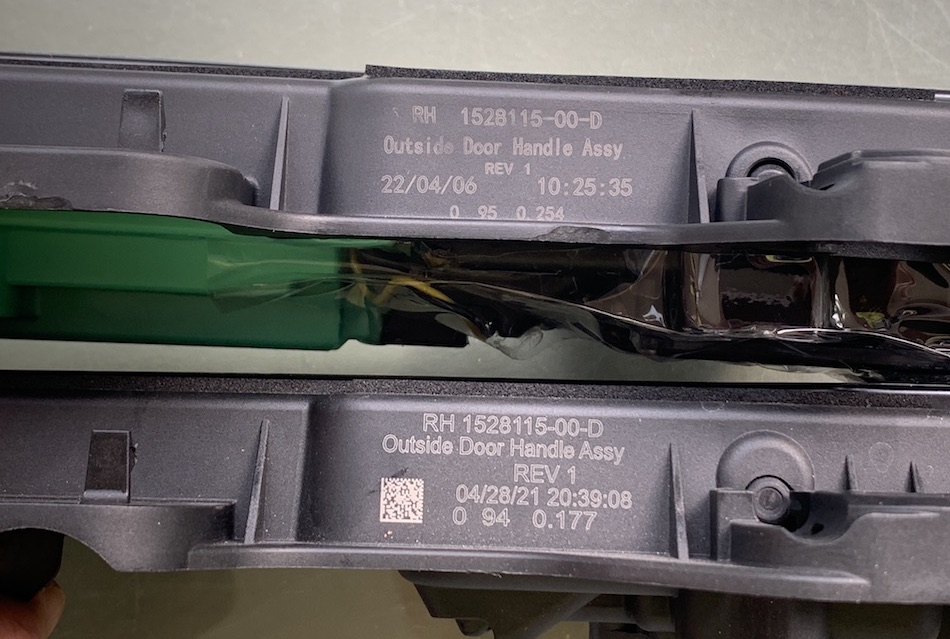 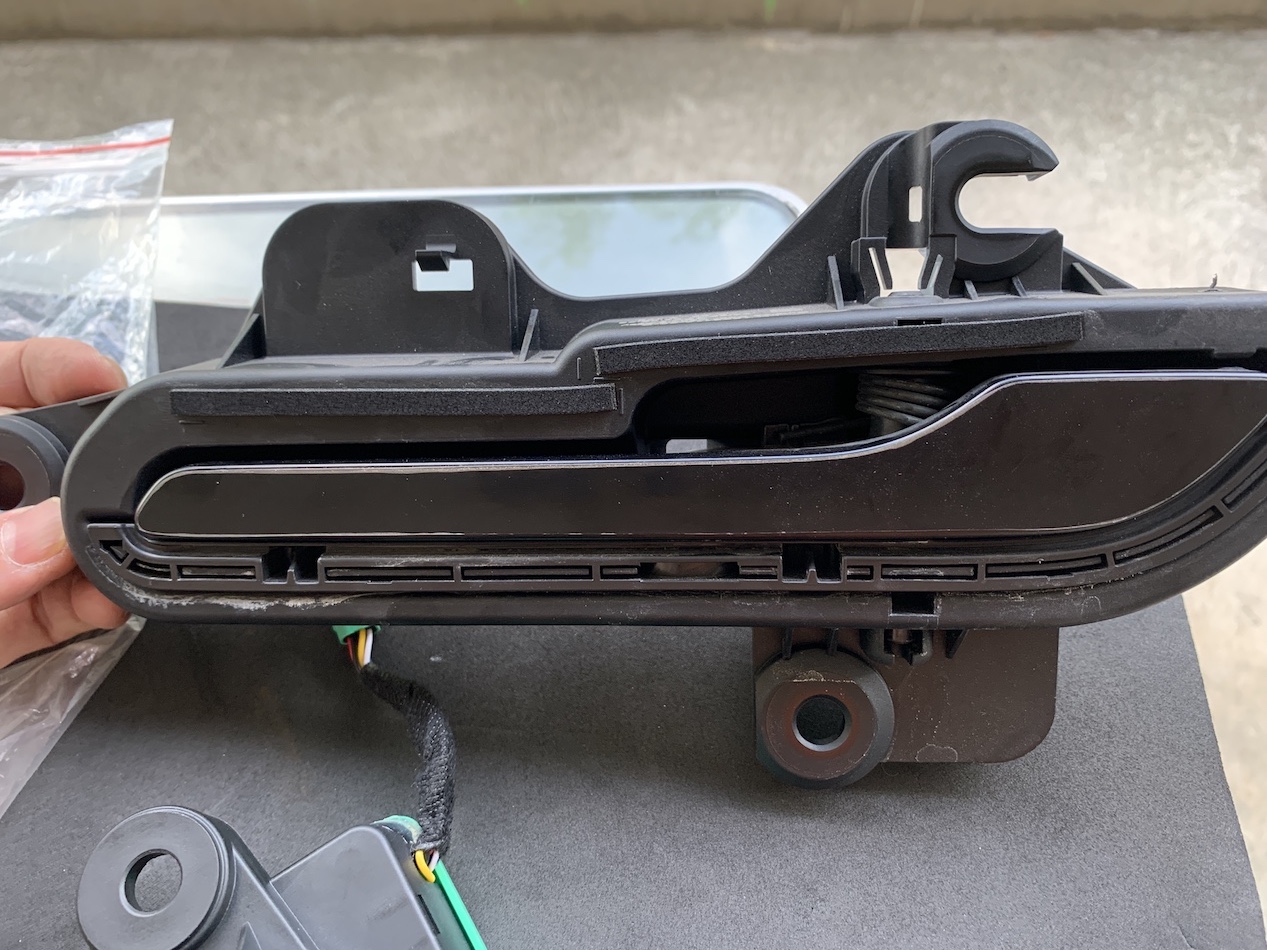
When comparing the Hansshow's unit, side by side, to the OEM. The OEM is equipped with the hall sensor that you will need to transfer to the Hansshow's unit. These hall sensors are normally hooked up with electrical harnesses inside the door assembly. The spring lever of the OEM appears to be better closed (softer, smoother), the Hansshow's closing is kinda harsh and less smooth. Aside from the hall sensor, you do not need to transfer anything else (previous version will require you to re-assemble the lever, the spring and underneath the gasket). The letters printed on the OEM unit are clearer and nicer. On the OEM's unit, you may notice the water residues on the body beneath the gasket.
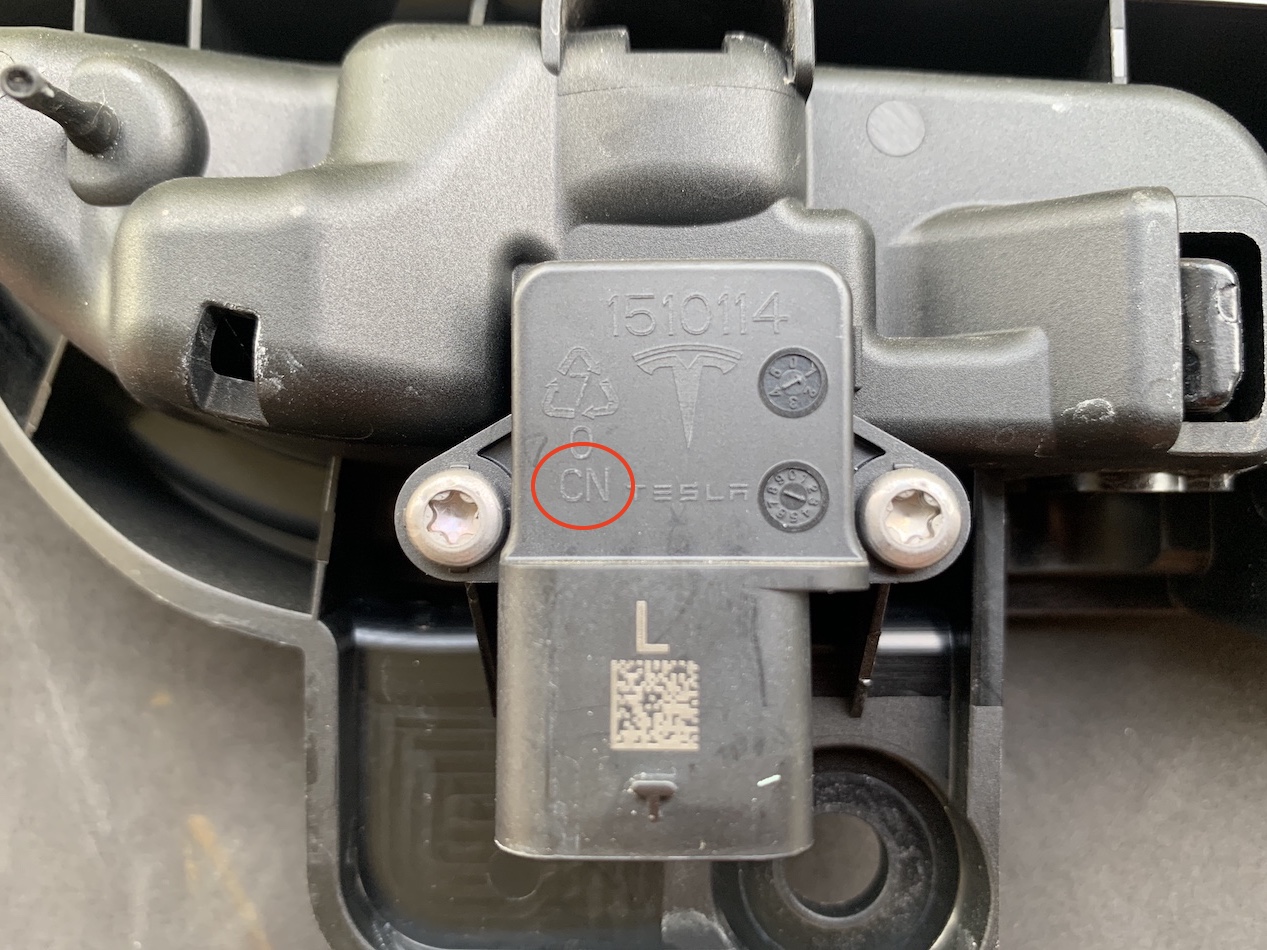 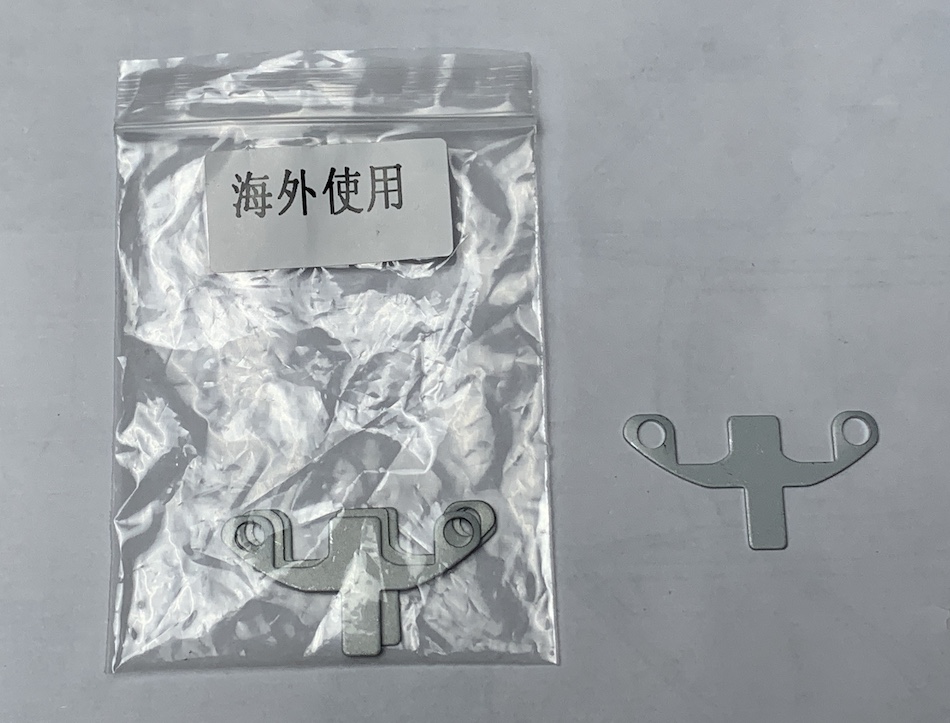
Of note, there are 2 versions of hall sensor, the one with CN mark is made in China and does not need the metal plate underneath (according to the guy from evoffer, but Hansshow insists that it must be installed). The one without the CN mark is made in Mexico and it requires the included W-shaped anodized metal plate to go between the hall sensor and the door handle unit, o/w, it will behave erroneously. For what I know, most model 3/Ys in the U.S. may have the Mexican hall sensors. The Hansshow's pdf didn't mention anything about this. Luckily, mine are CN versions and I didn't put them on and it has been working great.
After transferring the hall sensor (+/- plate), you can install the Hansshow's door handle back - do not go too crazy on your torque (Tesla recommends 10 N-m). The metal housing for the door handle is double layers, the inner one (with screws) is rigid (iron/steel) and the outer - is aluminum. With the door handle unit attached and it you overtighten the nuts - the door handle can be unevenly plushed on the surface. After all nuts went in, plug in the previous wire harness for the hall sensor.
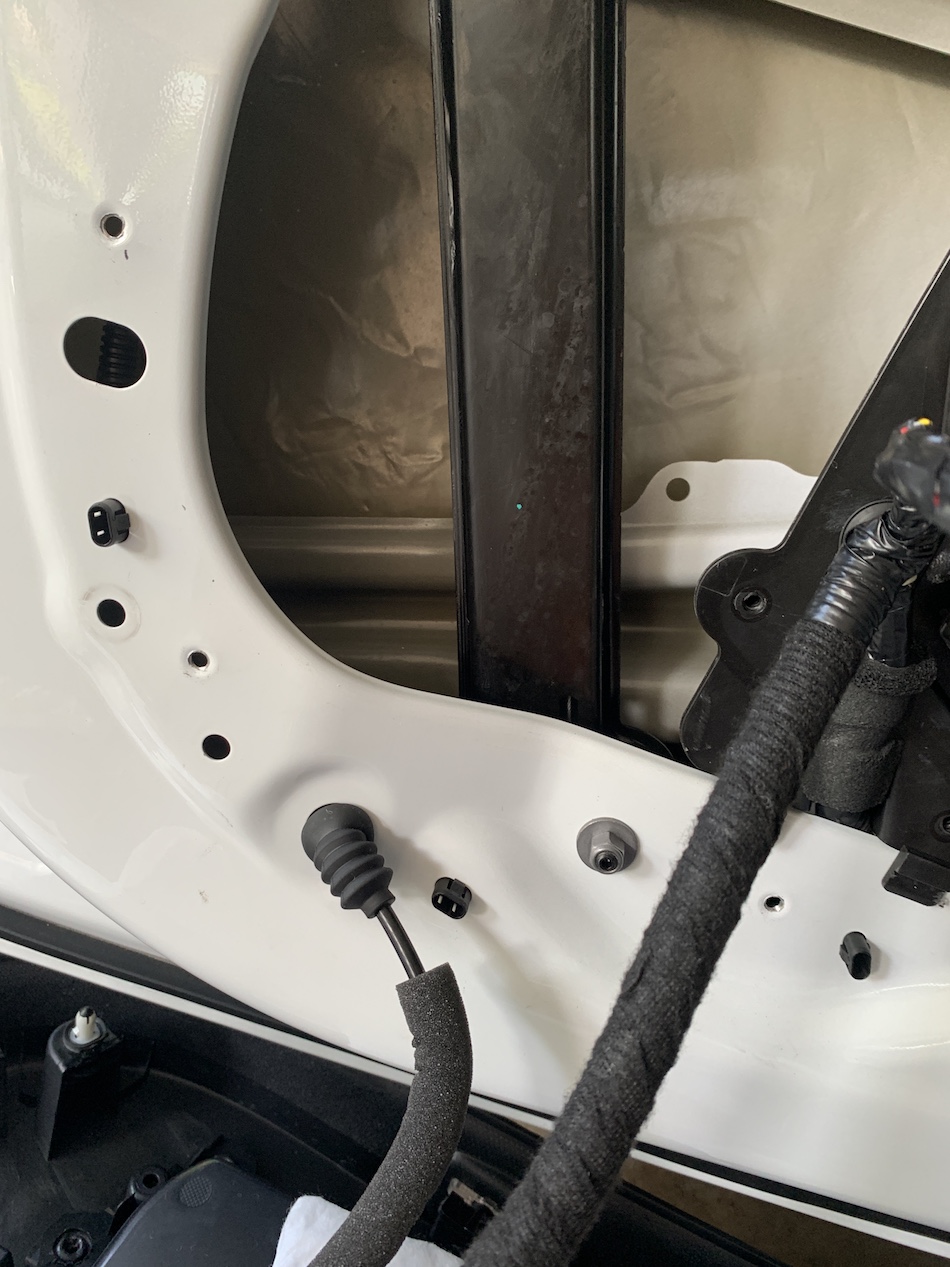
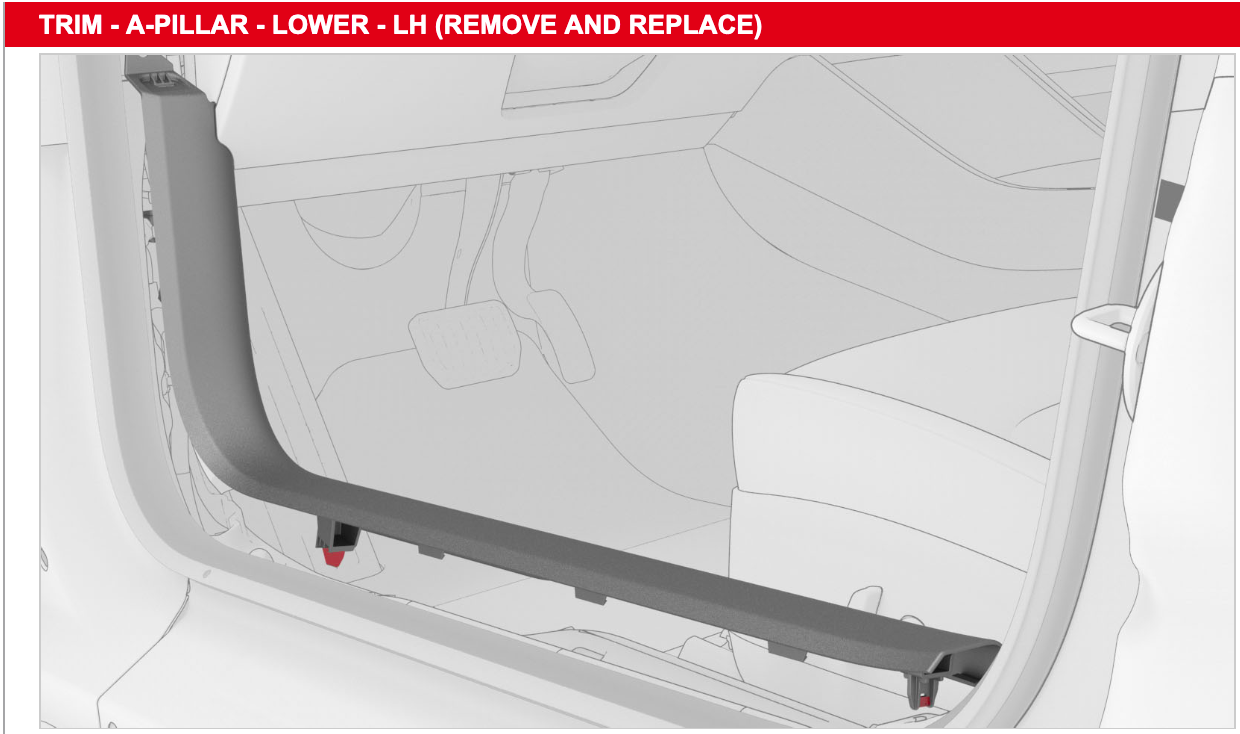
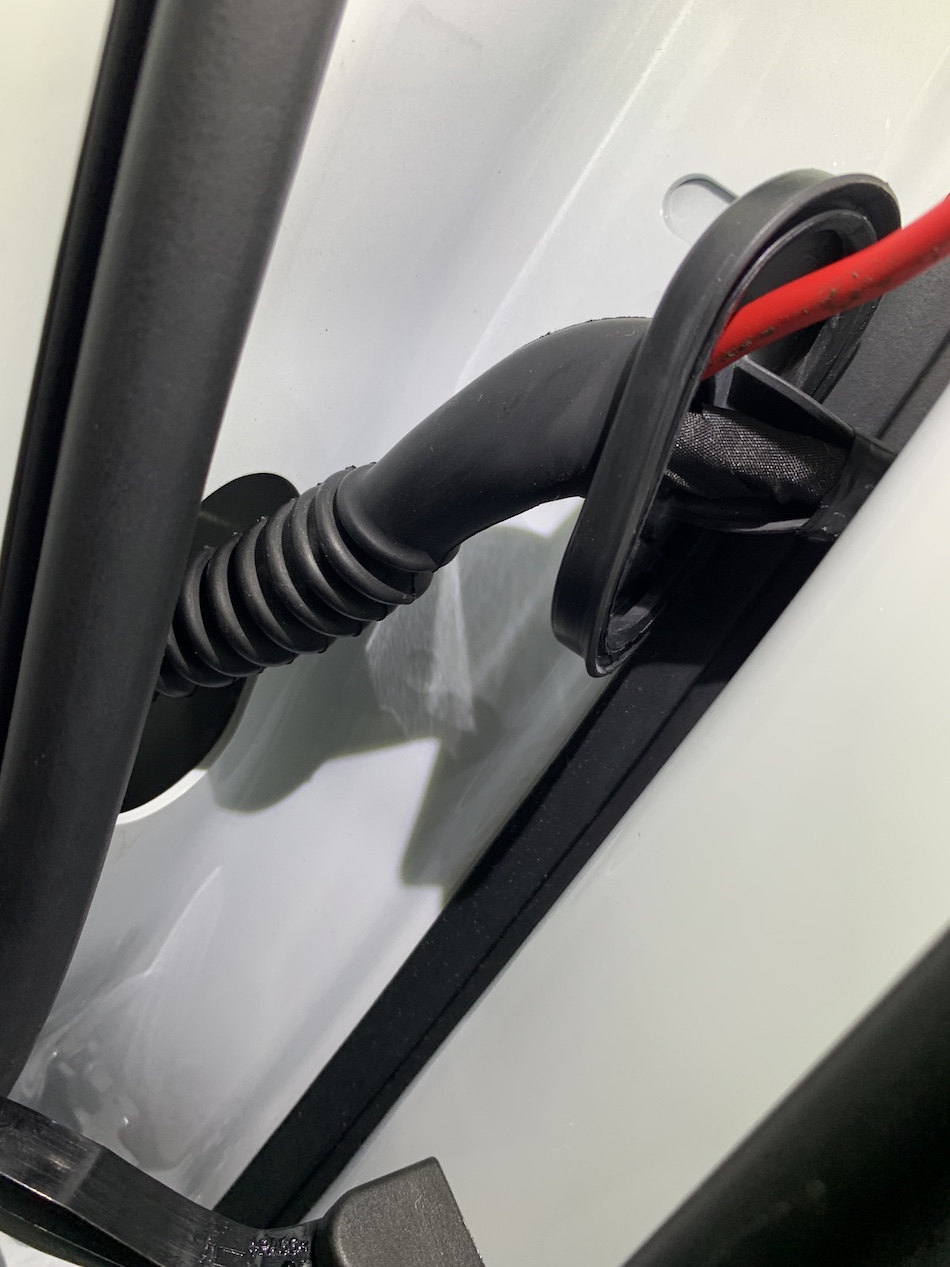
Next step, you will need to thread the Hansshow's color coded wire with the green connector going into the door. The front door is easier because the hinge area is much more spacious. You will need to remove the corrugated S-shaped rubber tube and its grommet from the car body & door frame to make the tube as straight as possible. To gain access to the rubber grommet on the car side you will need to remove the lower A-pillar trim. This can be easily done by removing the small rectangular (Trim - A-Pillar - Middle) piece which is held by one clip (top) and a hook, you can remove this piece out with the end cap of the instrument panel kept intact (in the picture above- the middle one, from Tesla's manual, this end cap is removed). The A-Pillar lower trim has one push pin clip at the top and 2 more clips down below on the horizontal part (see picture below). This piece can easily come off just by pulling in the right direction. Temporarily removing the lower part of the rubber door seal can ease both taking out and putting this back in.
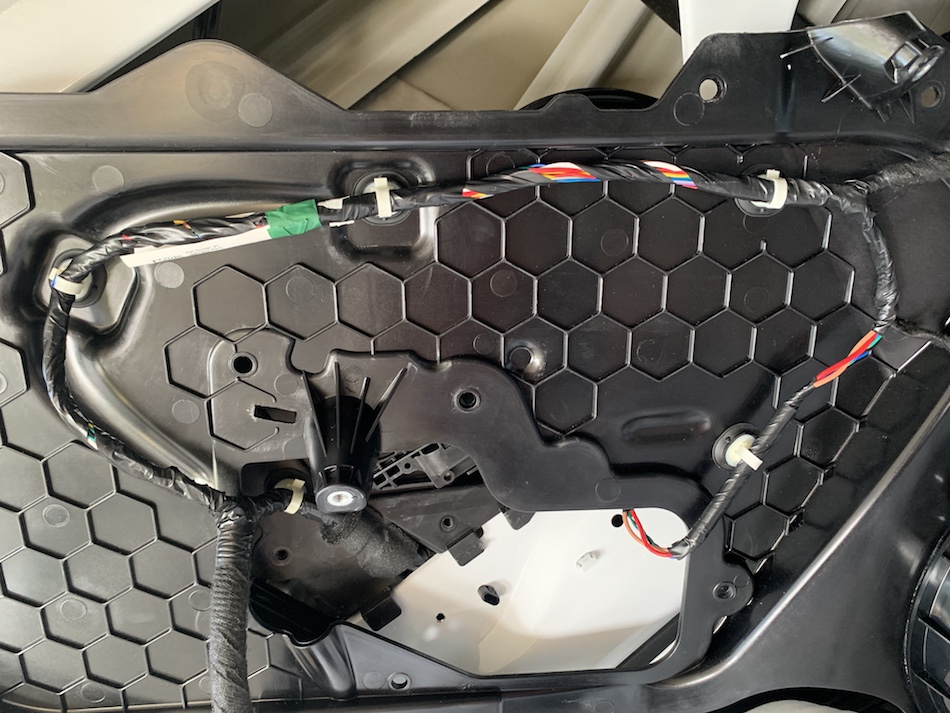
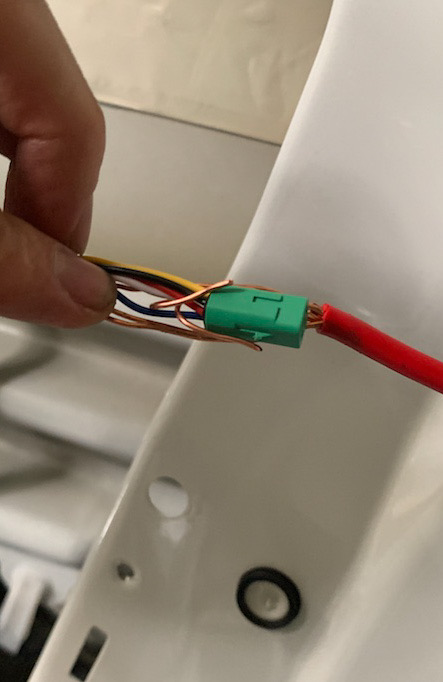
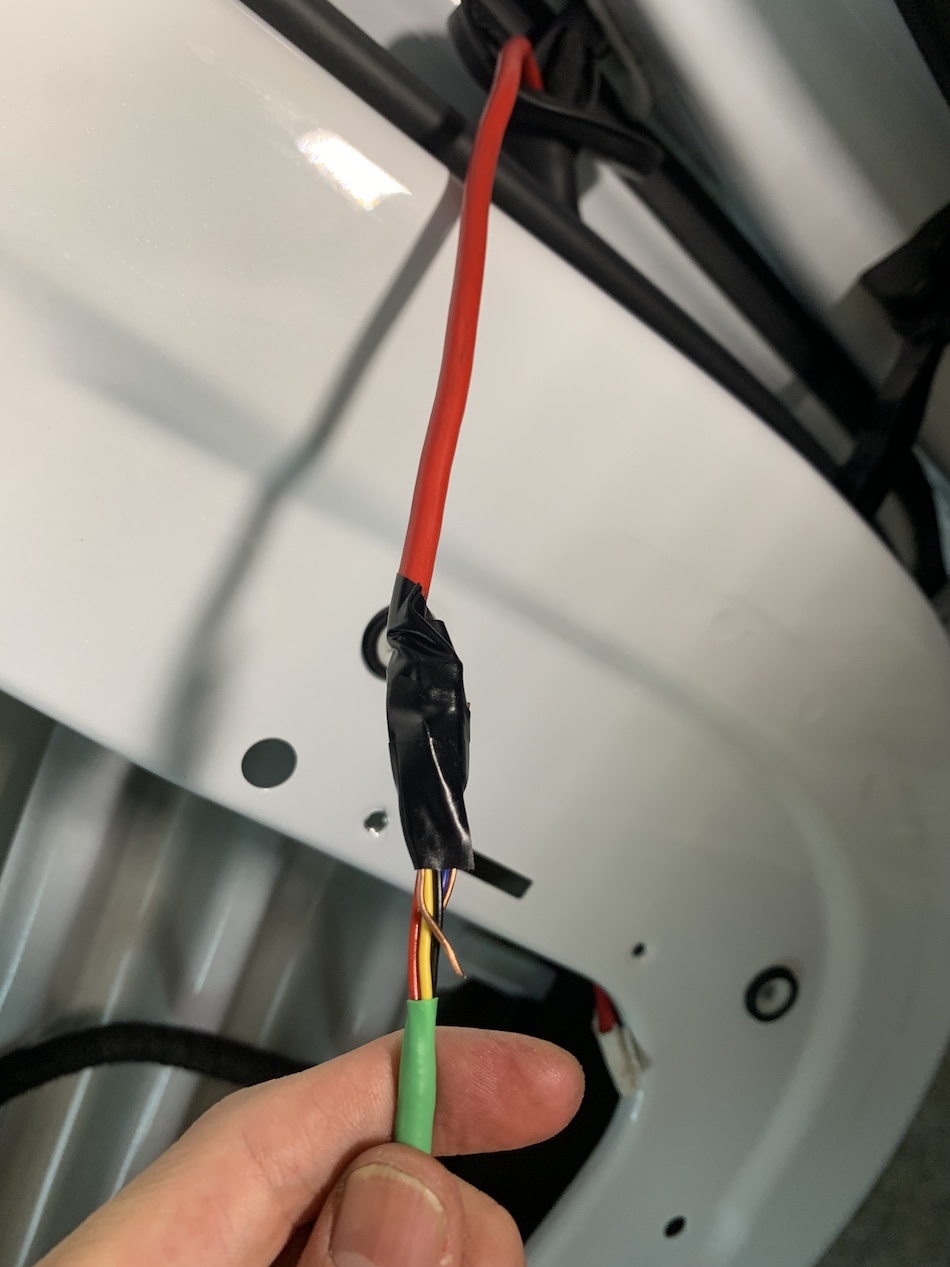
I sprayed a few puffs of silicone lubricant. I used a 6.0 mm2 THW electrical cable which was made of multiple stranded solid copper wires to help me make a wire loom around the green connector. With some massages/manipulations from the outside, it shouldn't be too hard (well, the first one took me almost half an hour, though, I was using the regular fishing tape and the head was too big). It's nice that Hansshow makes this green connector as small as possible (5 wires), I saw some other brands use a flat and wide connector, that must be quite a pain to thread. Inside the rubber tube is quite roomy just how can you make the head bundle as small as possible. Given that you've succeeded with this, you can now plug your green connector to the new handle unit. Try to route the wire along with the previous wire using cable ties or a tesa tape. Keep in mind that the wire path cannot block the glass coming up/down. For the front door, it takes quite a bit of wire length inside because the door is much larger.
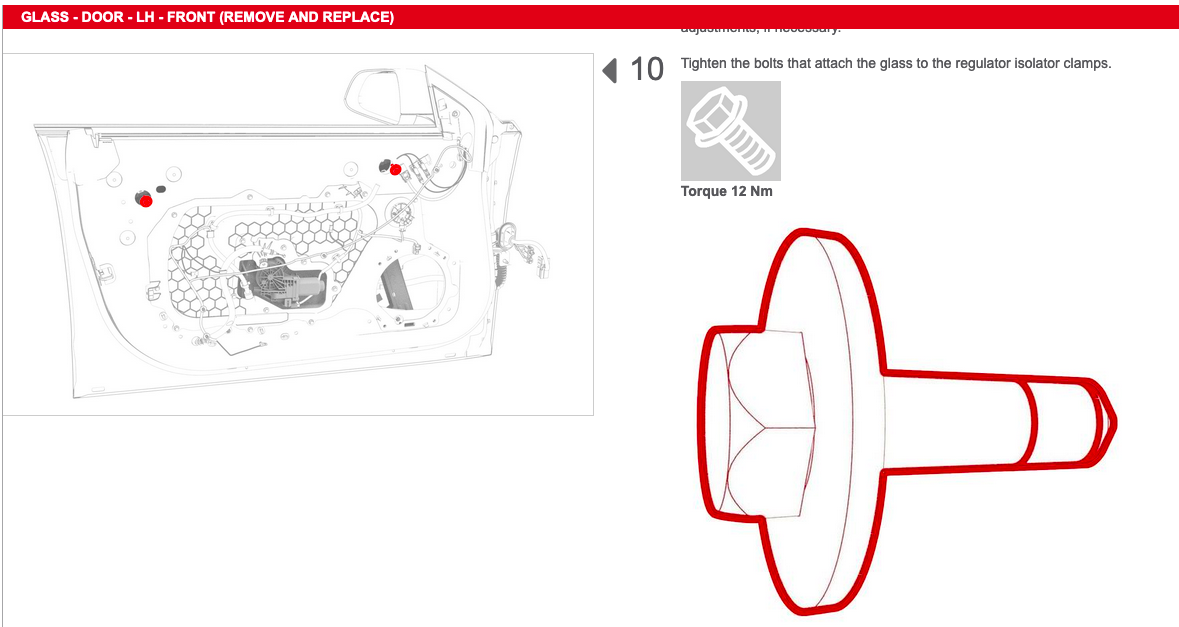
After this, you can put those 10-mm nut/screws that hold the rear pillar of the windows/motor regulator assembly and put the black close out panel back, it usually stays in place with clips. Next step is to put the glass back into the same position. Install the inner belt seat and its big rear rubber piece. It is useful having 2 people to help holding glass and re-adjusting position using the marks you previously did. At the beginning just tighten the same patch bolts by hand. If you have loctite adhesive (blue is enough), you can apply it. After you get the position you like, you can tighten it further. I used my torque wrench handle, set at 12 Nm as recommended in the Tesla's manual. At this point you should know that in the manual, Tesla recommends using the new patch bolts for installing window glass. So, re-using the old patchbolts with no glues - you might be at risk of window glass becoming loosened later. I learned about patch bolts later from the Tesla service manual, after I finished my installation. So mine didn't have adhesives, guess I'll be monitoring any rattles from the doors.
Overtighten these 2 patch bolts onto the regulator isolator clamps could potentially lead to crack (although, looking up closely, I believe they have designed the glass clip to kinda prevent that. After the glass is secured, try moving up & down to see if the glass can go all the way down and up smoothly. Then put all 14 hex screws back in (I use my Makita driver -setting 1 out of 4 - the lightest one, very gentle). Connect the blue connector (for the tweeter) and snap it back. Put all the round rubber plugs for all holes. Make sure your manual door release works and put the front door trim panel back in (it hooks to the rail on top and snaps in with clips). Do not yet put the final 3 screws back in. You should test opening and closing the soft close first. Be careful when closing the door, make sure the glass goes down slightly every time the door is opened and before you close it. Test the auto-present door handle by plugging the color-coded cable into its corresponding color on the Hansshow's controller unit and supplying external 12V power for it. You should be able to press (at the front end of the handle) and see the handle lit up and swing out for you. If you have already tapped the CAN bus signal, you can test the other functions. I did mine later. Once you're sure everything is working in order. Now finish the job (on this door) by those putting in those 3 final screws (torque 6 Nm) and the reflector clip. Don't forget to put back the tiny tweeter.
The next door to install can be either the same front/rear door or the same side. Since the installation of the front and the rear is not quite the same. It might be better if you do the 2nd installation on the same (front or rear) door as your first one. At least, what you have done before is still fresh and can be applied to your 2nd door. I did my first on the front left door and then I did my 2nd on the front right door. But I routed the Hansshow's wires for the front and rear door of the right side simultaneously where they join their paths.
Continue to part II for the next
| Create Date : 01 พฤษภาคม 2565 |
| Last Update : 1 มิถุนายน 2565 15:24:27 น. |
|
0 comments
|
| Counter : 3100 Pageviews. |
 |
|
|
|
|
 |
|