|
Continue from previous blog - part I
Rear door installation
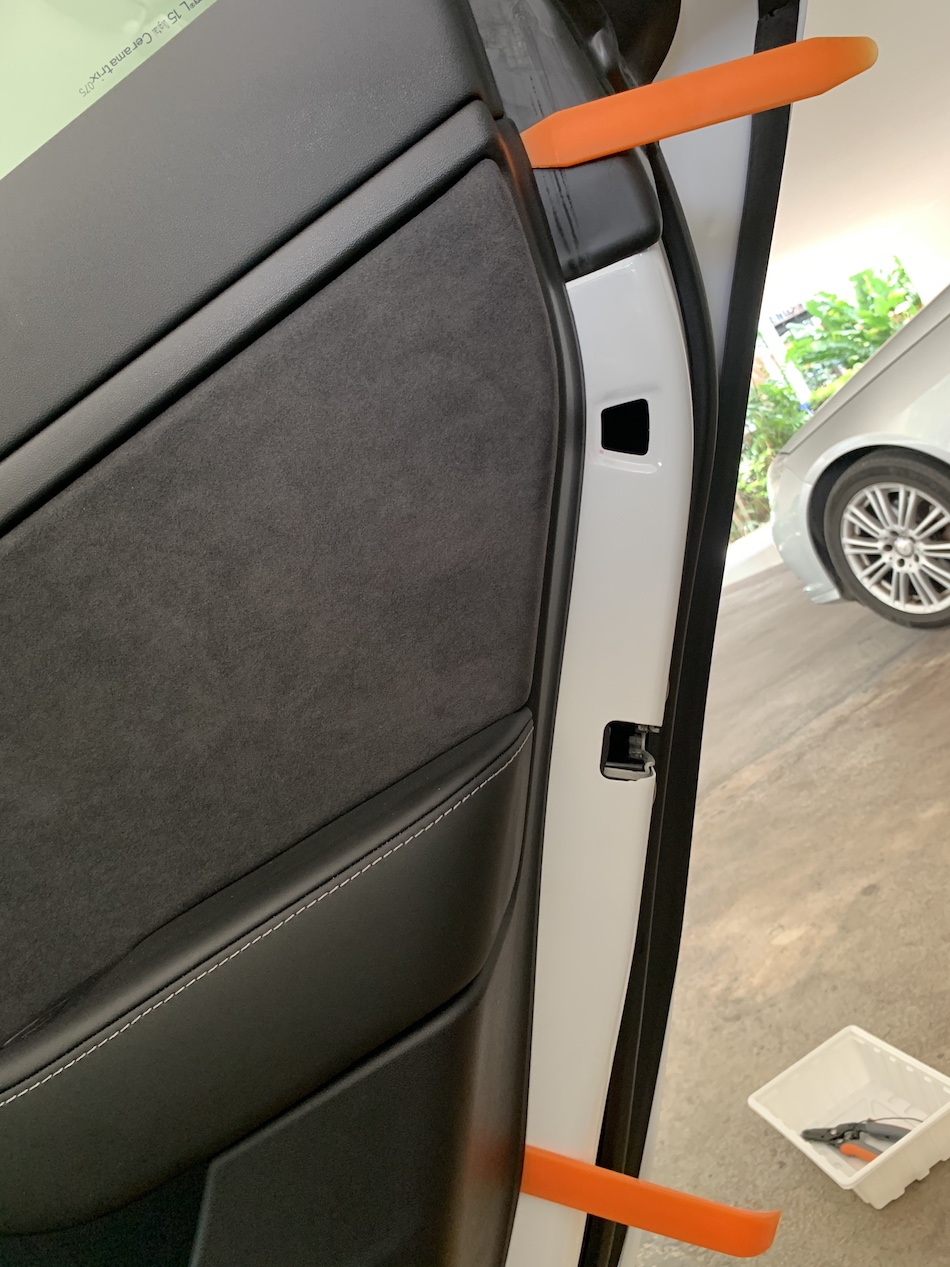
The rear door is smaller and the hinge area is much narrower than the front. You will need to remove the lower B pillar panel which was underneath the top B pillar panel. Pop the lower part of the top panel to allow the bottom piece to come out. If you can leave the top piece attached to the body (by clips)- leave it like that. Mines did come off completely on both sides but they were still dangling around with the safety belt going through the pieces. The wire can be easily routed from A pillar to B.
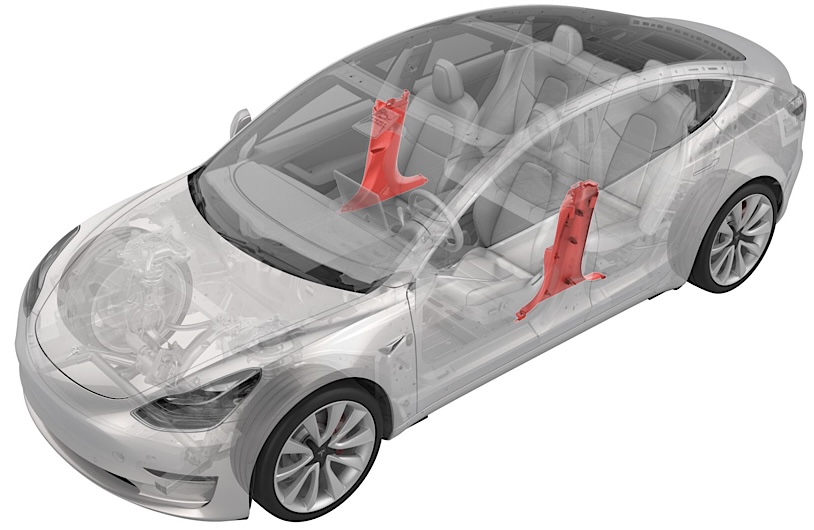 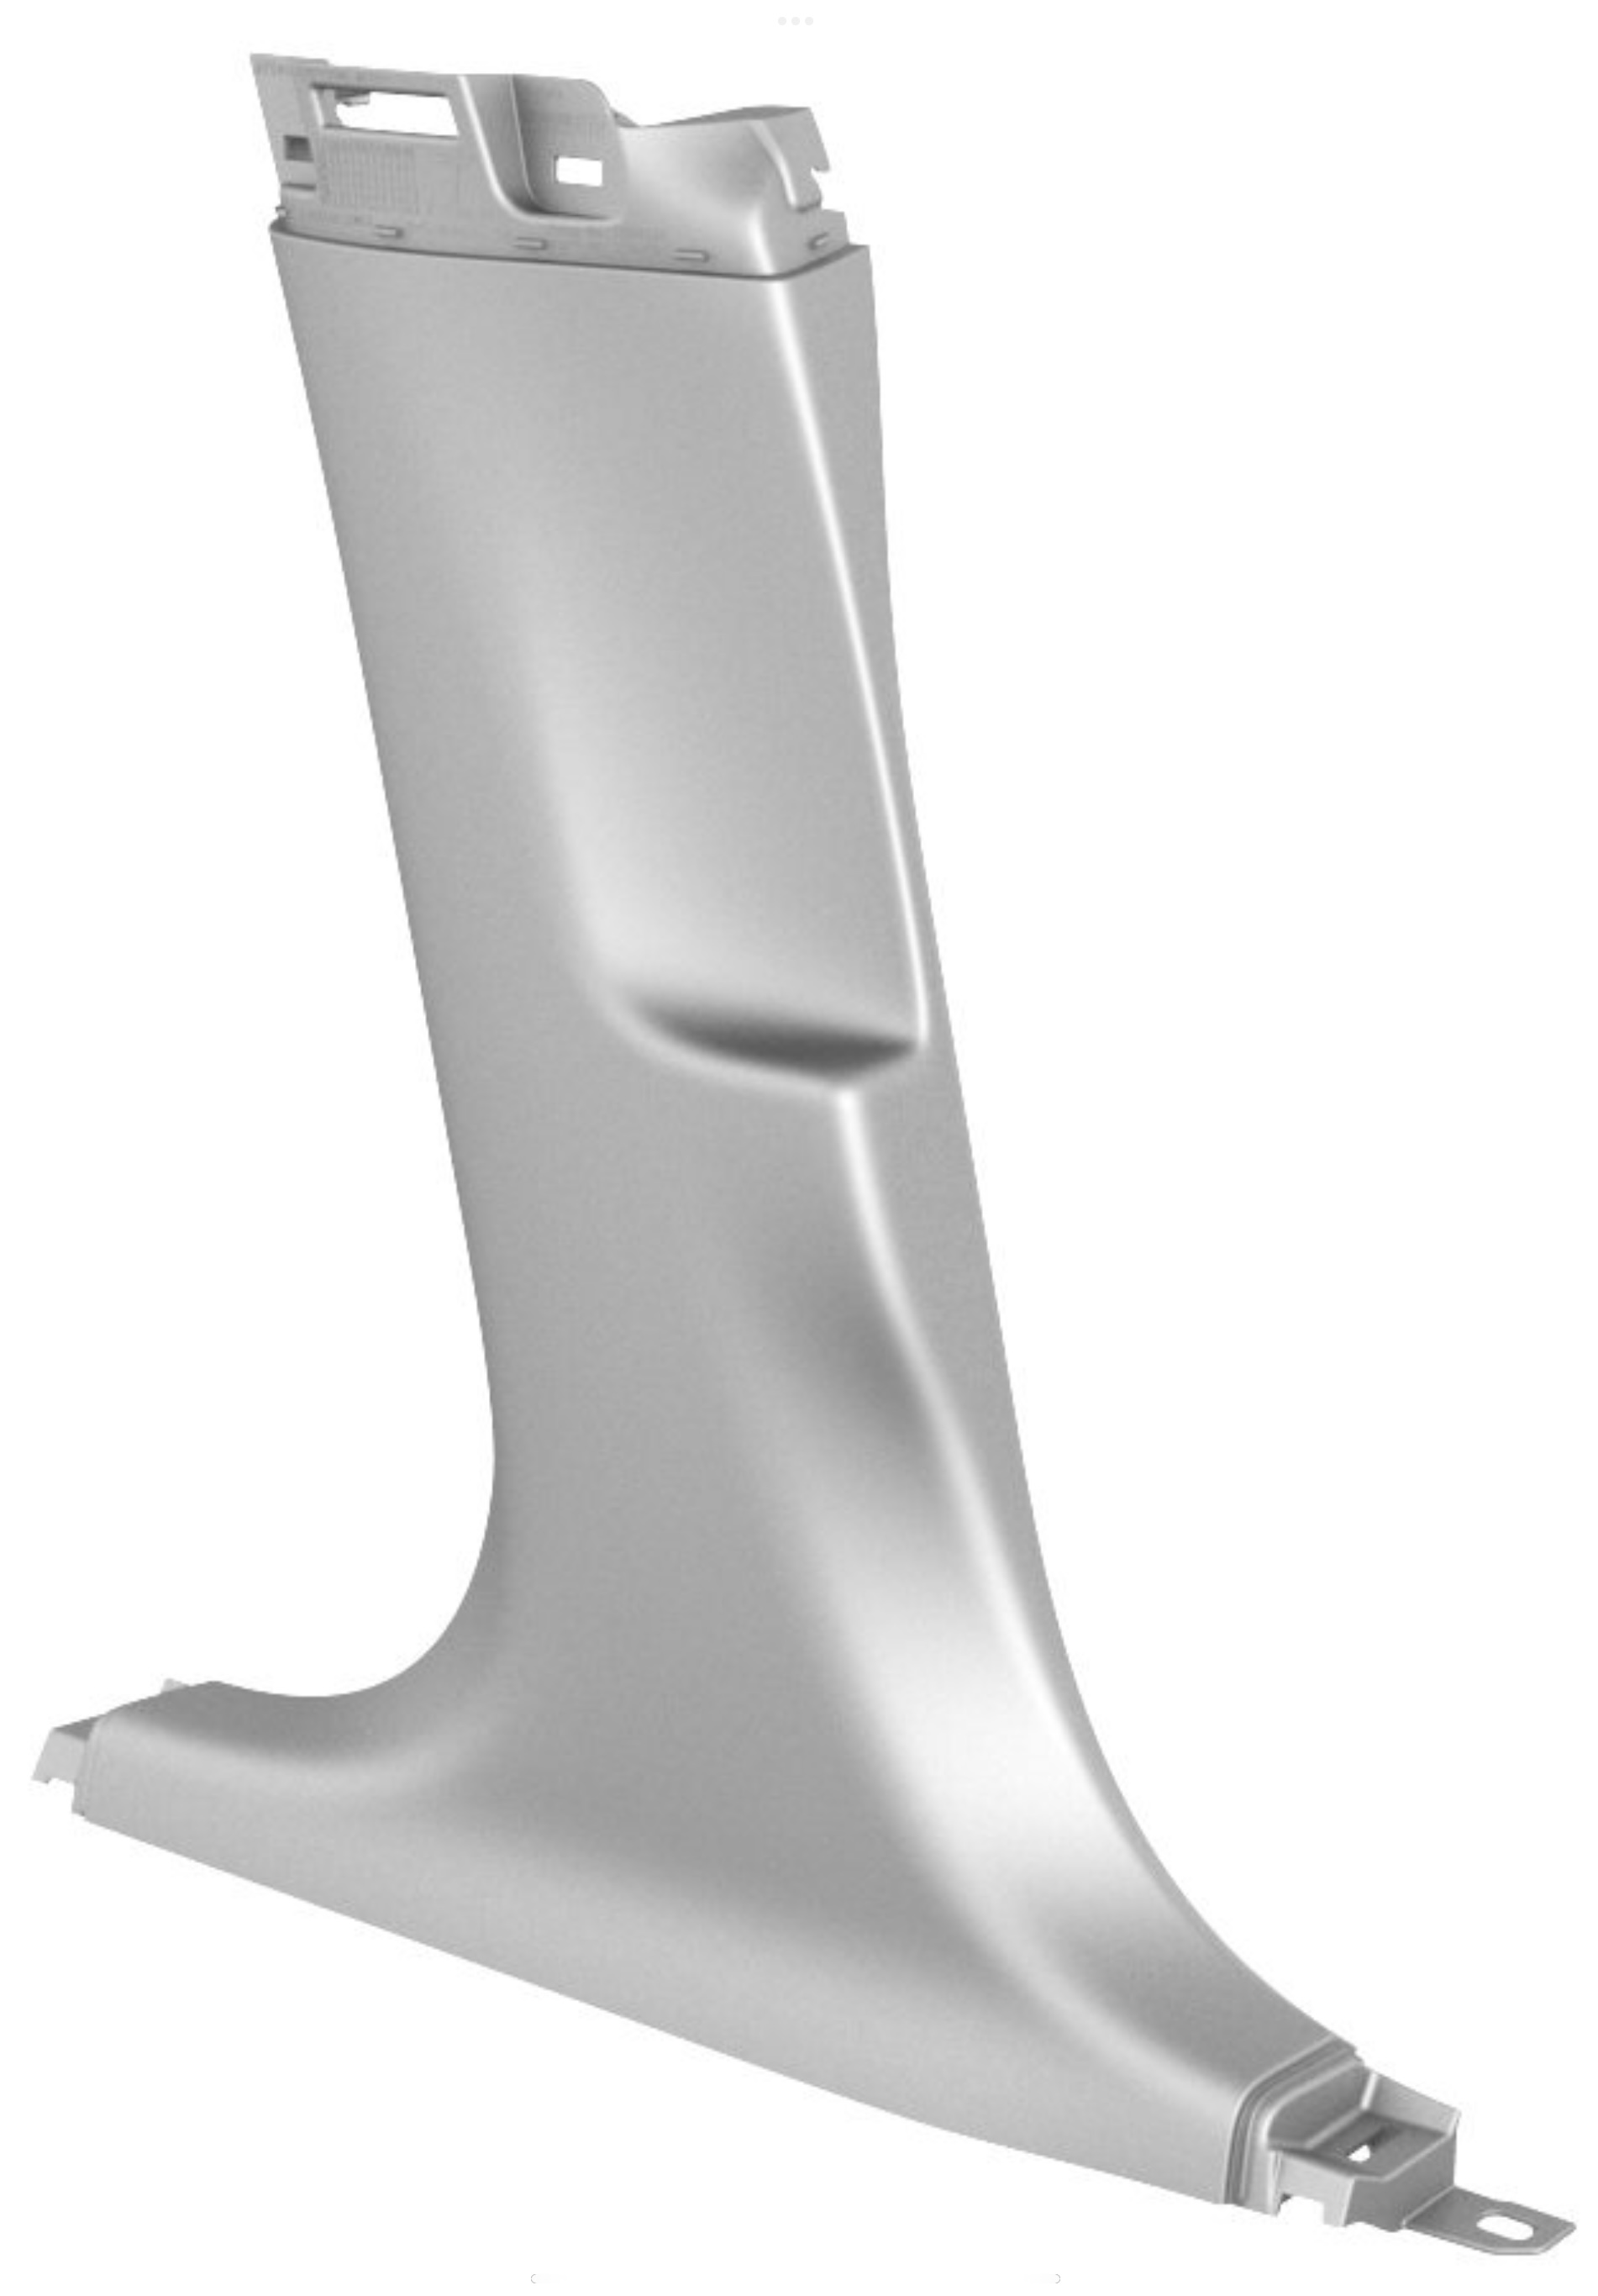 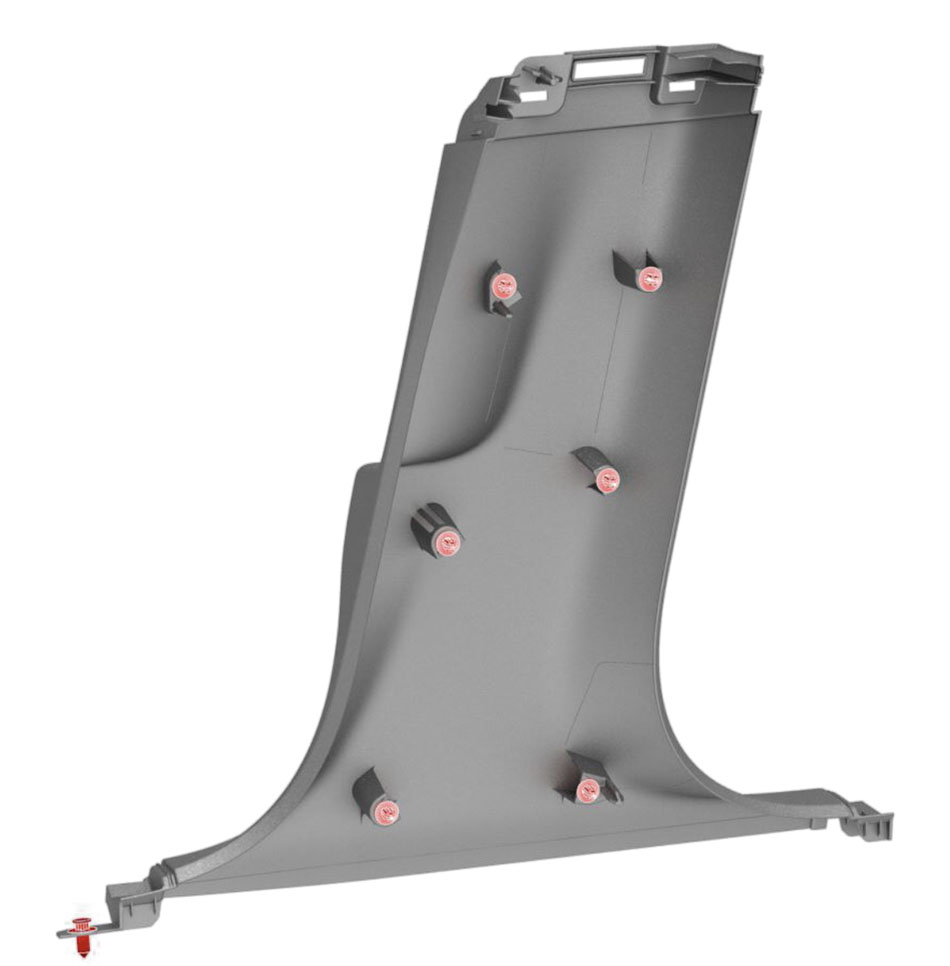
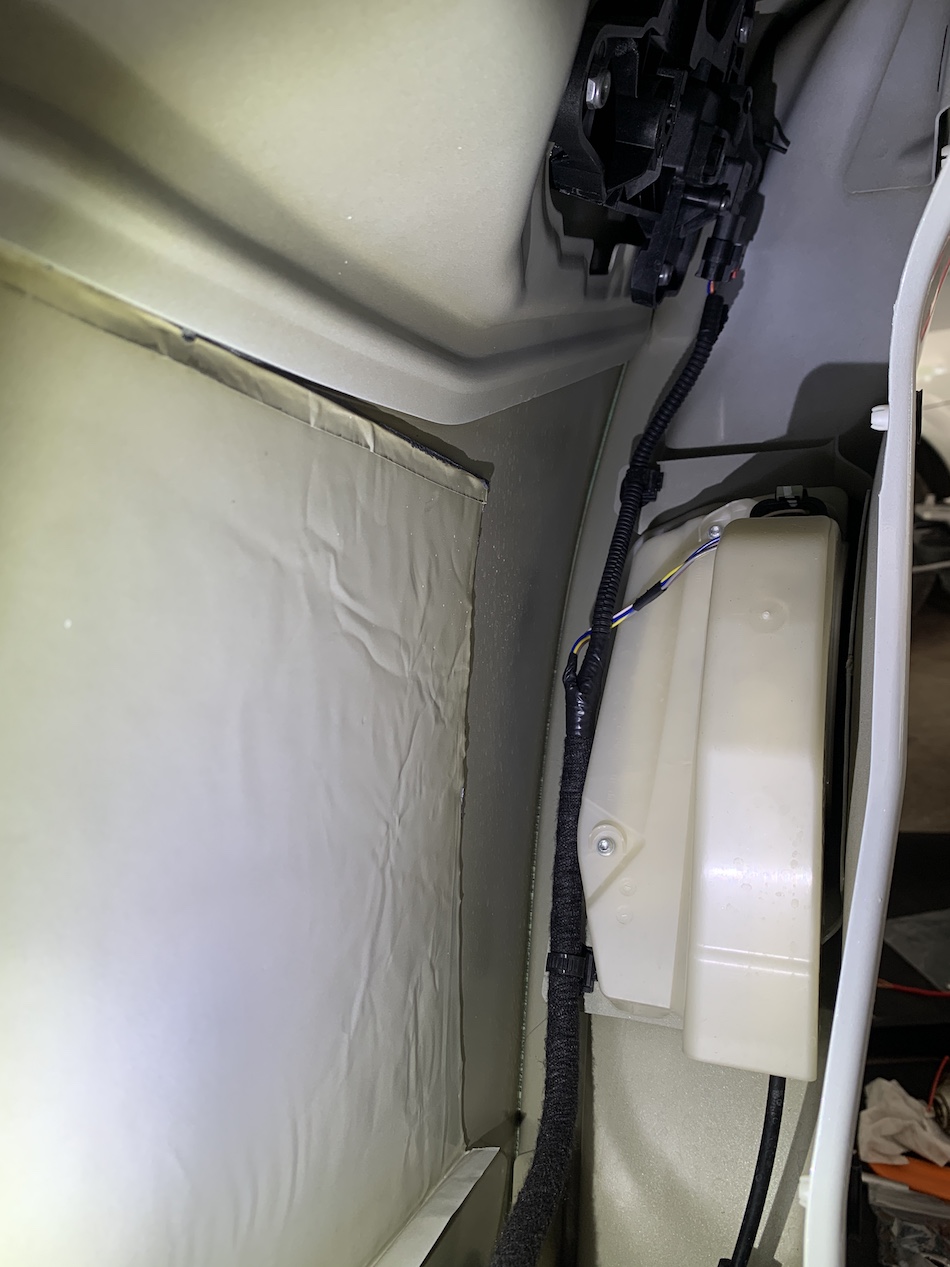
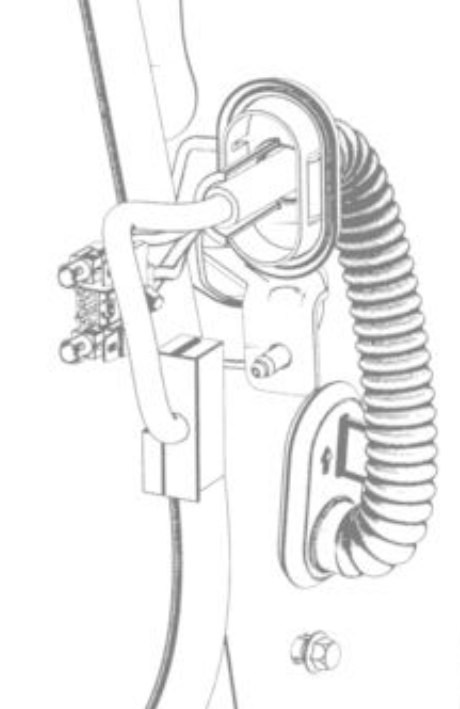
To remove the lower B-pillar panel, you have to release the push pin at the front end of its base, the rear end of the base is under another trim panel next to the rear seat which does not need to be removed (lift the front end of that piece to release the rear end of the base of the lower B pillar panel). This part is retained by 5 clips (apparently, they've removed 1 clip), just pop the panel out and you can see where the corrugated rubber tube and its grommet are attached to the lower part of the car's B pillar.
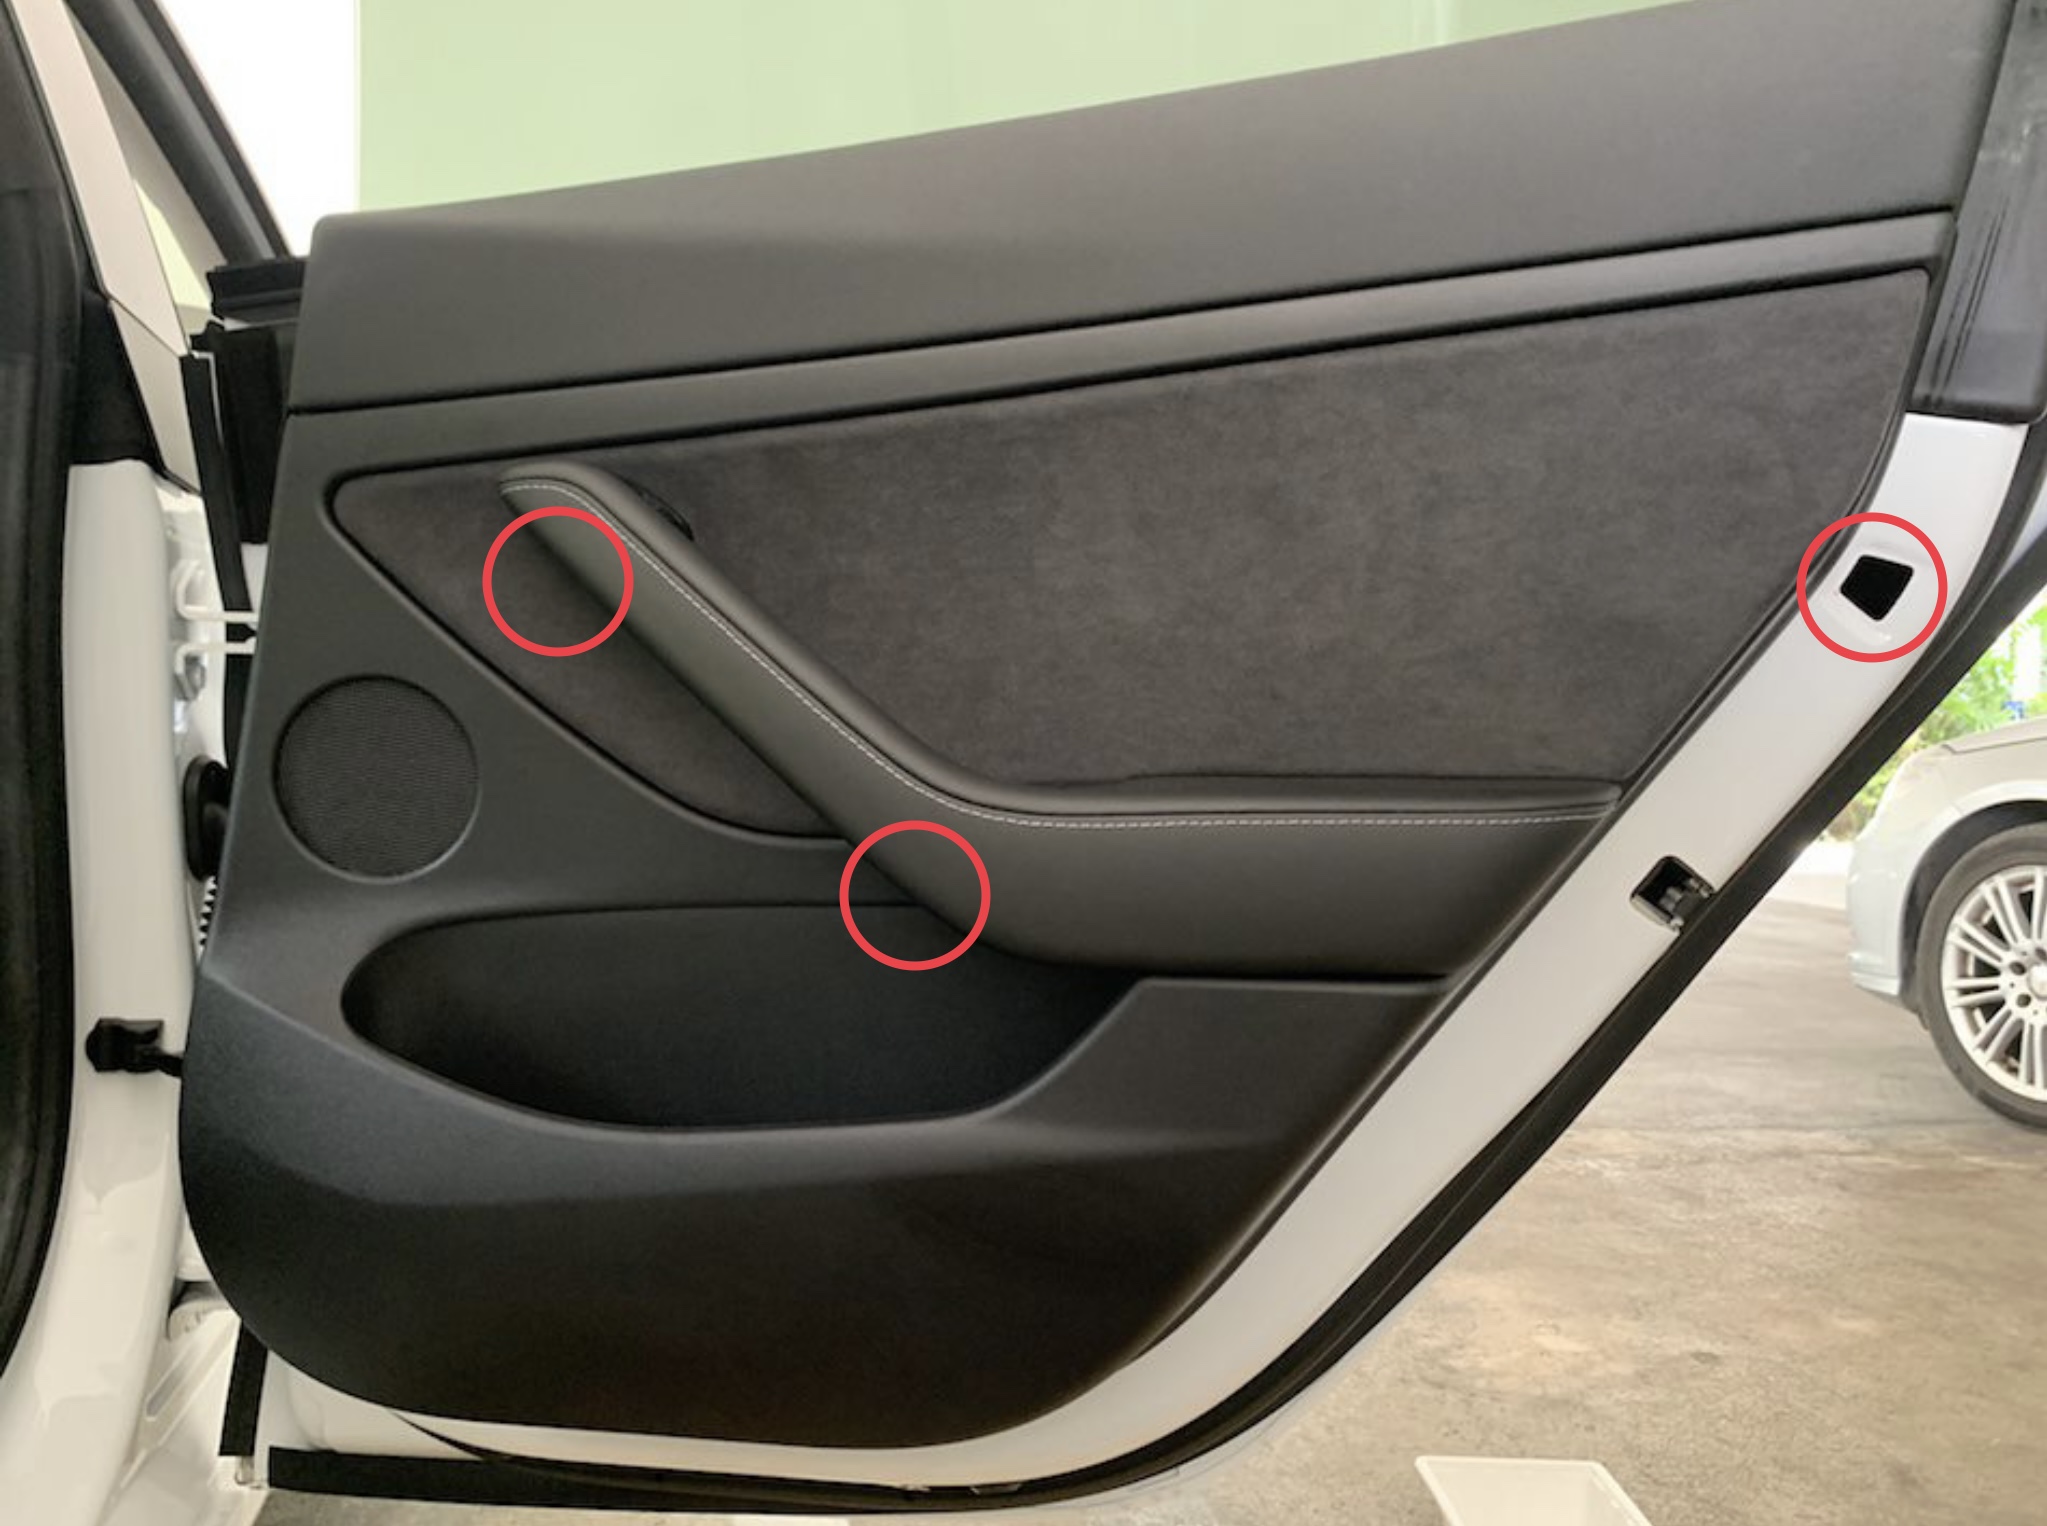 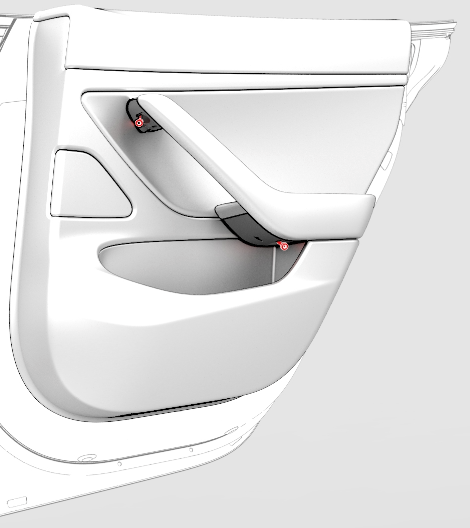 
The rear door panel trim has only two Torx-30 screws held in place, they are located at both ends of the handle (look from underneath). Once screws are removed, try to pry open the panel, it's very tight - try to enter from the top where the base is rubber and work your way down to the lower part where it sits on the metal base. Pry/pop open from the bottom- this piece is like the front, it's retained with clips, once clips are all popped you can then lift the pane out and lay it face down on the stool. Be careful, these skinny stem clips are easy to break.
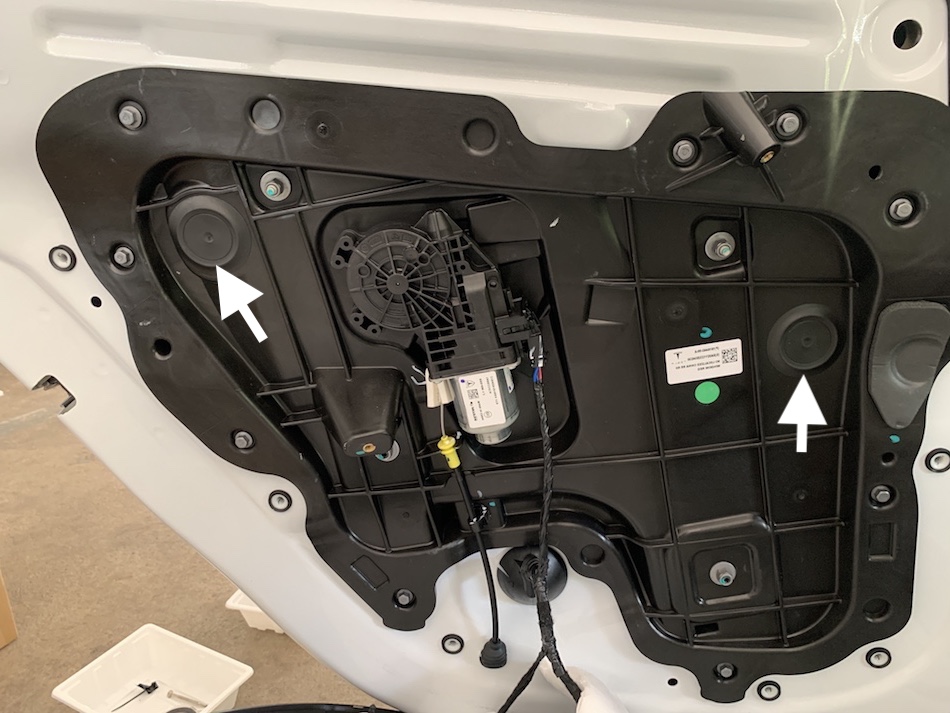 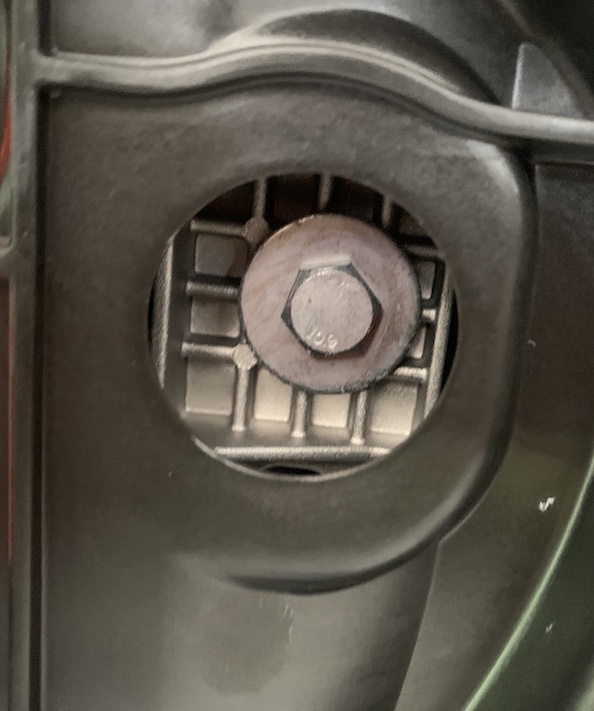
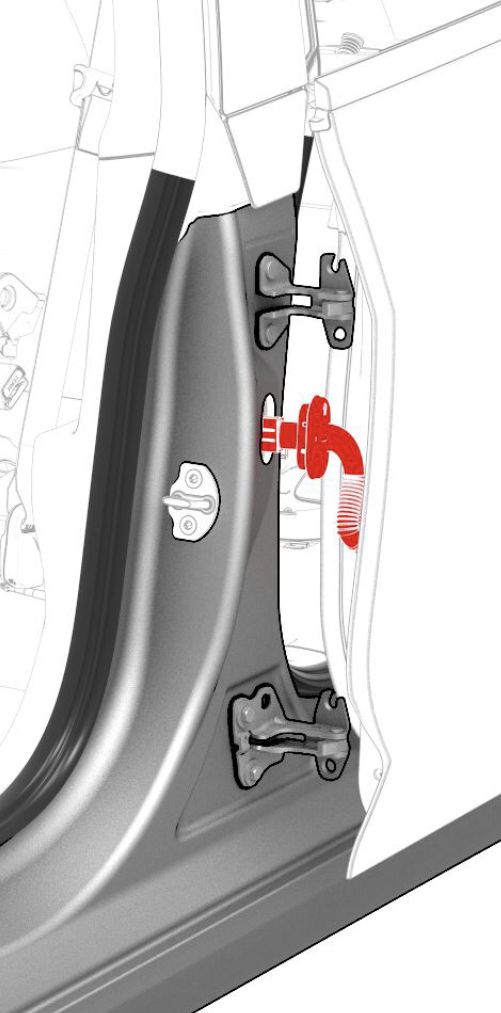
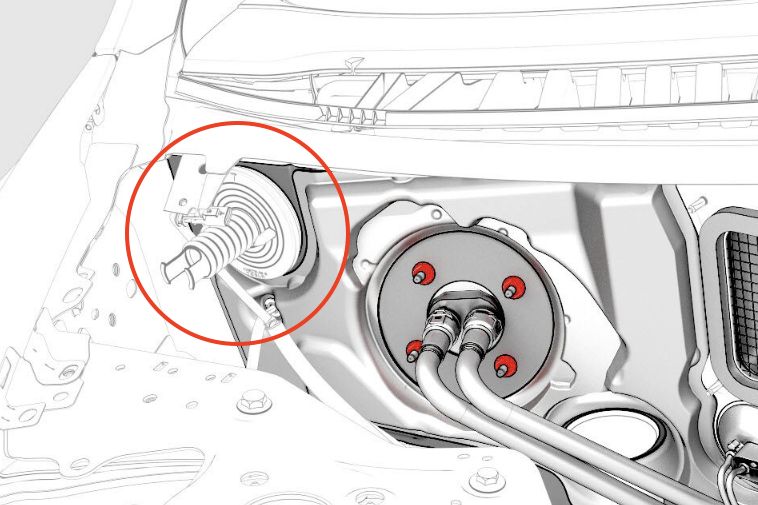
On the door, you'll see the black panel which is housing the window motor (window motor/regulator assembly -rear). Locate the large round rubber plugs (white arrow) and remove these. Press the window up/down until you can see the 13 mm patch bolts on the regulator isolator clamps appear. (if you're a grasshopper and have already removed all the wire connections, you can still move the rear door glass by using control on the driver's door).
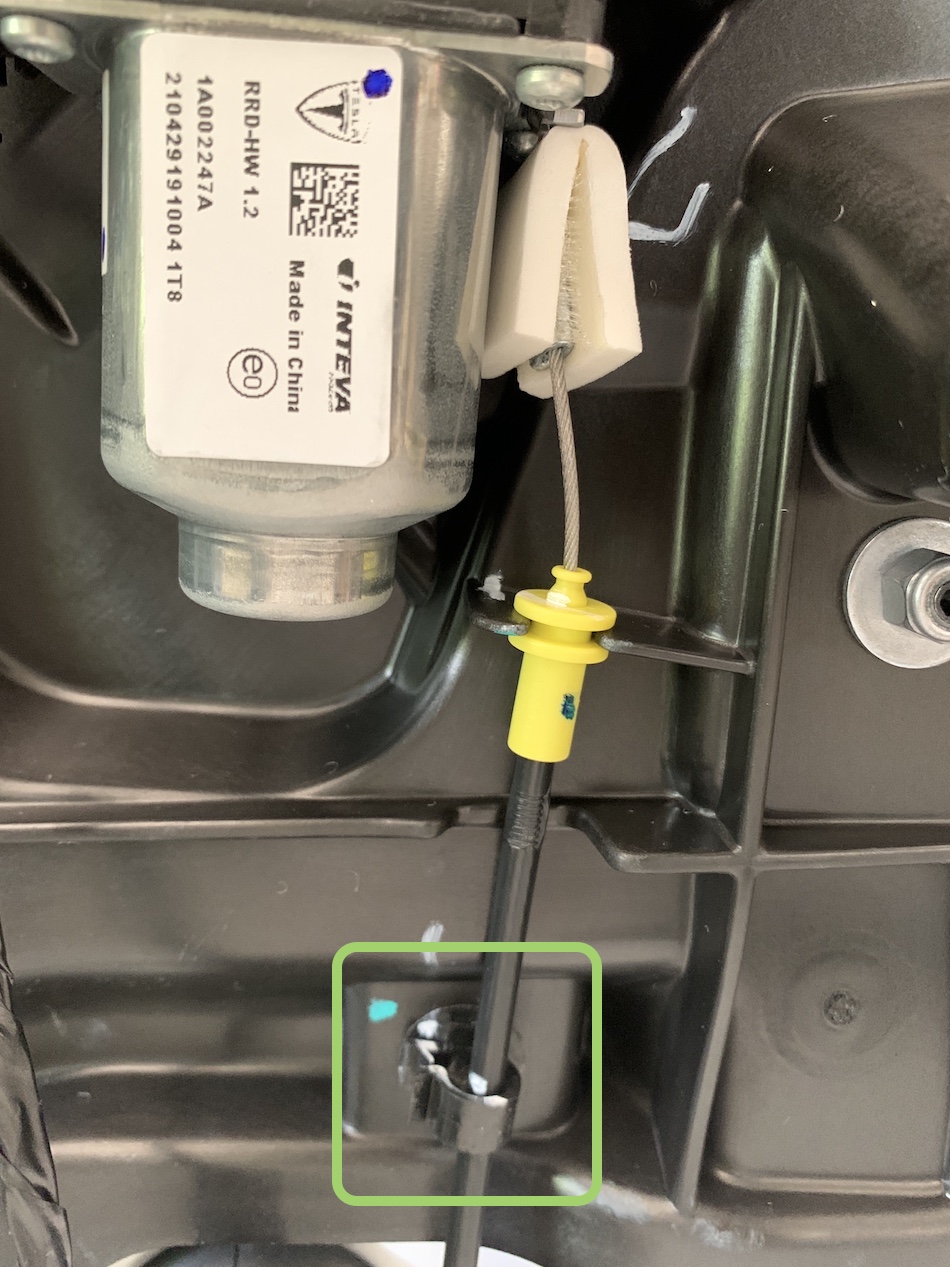  
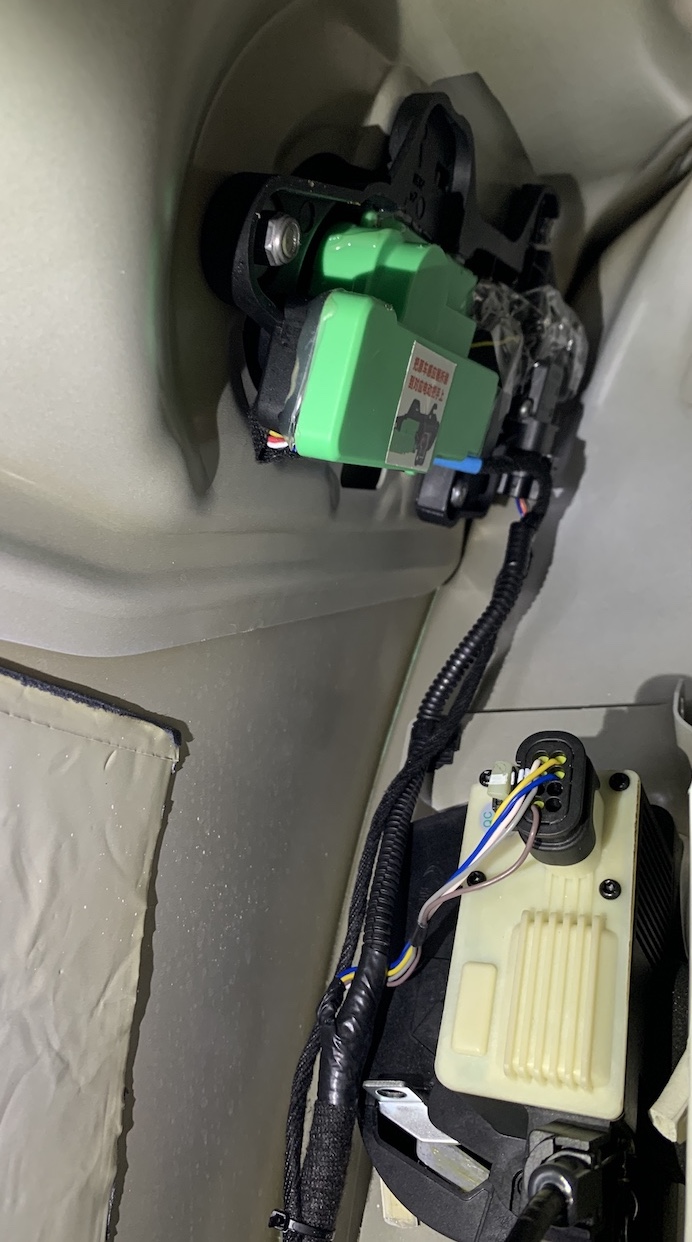
You will find the unused manual release cable tip looped and tugged to the side of the motor, just simply remove it, undo the clip below that (green square in the picture). I gently peel off the cushion adhesive to re-use with the new one. I guess this is to prevent the rattle. I was wondering what's the purpose of having the hidden manual release cable when Tesla didn't have any manual release lever on the rear door. Turns out that later, I accidentally closed the door and had to pull this cable to open. Without any electrical connections and this life-saving latch cable, that door would be forever closed. Now I know why there is always a manual release cable, even when it will be kept inside the panel. Although, I wondered why wouldn't the frunk lid have one?
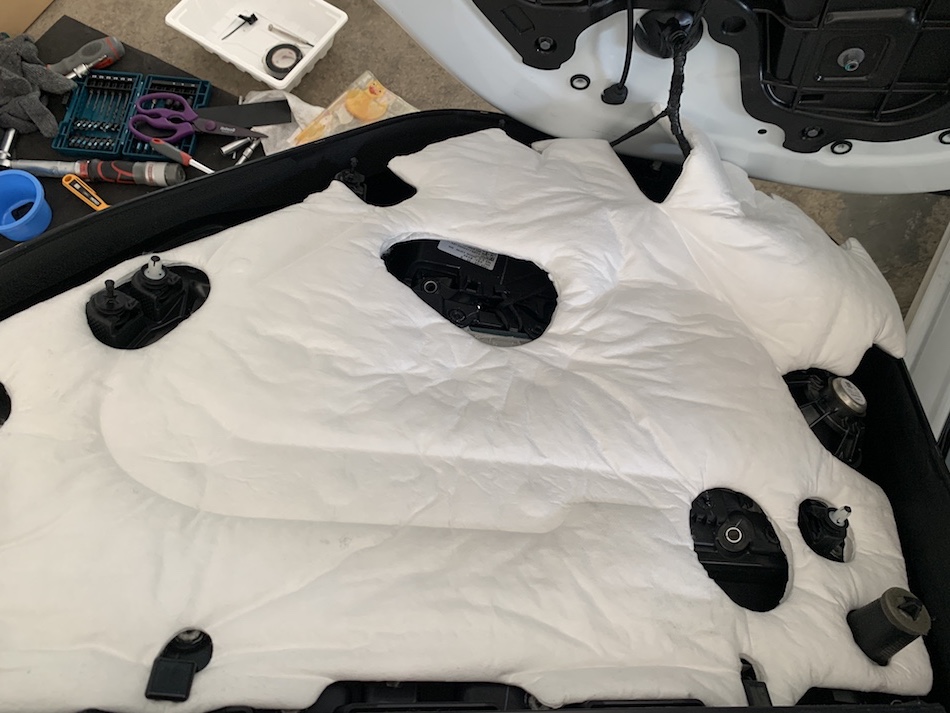 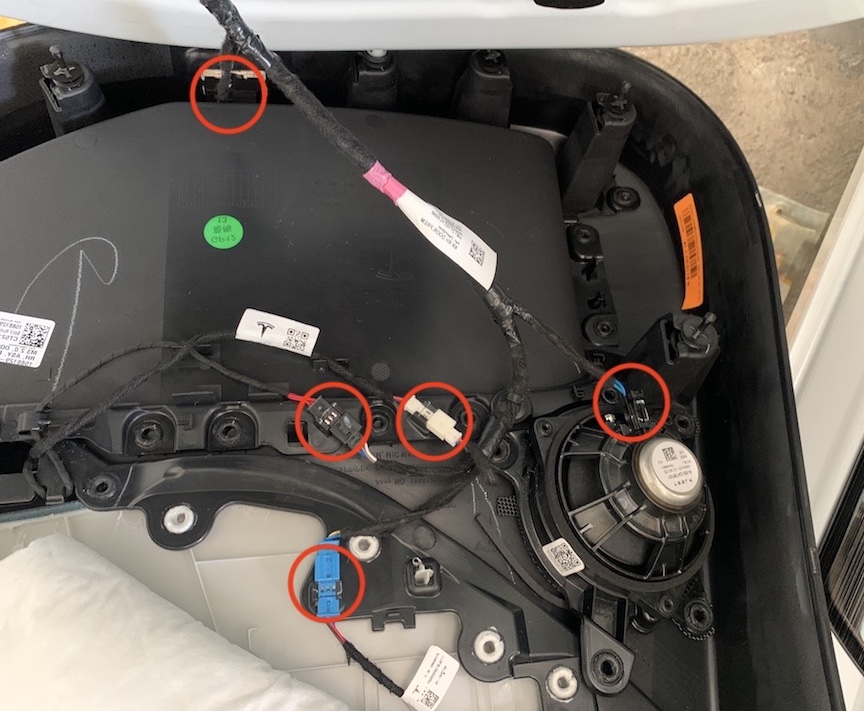
Next, remove all the wiring between the 2 parts. For the rear door, we can't use the same (remain wired) technique as the front door. I tried that but if you don't remove all the wire connections to free the first piece, you can't take out the whole closeout panel. So, flip the white padding up and remove all of those 5 connectors on the first piece including the connector for the puddle light. They all have some tiny locking mechanisms, if you can find a small flat eye-glasses screwdriver to help release these locks, the connectors can all be released without breakages.
 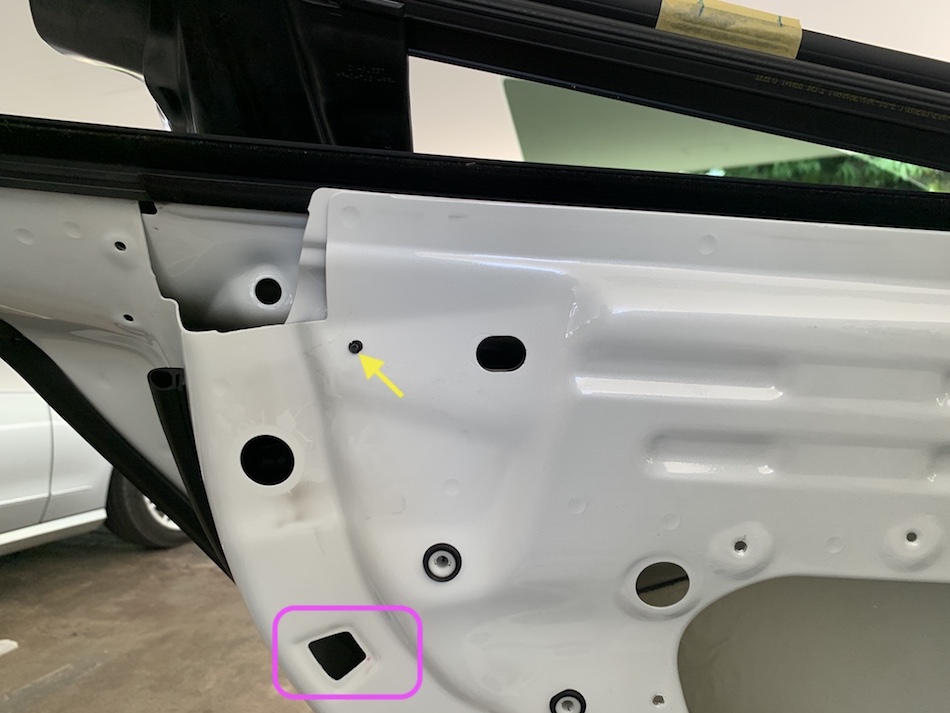
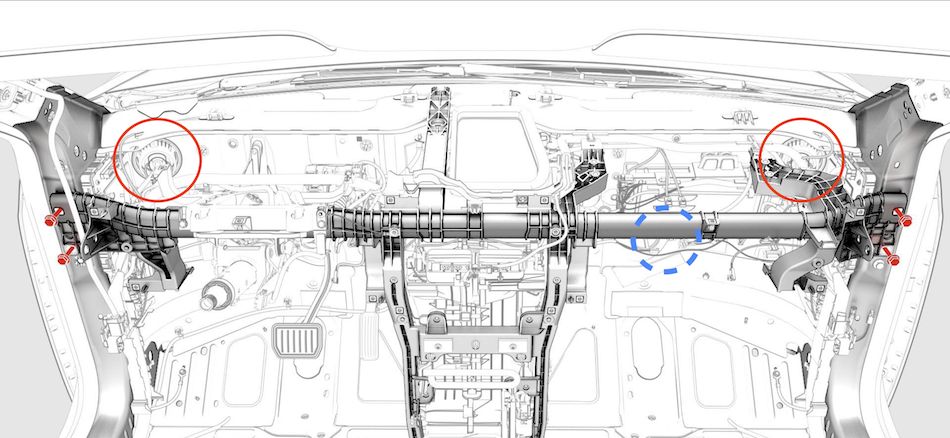
Then you can mark the location of the glass the same way you did on the front door, loosen those 13-mm pacth bolts and remove the glass and put it somewhere safe (trunk?, why not). The rear glass is much smaller but it's (still) a laminated glass. If you crack it, it'll crumble in to many small pebbles. You will also need to remove the rear big rubber piece that is part of the inner belt seal to ease the glass removal and also to reveal the openings to remove the door handle unit. You do not have to remove it entirely - you may lift it up, just get it ouf of the way. This part is held with 3 push-in rubber christmas tree rivets which can be easily broken (one of mine did, yellow arrow). At this point, you may as well, remove the trapezoid rubber plug (the pink rectangle). That's for the access to the bottom nut of the door handle unit.
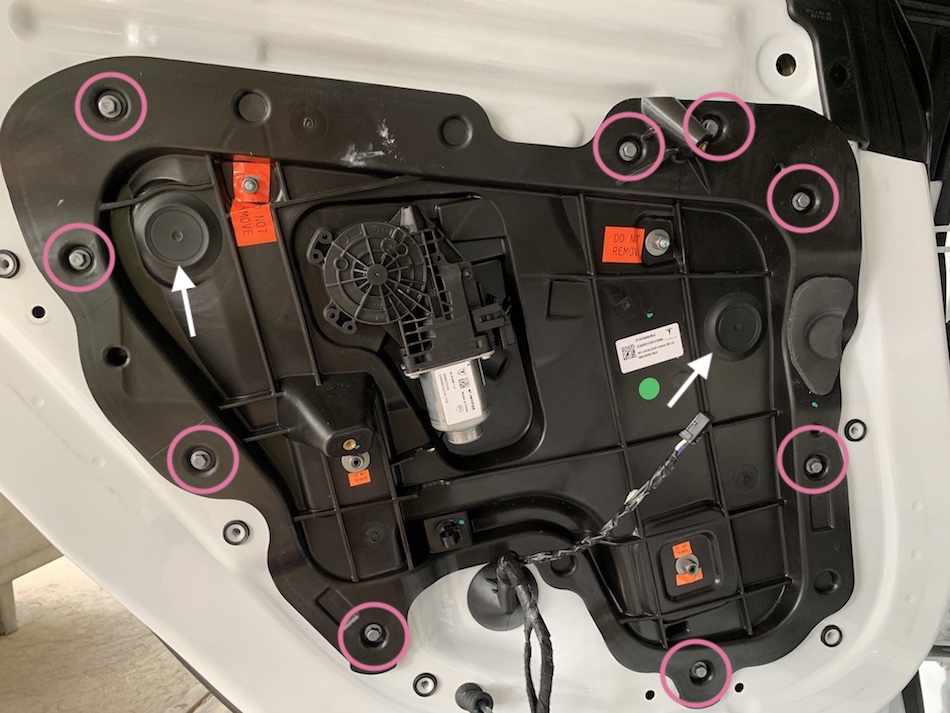 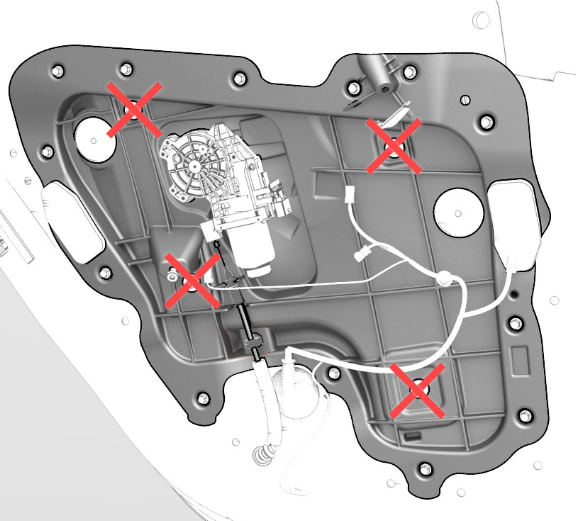
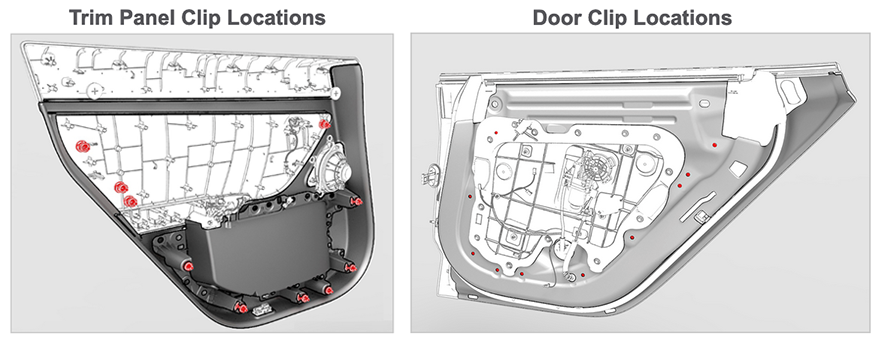
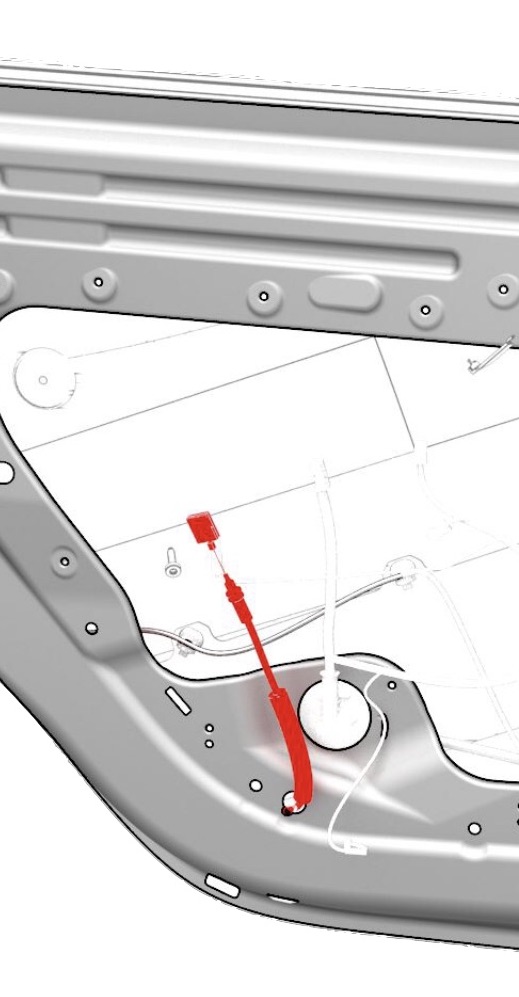
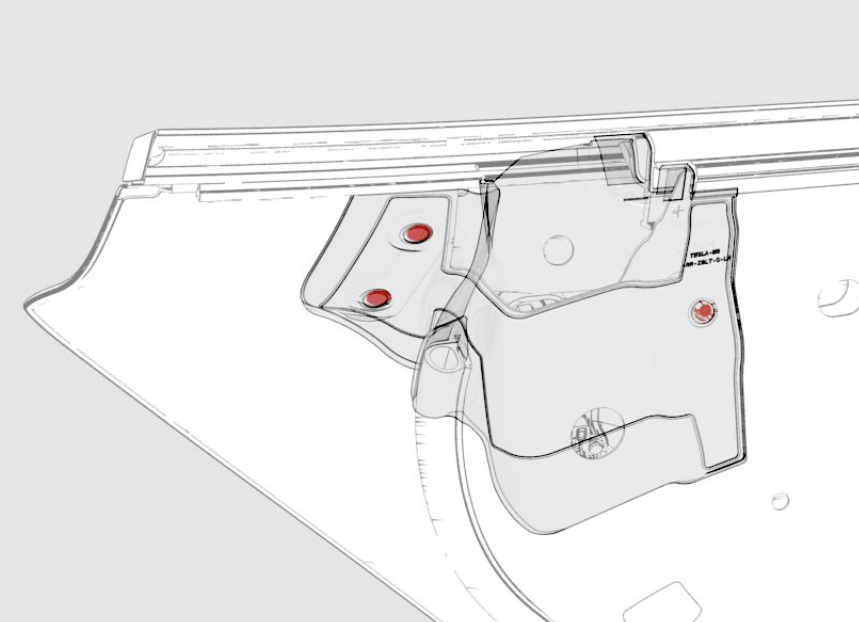
There are nine 8-mm hex screws (Torque 4 Nm) surrounding and holding the window/motor regulator assembly to the door frame. DO NOT remove those four 10-mm screws (those with cross signs in the drawing above). Releasing these screws will cause the sling and wheels inside to fall apart and you'll be so sorry. Once all surrounding 8-mm screws are removed, the entire assembly is now held in place by only 2 clips and it can be easily removed by pulling back the bottom part toward your body and then sliding down to get it out from the door frame.
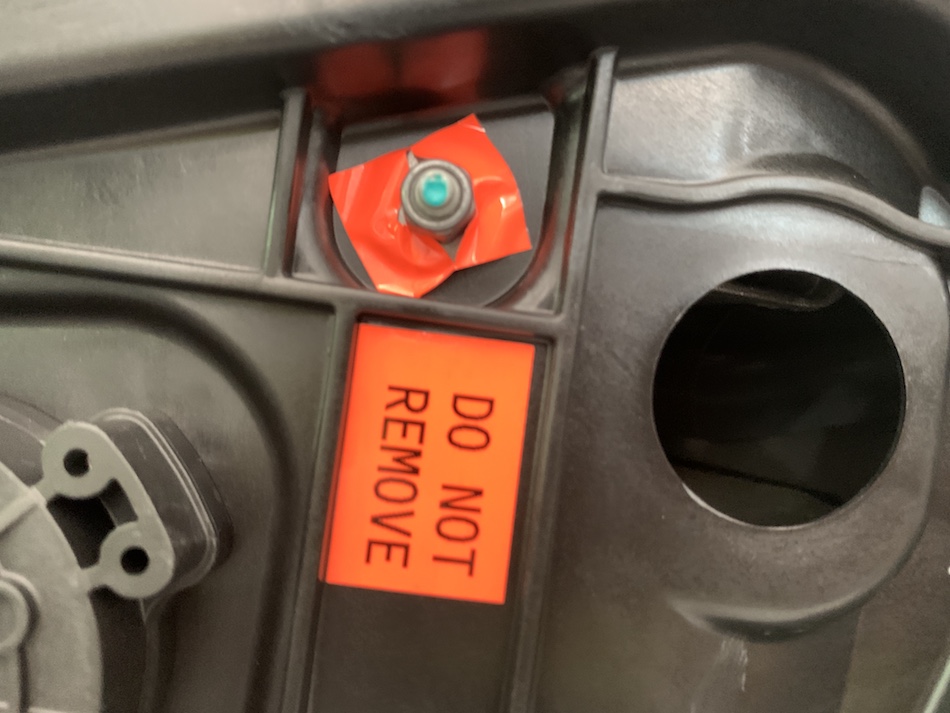 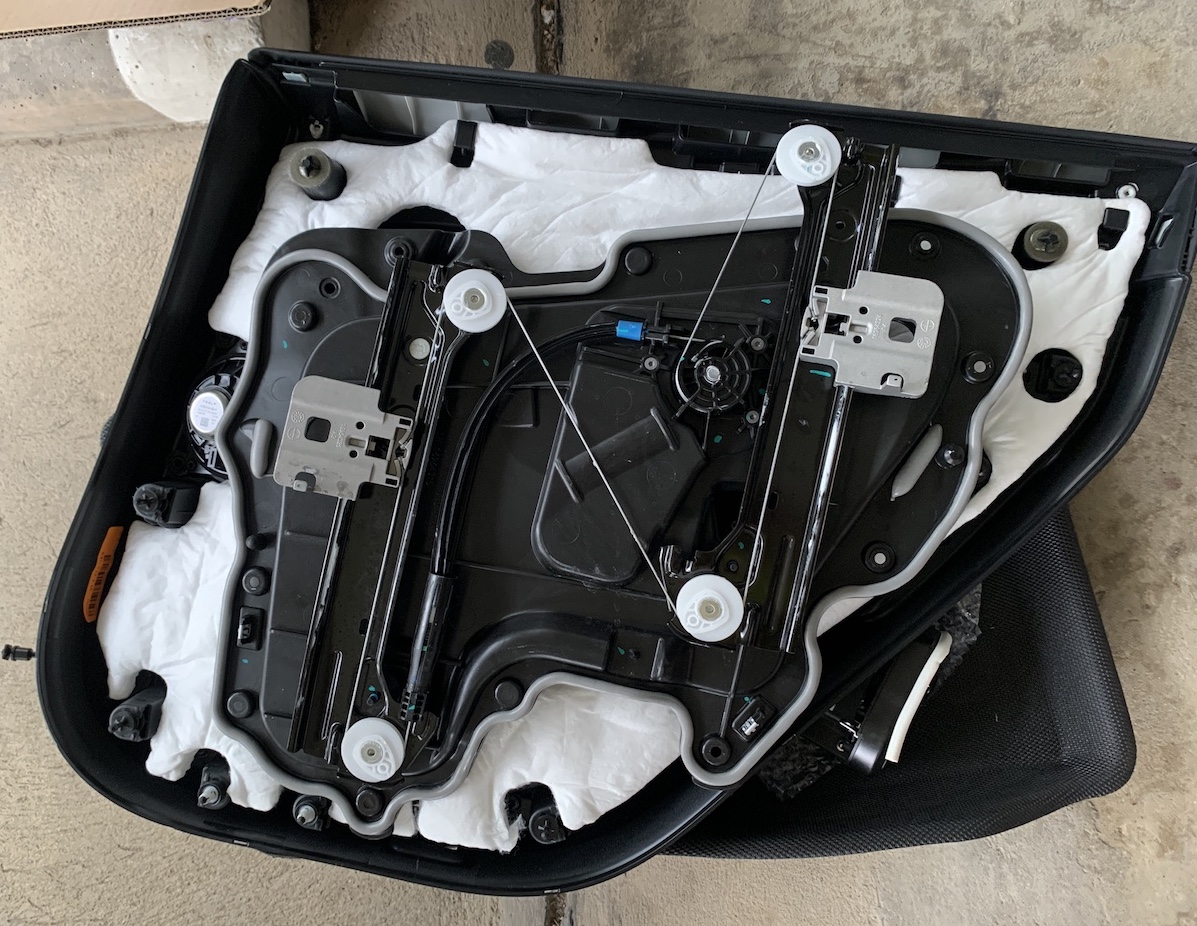
To prevent any Alzheimer's events in the future, I put up the signs on those forbidden screws. I wish Tesla should have made these proprietary screws. The right picture above showed the glass moving mechanism with slings and pulleys. I heard that model Y is using this type for both the front and rear door. That will make installation on model Y much easier.
After that window/motor assenbly piece is removed, the inside is quite empty and allows easy access to remove the OEM latch box and the door handle unit. You can now replace those 2 things with the Hansshow's units just like you did on the front door.
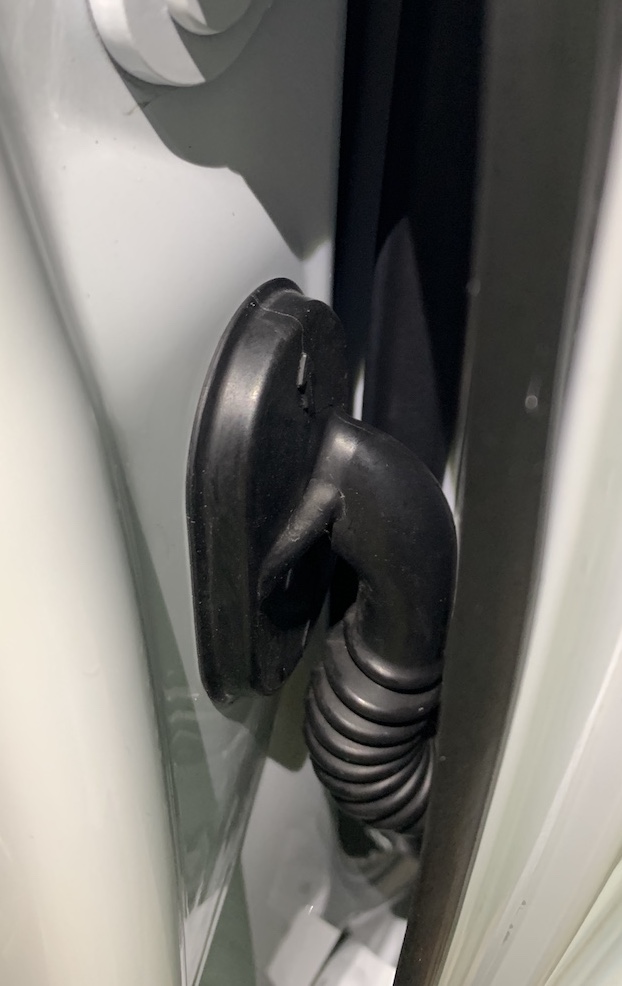  
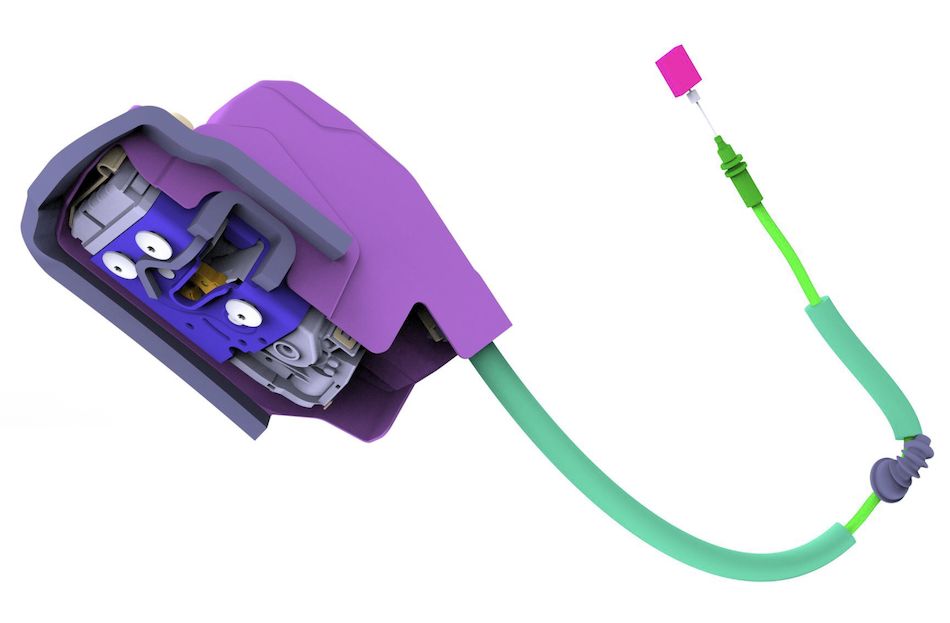
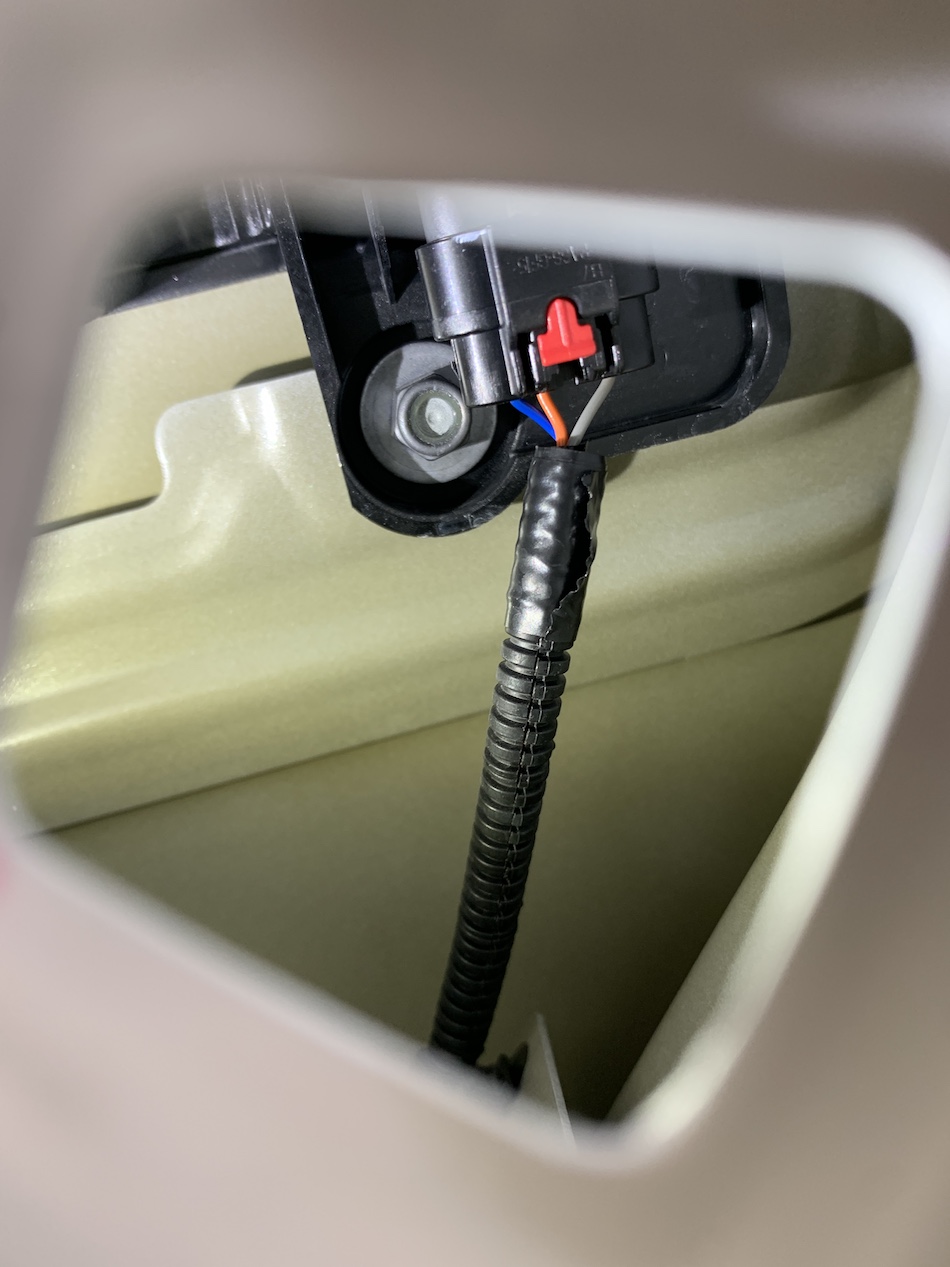
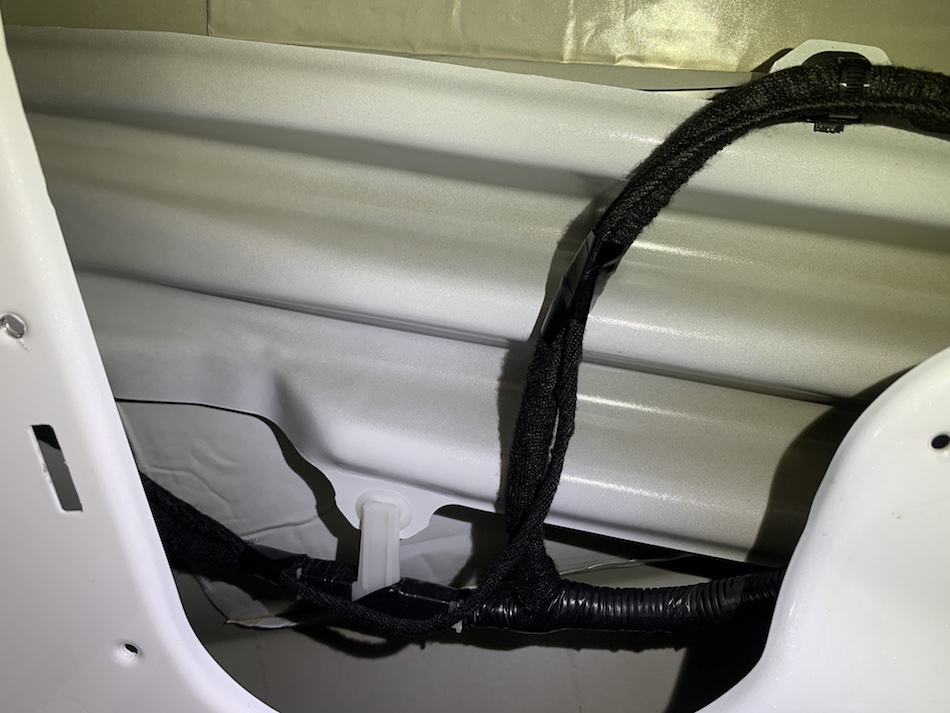
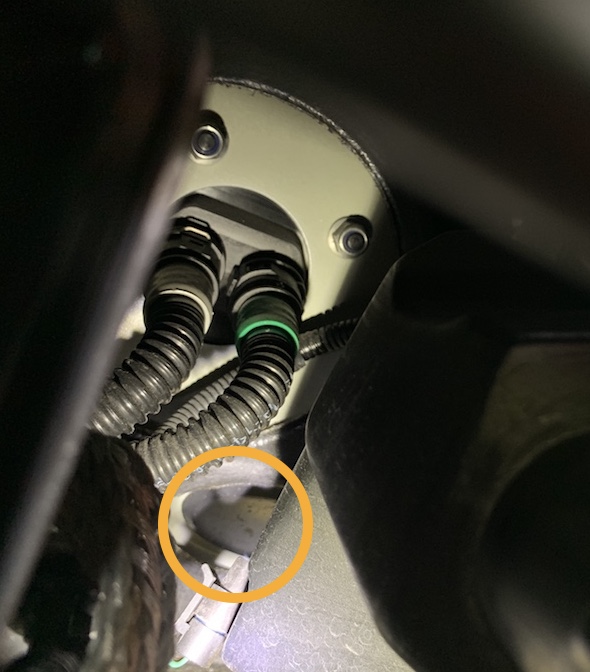
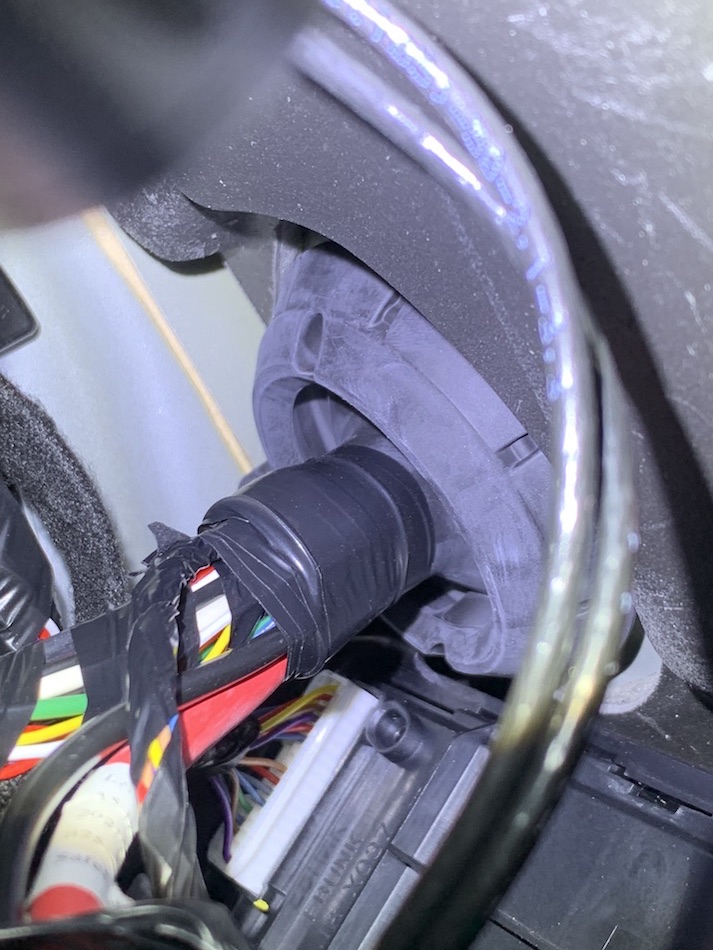
Threading electrical wires on the rear door is much more challenging. You need to fully open the door to work with the grommet on the door side and then partially close the door to work on the grommet on the B-Pillar. This side, there is a white plastic housing (see middle pic, above) which may be stuck on the car when you pull out the rubber grommet. You need to remove that plastic housing (use a flat screwdriver to push the small tang to free it). Marry that white plastic housing to the rubber grommet (like in the middle picture above) and now you can press the whole thing into the B-Pillar.
The cable for the door handle unit, again, needs to be tugged away from the glass up-down path. I route this along the existing wire using cable ties and Tesa tape.
Once both parts are installed, put everything back in reverse order, don't forget to place the round rubbers plugs for patch bolts back before installing the door trim panel. In general, the rear door is easier than the front door.
When you are done with all the doors, route all the wires from all doors to the control unit, tap the CAN bus, DC 12V supply and try testing the auto-present function before putting all the panel trim (A-Pillar, top and lower B-Pillar) back.
Where to get the 12V supply for the auto-present handle control unit?
Actually, I've been running mine with a small external 12V battery pack made from LFP (1P 4S) up until now. Hansshow recommends tapping directly from the car's 12V battery which is under the hood. I tried to ask Hansshow's technical guys about where to go from the cabin to the underhood area and they sent me the picture of the old models (see below). Moreover, my car is RHD, clearly that picture is from the LHD.
I, later, found 2 possible ways to put the wire through. There are 2 holes that Tesla uses to run the wires from cabin to the bonnet which are located at the top corner on both sides. Those holes have a giant rubber gasket and Tesla bundled up all the wires and wrapped the center piece of rubber gasket tightly. It will be hard to try to go along with those through the center of that rubber gasket. Going off-center will be much easier. In my car, accessing the left side is easier from the cabin. There is also another hole which is not used for anything, this hole is lower, right in the middle of the footwell, it's the same spot of where the steering wheel shaft go through on the driver side and I believe this is where the steering wheel shaft will go through if the car is the LHD model. This hole got a very very thick rubber seal and went straight to the underhood area which can be seen from the outside without having to remove the frunk storage basin. However, I am probably gonna go with one of the upper corner holes. I also came up with another way to go outside by using a flat copper sheet in shrink wrap and going around the door edge underneath the thick rubber cushion. Anyhow, there are too many options and I can't yet decide. I plan to open the hood and remove the underhood storage unit to take a look and make a decision, soon. I'll make an update once I've done that.
The left picture is what Hansshow's tech support sent me, he wants me to go there but I think his arrow's tip is off to the right, given that I can see the pink wires actually go through the rubber grommet. The drawing on the right reveals the opening with rubber grommet which Tesla uses for routing electrical harnesses into the cabin area. They have already wrapped everything so tight (see below), it'll be hard to go through or even go along the existing bundle. I you don't mind, just pierce through the periphery. I think the rubber can still form a seal around the wire.
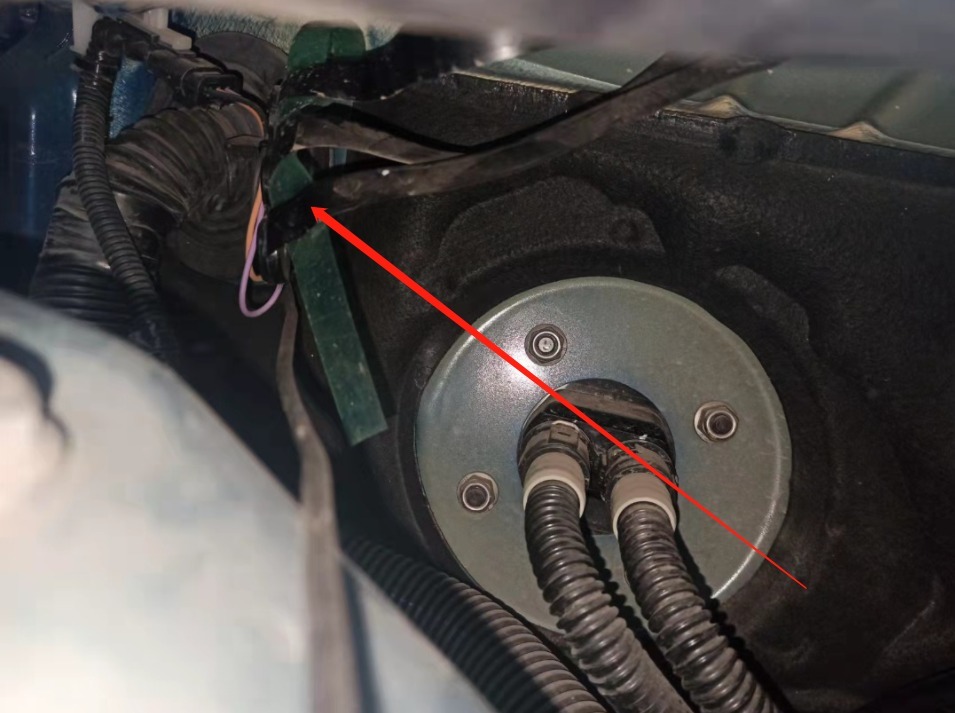
The round openings used by Tesla to pass all electrical harnesses are located at both top corners of the metal sheet between the underhood area and the cabin. But there are so many wires, including the big red one (on the right side) and there isn't much room to try to go in the center. Unless you puncture the rubber, off-center, it's possible. If you do not want to go through either of those. Look at the middle area of the passenger's footwell where the steering shaft is supposed to go (if this were a driver side). You will find another easy hole (picture below).
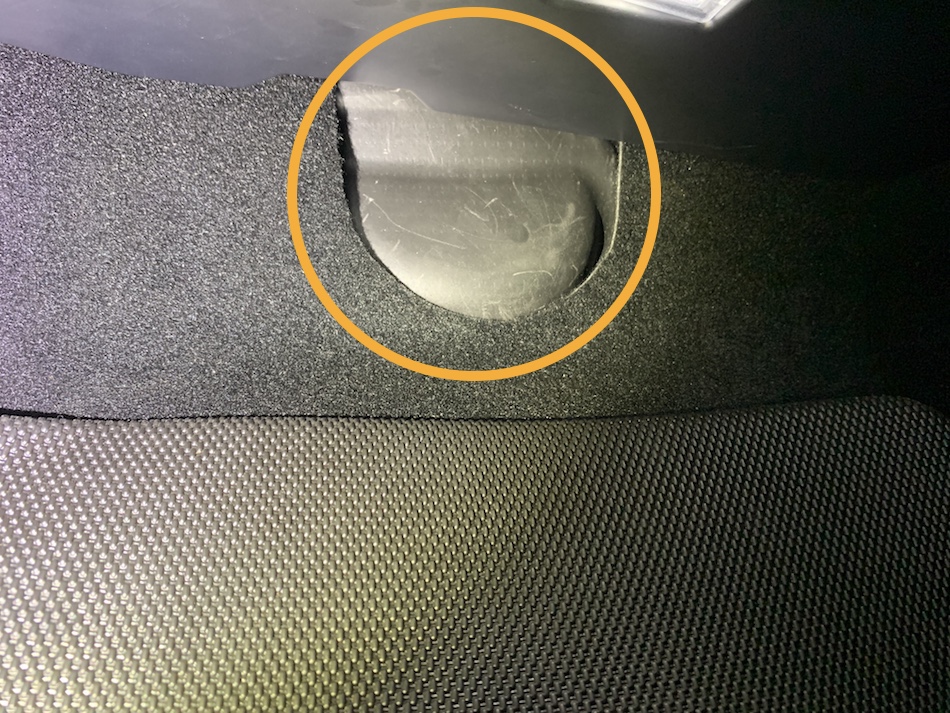 
This is by far the easiest access to go through, you don't even have to open any trim panel (although, the wire can be exposed, unless you tug it above or below, and it can only be seen when you look under the console). In my RHD, I can spot the thick rubber seal from the outside without removing the underhood storage basin. I believe this is where the steering shaft will go through if the steering wheel were on this side. However, I do not plan to use this one. The rubber pieces both outside and inside were so thick and somehow, I do not feel like making hole(s) in it. If you don't mind that and want to get the job done quickly - you can drill through here from the inside and work your way out.
  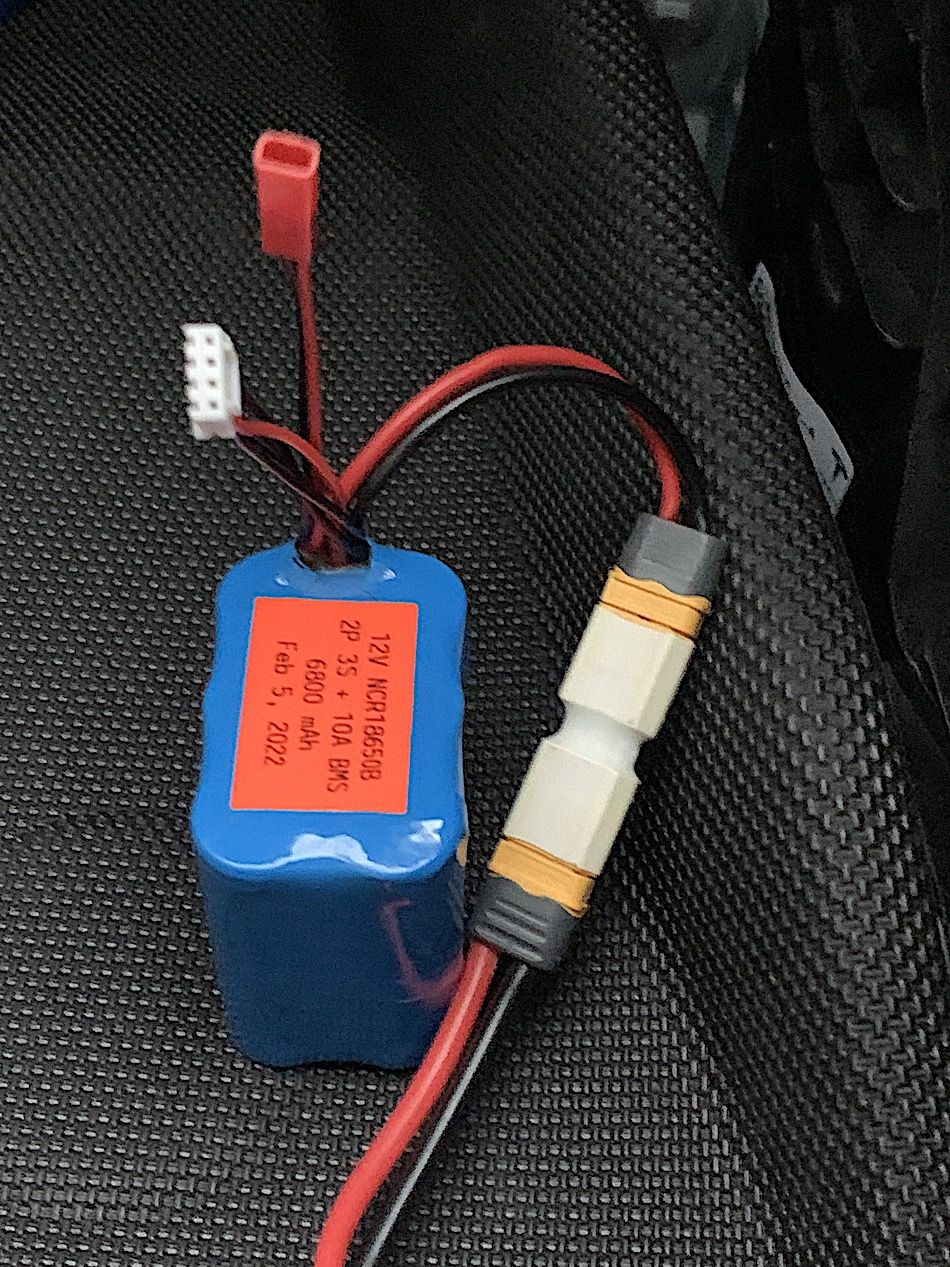
The left top corner hole is where I might go, in my RHD, this side is much less busy from the inside. I can reach my hand to make a hole in the rubber diaphragm and go through there. However, on the outside, the windshield washer fluid reservoir is totally blocking the view. I will have to make a decision again once I try removing the underhood storage unit to get a clear view from the outside. Afterall, I might choose to go with my 3rd plan which is using the flat copper sheet to go around the edge. Currently, I'm in no rush because I use my self-made 12V battery pack, the one you saw above is made of 18650 cells (2P 3S). This actually can last for months since the controller unit consumes as little as almost 0 amps while idle.
Another reason that I haven't executed the 12V tapping is I do not know the actual reason why won't Hansshow suggest using the switched 12V. I have watched so many videos showing how to tap the switched 12V wire on either side of the A-pillar. I'm pretty convinced that may lead to error messages popping up (especially if you draw a lot of current). I tried to locate the wires that lead to the 12V cigarette socket proximally with no success. It's likely that I'm gonna have to take apart the center console just to tap those 12V wires right behind the cigarette socket. That's the only place I'm convinced that the Tesla VC (Vehicle Control) front/VC right or VC left won't give out any error messages.
I am also uncertain about the functionality of the auto handle on switched 12V vs on the continuous 12V supply. Clearly when you supply the continuous 12V to the system, anyone can come to the door, press the handle tip to light up and the handle will swing out for fun. But if they don't have keys, the door won't open. Although, doing that will wake up the car but it's the same thing that happened to the OEM handle (when someone without key tries to open the door manually, the car wakes up but doesn't open). With switched 12V, the power will be cut off when the car sleeps and nobody can play around with that. When everything is powered again, the control unit will beep and work from then. I will try connecting to the switched 12V soon and learn from the using experience of this setup. I hope that frequent power up/down the unit won't lead to a premature death of the control unit.
So, I'll get back to you later on this issue.
Addendum (June 7, 2022)
I did try the switched 12V (tapped from the cigarette lighter socket). It works OK and it permits you to abstain from making holes or find a straight connection to the 12V battery. However, after a few weeks passed, I decided to use the continuous 12V power supply directly from the battery like Hansshow suggested. While using the switched 12V is OK but there is a small delay when you try to open the door by tapping the front end of the handle while the car is asleep. That's the only problem I experienced but it's enough for me to go for the continuous 12V or maybe I found the way to get it done. Like I have previously stated, I might poke the upper top left rubber grommet to pass the wire to the 12V battery. With all the equipments I had ready, on the day I was gonna do it, at the end, I decided not to. I couldn't make myself drill a hole or you can say that I was too pussy for this. I finally used my plan B - the flat copper sheet around the car's body and folded it underneath the rubber door seal. I made sure that this piece will not make contact with the car's body and the junction between the copper sheet and silicone wire is water tight. The installation is easy and uneventful. This has been in place and working for almost a couple weeks now and I wrote about this in another blog (click here), sorry, that was written in Thai but I think you can see the pictures and still get the idea. While I was doing this job, I noticed the hole inside the car that connects electrical harnesses (bunch of wires) to the door and this body's part, I wondered, can be used to pass another wire to the underhood area. To explore this channel, I will need an instrument from my work called "fiberoptic bronchoscope" which my boss would probably not allow me to borrow. So I ordered a flexible-tip borescope from aliexpress. It perhaps will take another month to arrive. I'll let you know if this channel is legit. If it's so, this will be the best way to go to the battery but you will need this flexible-tipped borescope to get it done, not that simple, after all.
Rework after installation
 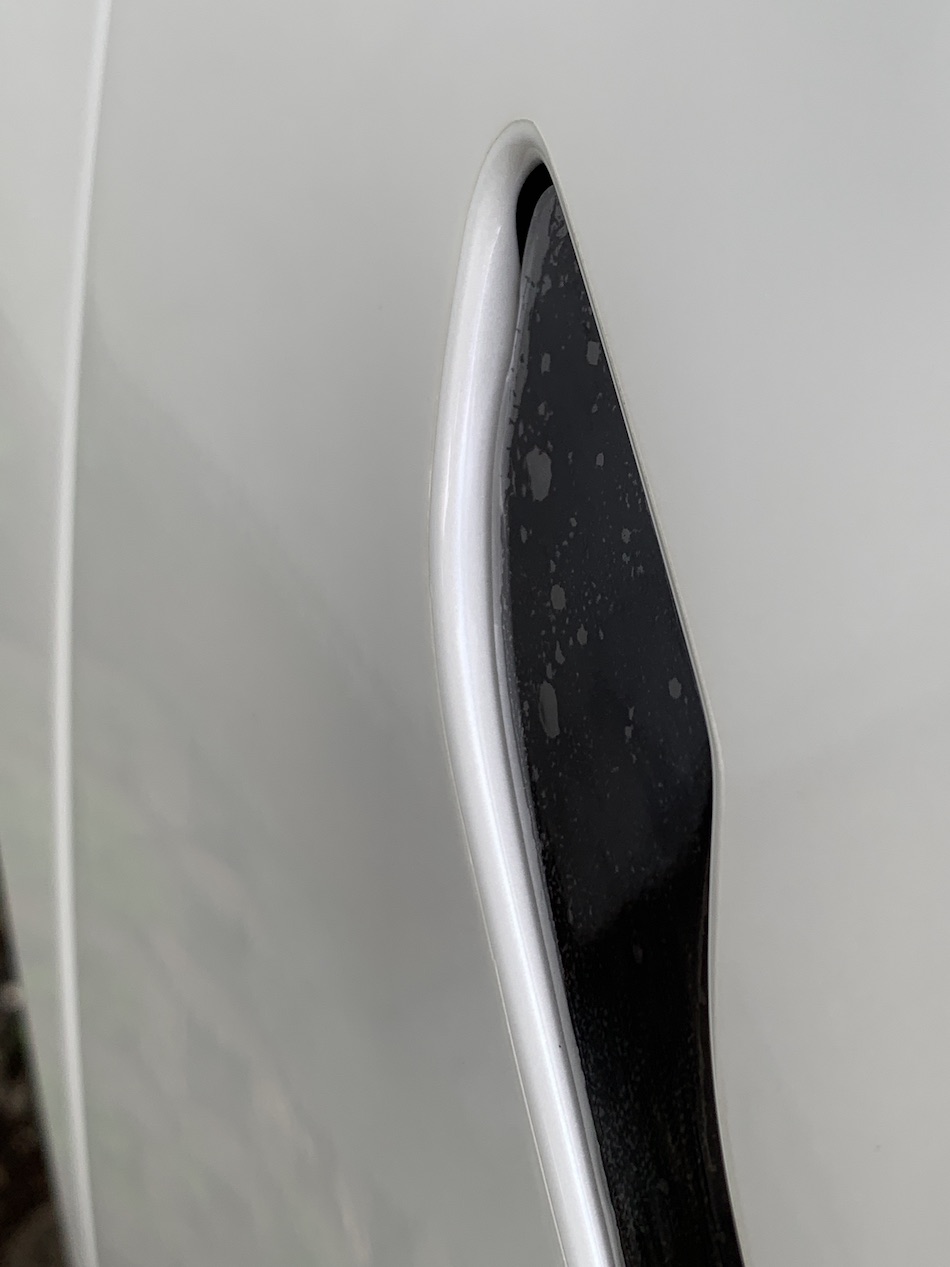 
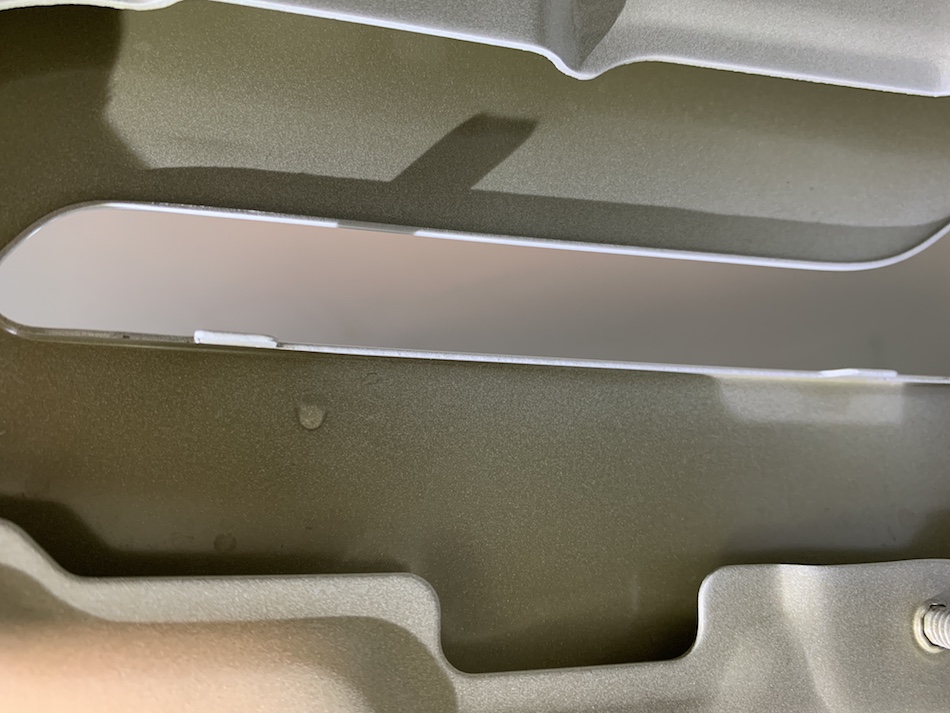
The left and the middle picture show the rear part of the handle on my right rear door appears visibly recessed/sunken by a few millimeters, compared to the front door, which is nice and flush evenly.
I finished my installation on Saturday's PM (one door on Friday's PM, 3 doors - all day on Saturday). Everything is working nicely until later, I noticed that the back part of my right rear door handle is sunken. This wasn't there with the OEM handle. I explored the OEM handle unit which is now outside and I noticed that the the rear part of the handle on this door is slightly protruding and somehow, this protrusion made it look nice and flushed when installed.(see below picture)
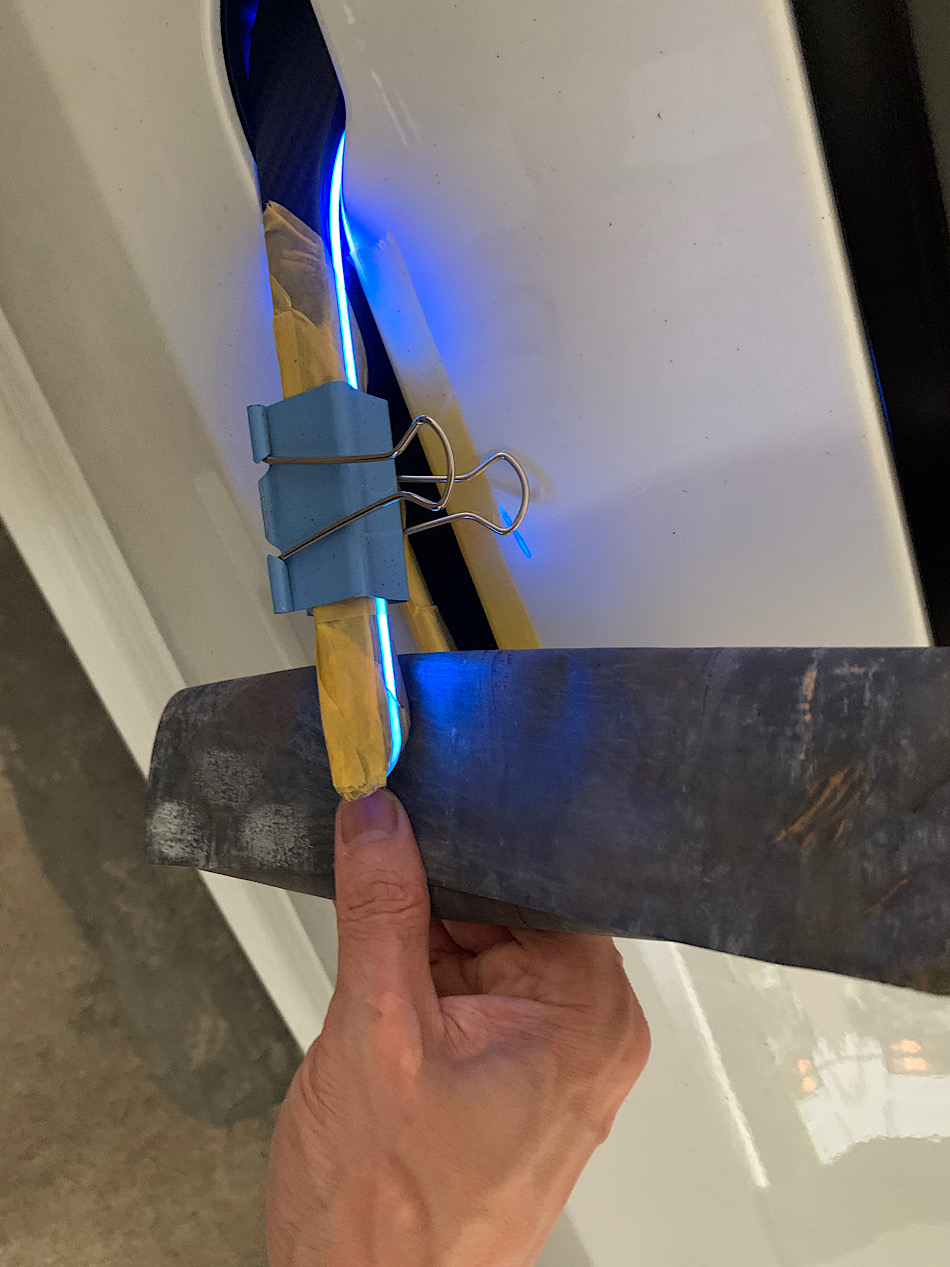
There is no way to adjust how far the handle should be sticking out or recessing within the unit. In the Tesla manual, they mention how to adjust the door handle unit installation by using shims - no more than 2 shims per screws but adding shims will just make it appear even more recessed. I ended up redoing the entire installation on the right rear door for the door handle unit. I learnt that the frame cut out is double-layer. The outer metal is the door that you normally see from the outside and it is aluminium. but there is also another metal housing inside where the 3 screws stand -this part is more rigid, perhaps steel. This is why I said that you do not want to over tighten the nuts (Tesla asks for 10 N-m). The more and more you tighten the nut, the distance between these 2 layers will be far apart and the handle will appear sunken. After several hours of trying to adjust this, I ended up using the F-clamp to squeeze the gap between these 2 metal layers of the door handle frame. Too bad that I was such a coward and too afraid of overdoing it. We ended up making peace with an improved appearance of our handle now which is still, well if you have keen eyes, a bit sunken. The next remedy is putting a carbon fiber cover on it and using double sticky tapes on this sunken part to make it appear more flush.
 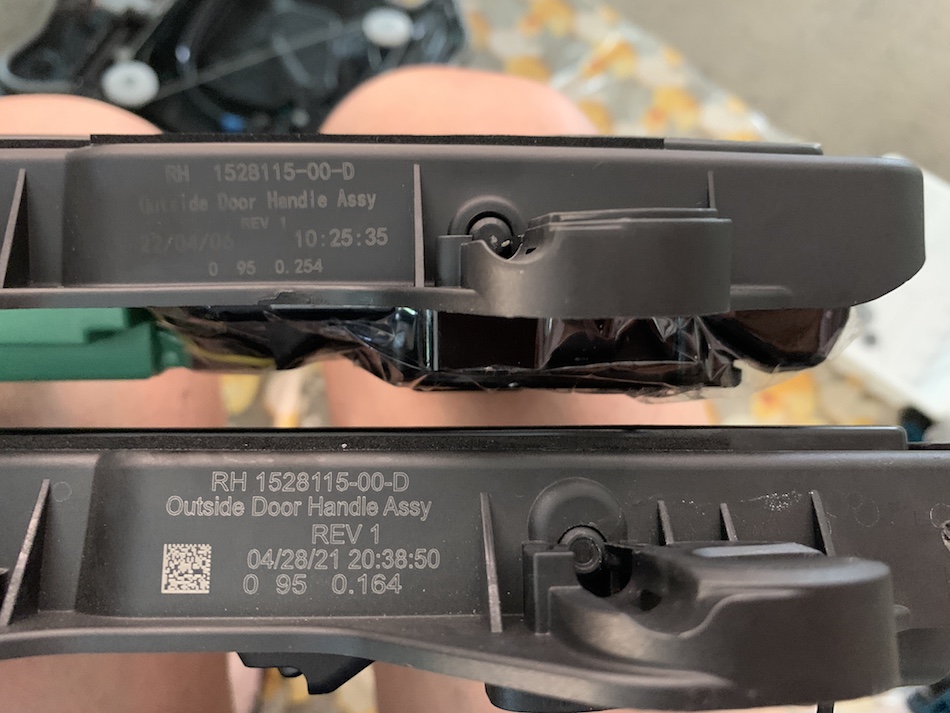
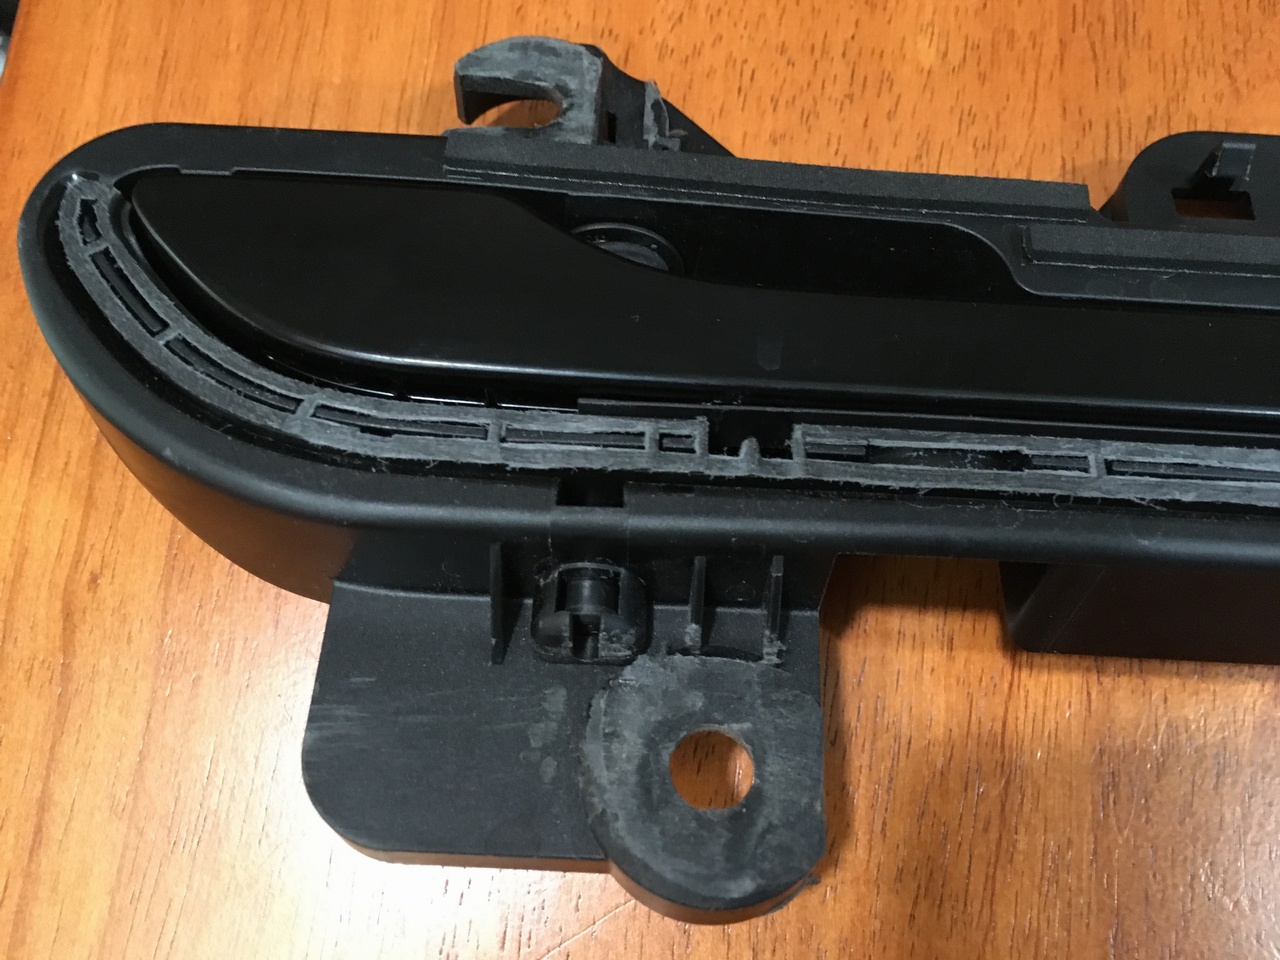
The left picture is to demonstrate the double metal layers housing for the door handle unit, the inner layer is stiffer with screw stems (3 of them) the outer shell is the aluminum door surface that we saw on the outside. I spent almost another day (Sunday) trying to fix this issue, I have to tear down the door again. Once I removed the sunken Hansshow's unit, I compared it side by side to the OEM one that was on this door (right picture above). I notice that the OEM unit's handle is sticking out 2-3 mm. This has somehow compensated well and everything appeared flush and flat before the Hansshow's installed. I also tore down the OEM unit to see where to adjust the protrusion of the handle and there is no such mechanism. At this point, I concluded that there is nothing wrong with the Hansshow's door handle unit but something is wrong with my Tesla's rear door double-layered metal frame housing for the door handle unit. The gap between these 2 layers is too wide.
The left picture is how I (partially) remedy my problem. My Tesla has paint protection film but I still use the folded cardboard beneath the wood and try to narrow the gap between the 2 metal pieces. On the right picture, I borrowed from Gauss Guzzler, a member of the teslamotorsclub.com forum in which he shared how he fixes his problem. He stated that when he disassembled the door, the screw areas of the unit had already been sanded down - somebody at Tesla did it. He just used his Dremel to sand down way more and put it back. So both of these methods should work. Mine will be more straight to the problem, just have to be very careful. So this is the quality issue and it seems to be more common with the rear door. Hope you have some space in your heart to forgive Tesla, they are not quite like the German automakers - or even the Japanese car makers in this regard, panel gaps issues.
June 13, 2022 update
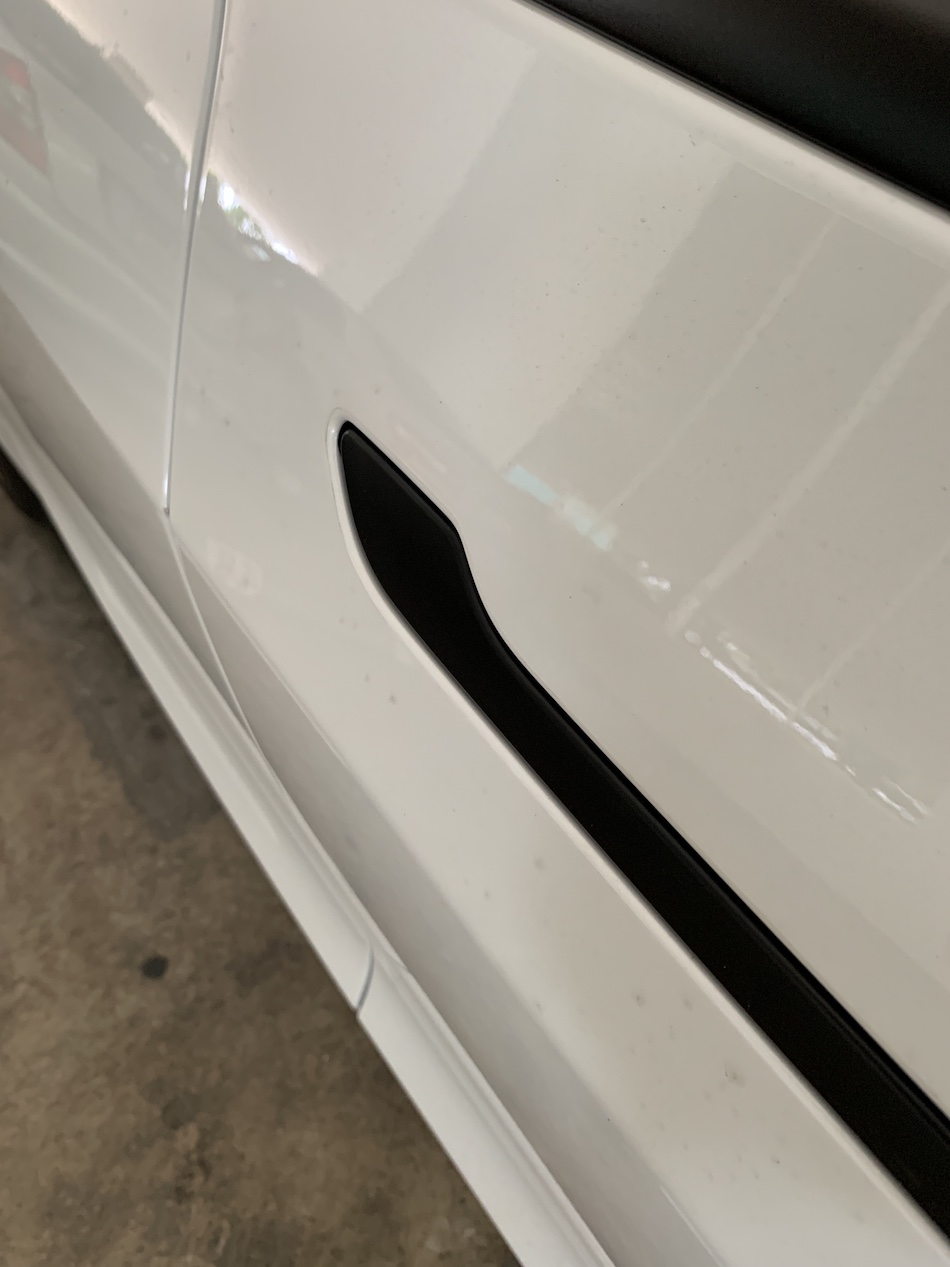
I think I have finally completely resoved this sunken handle issue. I was gonna rip that right rear door apart and clamp those 2 shells down again but I noticed that the front part of the handle is sticking out. Actually all 4 Hansshow's unit are like that but the one on my right rear door is more prominent. Underneath that is the rubber push button. So I imagined that I I sand down the back part of the front end of the handle - it will get both problem fixed because the handle is like a seesaw board - if I can make the front end sunken in, the rear end will sticking out more and make it even. So I start sanding down from an 80-grit and gradually fine it up to 1000 grit sand paper. It's smooth and feel nice and it's in the back and kept inside the handle unit - nobody will really see that. And also, I bought a real carbon fiber piece to stick on the handle. So now all my 4 door handle appeared plush and even.
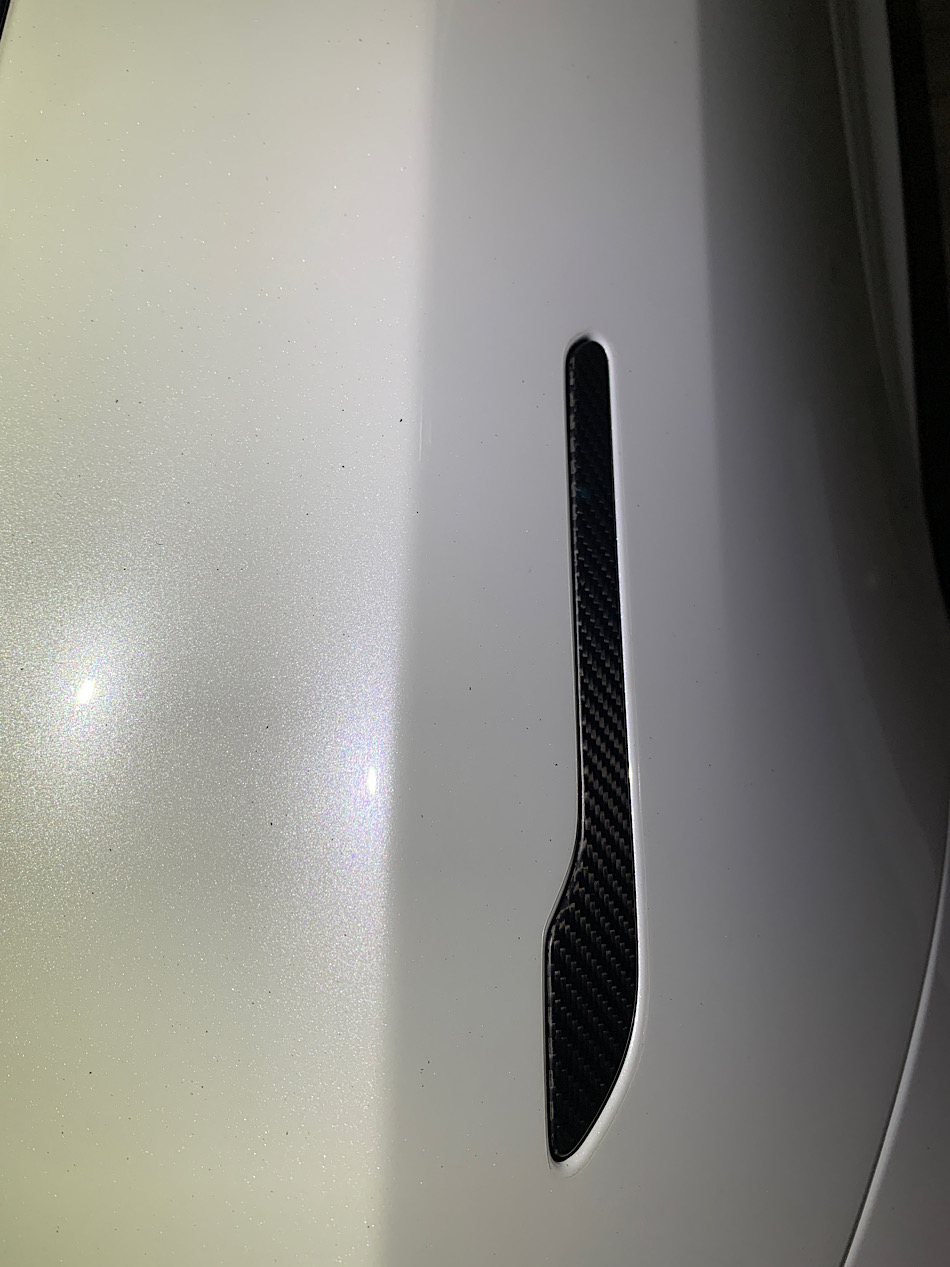 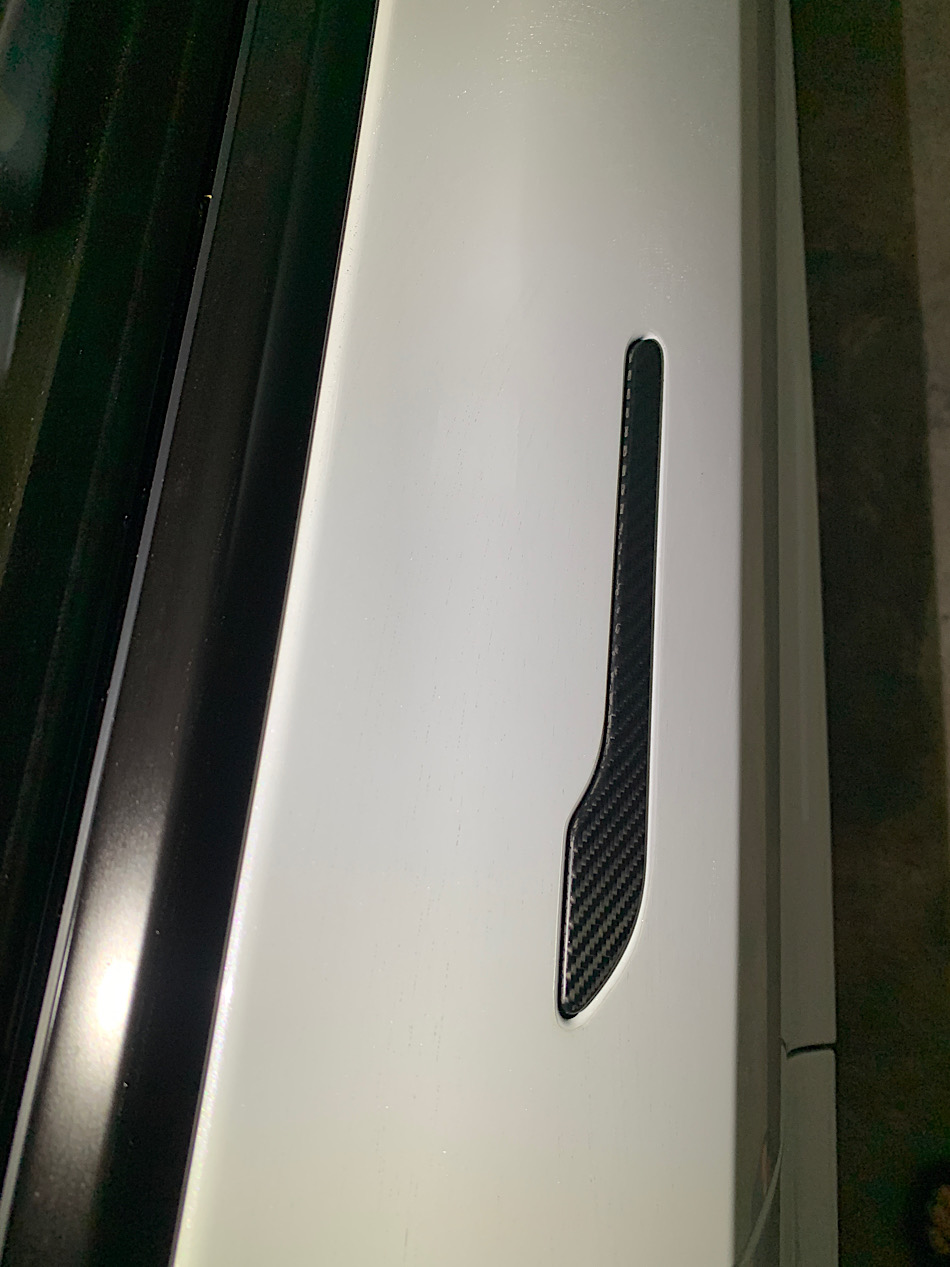 
The left picture is the right rear door which was the culprit and now it looks nice (look closely, you can still see the back part is perhaps 0.2-0.3 mm sunken -negligible for me). The middle picture is the right front door, this one is more perfect, nice plush and even. The front part of the handle of all 4 doors were sanded down, I didn't notice the protrusion of the front part of the handle of each door until the carbon fiber covers were placed on.
User experiences after installation
The soft close works nicely, it's primarily why this whole thing started. I love it when my driver and any guest passenger doesn't have to slam the door. In fact, it seems like the front door is now easier to close than before. It's funny that now we are trying to close the door ajar to see the soft close in action every time. A little too much of a push, the door just closes without the soft close function. Could it be that this Hansshow's soft door latch is better than the OEM? I doubted it. The rear door is, somehow, never changed, always hard to close. This is the combination of a lesser momentum caused by smaller door size and also the fact that my white seat cover just rubs against the door when closed, making it harder for the latch to catch the striker. Now the soft close door will take care of it. I guess this soft close kit is worth every penny and also worth all the efforts to install, too.
On the other hand, the auto-present door handle is just... like I said before - a gimmick. It feels majestic when you walk to the car and the door handle is lit and opens up for you. This only happens if the car is still awake and senses your (key) presence. If you walk to the sleeping car, nothing happens. Sadly, my morning routine involves me pulling out the charging connector before opening the door. So by the time I finish unplugging and stowing my charging connector on the wall, the handle has already closed (it stays lit and opened for like... maybe 15-20 seconds). I might have to change my routine by opening up the door and putting my stuff in the back seat first and then pulling out the charging connector later.
Also, when my driver comes to pick me up. The door handle never illuminates and opens up to me. When the car is in drive mode, the door won't open even if I have a key (phone) unless somebody inside presses the unlock icon or the parking button on the steering stalk. My driver confirmed that this behavior is unchanged from previously. Meaning that even if I have a key (phone) with me, when he drives to pick me up, he always has to press that unlock icon to allow me to open the door (manually) every time. He usually never presses park because it just a short stop before he pulls away again. Now we have tried many ways to make the door handle open, It turns out that once the car stops still, you just have to hit that park button twice, then the door handle will light and open up and I'll be feeling wonderful again.
The door handle will also light and open up if you approach the car with a keyfob (while the car is awake), press unlock from the app or the keyfob and also when you tap the keycard on the B-pillar. But those are not my usual routines, which means that the only time I will witness this magic is in the morning. I have to beg my driver to hit the park twice when he comes to pick me up. Well, he hasn't adopted that habit just yet. The other thing is that I can press the front part of the handle to make it open up, too. Is this easier than the previous manual open?, a little bit, not by much. I guess I still haven't gotten used to this way. The only time I can see its benefit is when I carry too many things and my whole hand isn't available to do the seesaw board opening, now I can use only my pinky to press the front part of the handle and also use my pinky to pull the handle to open the door. Of course, you still can always use this door handle manually like the same way before but doing that, it feels kinda waste of money and time to install this $469 kit. So I dont' think it's worth the time and money to get just the auto-present handle alone, either you get the soft close alone or get both is OK.
So, I wasn't very impressed with the auto-present door handle. If it's not because I have to install the soft close. I don't probably care enough to get this. Plus, it's much harder to install with all those wirings and it also costs nearly twice as much.
Regarding Hansshow vs the others
I noticed that there are other sellers for Tesla aftermarket accessories and also those on aliexpress. From watching videos and my own 1+ year experience into this. I learned that these people making aftermarket accessories don't always get it right from the beginning. So if you see something interesting, try to wait it out until the product matures. You can see that they always come up with newer and better versions. Some of those accessories for the same job may not be exactly the same, like the soft close, I have seen some makers using the exterior motor with a sling which makes installation much harder. It could be discouraging when you see the youtuber who shared his bad experience on the obsolete version of the auto-present handle and never revisit the issues (or did so with another brand). The same guy also posted the video of how he broke his center screen connector while installing the swivel fittings and that is the reason I still don't have enough courage to get one since I'm afraid I might have that, too. When watching youtube videos, you always have to look at how old the product version they are based on and which brand is it. Keep in mind that the information of those youtube videos (including this blog) is not peer reviewed, not audited. They (including me) can be saying and spreading inaccurate information. So use your own judgements. Some of them might be biased because they get incentives from posting the videos.
The Hansshow's technical guys need to learn English if they want to go international. I find them pretty useless when asking questions. But at least the sales person on Facebook messenger is attentive and helpful. Without her assistance, the technical guys will only ask you for videos of your problem and never provide any useful helps. Well, some problems don't come in the video!
There are some differences between buying from retailers with their own platforms and the sellers on Aliexpress. There are lots of fakes and poor quality stuff selling on aliexpress and aliexpress almost always sides with sellers when problems arose (at least, to my experience). Of course, many things on Aliexpress are cheap but you have to be careful. I can't tell you whether these items are from the same factory especially, when they look so alike (on the web) and carrying the same specifications. Not until you can inspect them side by side carefully. For something that involves the car's CAN bus system or is extremely challenging to install. I am willing to pay extra money to some trusty brand and to get it done once and for all. Your Tesla is not that cheap.
Have I bought from the other retailers like evoffer, evannex, teslarati, rpmtesla, etc?? Not yet, just small accessories but not the big ones. I live in Thailand and those stores are mostly in the U.S. If I were to buy something, I would be slapped with the freight and custom and that could bring up my cost almost another 40-50%. I found that Hansshow always shipped FEDEX, already included in the price they asked. You can get 15% off from many discount codes. They might take more than a few days to ship but once they shipped, from Guangzhou, China to Bangkok, Thailand, it only take 1 or 2 days. Moreover, they have always under-declared the good's value and that have saved me a lot on custom duties.
In conclusion, I think you will love the soft close kit if you are reading this (means that you're interested). I think it's quite a mature product. It's been around, not just for Tesla but for other cars as well. You may find a local installer to help or you pluck up your courage and do it yourself. If you have done it successfully, you'll be very proud and love your Tesla even more. For the auto-present door handle, it's up to you. It's nice to have but might not really be worth the cost or the increased hassles for installation. For me, I just have to go all the way and I know I can do it (after a lot of research), that's all. In the end , this blog serves to remind myself -like a personal memoir or a journal and I hope it also helps you guys install yours, too.
| Create Date : 12 พฤษภาคม 2565 |
|
0 comments |
| Last Update : 13 มิถุนายน 2565 19:12:37 น. |
| Counter : 2291 Pageviews. |
|
 |
|