|
Moko the cat
ก่อนอื่นบอกที่มาก่อนนะคะ
//baghisblog.blogspot.com/2010/08/free-amigurumi-pattern-moko-cat.html

Materials:
3mm hook
3mm yarn orange/white
8mm safety eyes
MUCH LOVE
Mokos head:
Bring the orange yarn and start with a magic ring.
Rd1 work 7 sc into a centre of the ring.
Rd2 [2 sc in each st around]
Rd3 [sc in next 1st, work 2 sc in the next st] repeat 7 times
Rd4 [sc in next 2st, work 2 sc in the next st] repeat 7 times
Rd5 [sc in next 3st, work 2 sc in the next st] repeat 7 times
Rd6 [sc in next 4st, work 2 sc in the next st] repeat 7 times
Rd7 [sc in next 5st, work 2 sc in the next st] repeat 7 times
Rd8-12 work around
Stuff!!
Change colour in white
Rd13 work around
Rd14 [sc in next 5st, dec 1 in the next st] repeat 7 times
Rd15 [sc in next 4st, dec 1 in the next st] repeat 7 times
Rd16 [sc in next 3st, dec 1 in the next st] repeat 7 times
Rd17 work around
Rd18 [sc in next 2st, dec 1 in the next st] repeat 7 times
Stuff , put in position the safety eyes and close the security.
Rd19 [sc in next st, dec 1 in the next st] repeat 7 times
Rd20 [dec 1 in each st round]
Mokos chest
Bring the orange yarn and start with a magic ring.
Rd1 work 6 sc into a centre of the ring.
Rd2 [2 sc in each st around]
Rd3 [sc in next 1st, work 2 sc in the next st] repeat 6 times
Rd4 [sc in next 2st, work 2 sc in the next st] repeat 6 times
Rd5 [sc in next 3st, work 2 sc in the next st] repeat 6 times
Rd 6-12 work around
Rd13 [sc in next 3st, dec 1 in the next st] repeat 6 times
Rd14 work around
Rd15 [sc in next 2st, dec 1 in the next st] repeat 6 times
Rd16-17-18 work around
Rd19 [sc in next st, dec 1 in the next st] repeat 6 times
Rd20work around
Stuff!!
Rd21 [dec 1 in each st round]
Mokos arms:
With orange yarn start with a magic ring.
Rd1 work 5sc into a centre of the ring.
Rd2 [2 sc in each st round]
Rd3 [1sc in next st, work 2 sc in the next st] repeat 5 times
Rd4 work around
Rd5 dec1 and work around
Rd6 dec1 and work around
Rd7 dec1 and work around
Rd8 dec1 and work around
Rd9 dec1 and work around
Rd10-13 work around
Rd14 dec1 and work around
Rd15-20 work around
Finish with a slst and cut with a long tail.
Stuff !!!
Repeat all 2 times.
Mokos tail:
With white yarn start with a magic ring.
Rd1 work 5 sc into a centre of the ring.
Rd2 [2sc in each st round]
Rd3-4 work around
Change in orange
Rd5-20 work around
Mokos legs:
With orange yarn start with a magic ring.
Rd1 work 6 sc into a centre of the ring.
Rd2 [2 sc in each st round]
Rd3 [1sc in next st, work 2 sc in the next st] repeat 6 times
Rd4 work around
Rd5 dec1 and work around
Rd6 dec1 and work around
Rd7 dec1 and work around
Rd8 dec1 and work around
Rd9 dec1 and work around
Rd10-13 work around
Rd14 dec1 and work around
Rd15-20 work around
Finish with a slst and cut with a long tail.
Stuff !!!
Repeat all 2 times.
Mokos muzzle:
Bring the white yarn and start with a magic ring.
Rd1 work 6 sc into a centre of the ring.
Rd2 [2 sc in each st round]
Rd3 [1sc in next st, work 2 sc in the next st] repeat 6 times
Rd4 work around
Mokos ears:
In orange yarn start whit a mgic ring.
Rd1 work 6 sc into a centre of the ring.
Rd2 work around
Rd3 [2 sc in each st round]
Rd4 work around
Repeat all 2 times
Assembly:
Sew the arms and the head to the body using the long tail.
Sew the ears and the muzzle to head using the long tail.
Sew the legs to the body using the long tail.
Embrodery the nose.
FINITO!!!!
Pattern and tutorial only for NON COMMERCIAL USE.
Sale or non authorized commercial distribution in any form is prohibited.
Please link this blog if you post your finished cat ^__^
Under Creative Commons License: Attribution Non-Commercial No Derivatives
| Create Date : 20 ตุลาคม 2553 | | |
| Last Update : 20 ตุลาคม 2553 17:16:01 น. |
| Counter : 1460 Pageviews. |
| |
|
 |
|
|
|
Watermelon slice
เก็บมาจาก web เมืองนอกตามเคย จะได้หาง่ายๆเผื่อวันไหนอยากทำ ^^
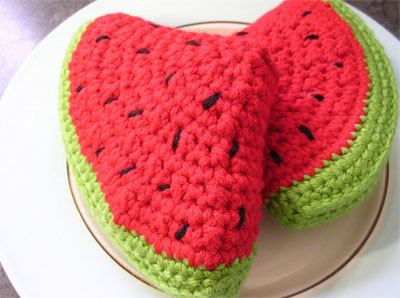
Amigurumi Watermelon Slice
Created by Kay Farquharson
Materials:
3.5 mm (E) crochet hook
Green worsted weight yarn (I used Red Heart Soft Touch)
Red worsted weight yarn (I used Bernat Berella "4" Afghan Yarn - Geranium)
Black worsted weight yarn (about 1 m long) (I used Red Heart worsted)
Batting
Darning Needle
Note: This pattern is completed in joined rounds
Foundation Row: Using green yarn ch 31. Turn.
Row 1: sc in 2nd st from hook, sc in next 29 st. Turn. (30 st)
Row 2: ch 1. sc in next 29 st. Turn. (30 st)
Row 3: repeat row 2.
Round 4:
ch 3 (as 1 bpdc), bpdc in next 29 st. dc in same space as last bpdc. dc in each row end (3 st). bpdc in same space as last dc. bpdc in next 9 st. dc in same space as last bpdc. dc in each row end (3 st). Join round with sl st into 3rd ch sp at beginning of round. (66 st)
Round 5:
ch 1. sc in next 65 st. Join round with sl st in ch 1 sp. (66 st)
Round 6:
Using red yarn, repeat Round 5. (66 st)
Round 7:
ch 1. sc in next 3 st. (invdec, sc in next 2 st) 3 times, 1 sc in next st, (sc in next 2 st, invdec) 4 times, sc in next st, (sc in next 2 st, invdec) 3 times. Join with sl st into ch 1 sp. (52 st)
Round 8:
ch 1. sc in next 51 st. Join with sl st into ch 1 sp. (52 st)
Round 9:
ch 1. sc in next 3 st. (invdec, sc in next st) 4 times, sc in next st, (sc in next st, invdec) 3 times, sc in next 4 st, (invdec, scin next st) 4 times, sc in next st, (sc in next st, invdec) 3 times. Join with sl st into ch 1 sp. (38 st)
Round 10:
ch 1. sc in next 37 st. Join with sl st into ch 1 sp. (38 st)
Round 11:
ch 1. sc in next 3 st. (invdec, sc in next st) 3 times, (sc in next st, invdec) 2 times, sc in next 4 st, (invdec, sc in next st) 3 times, (sc in next st, invdec) 2 times. Join with sl st into ch 1 sp. (28 st)
Round 12:
ch 1, sc in next 27 st. Join with sl st into ch 1 sp. (28 st)
Round 13:
ch 1, sc in next 3 st. (invdec, sc in next st), sc in next st, (sc in next st, invdec) 2 times, sc in next 4 st, (invdec, sc in next st), sc in next st, (sc in next st, invdec) 2 times. Join with sl st into ch 1 sp. (26 st)
Round 14:
ch 1, sc in next 25 st. Join with sl st into ch 1 sp. (26 st)
Round 15:
ch 1, sc into next 3 st. invdec 3 times, sc in next 4 st, invdec 2 times, sc in next st, invdec 1 time. Join with sl st into ch 1 sp. (16 st)
Seeds:
Using black yarn and darning needle, stitch in seeds.
Round 16:
ch 1, sc in next 3 st. invdec 2 times, sc in next 4 st, invdec 2 times. Join with sl st into ch 1 sp. (12 st)
Round 17:
Ch 1. sc in next 3 st. invdec, sc in next 4 st, invdec. Join with sl st into ch 1 sp. (10 st)
Tie off and cut yarn, leaving a tail about 30 cm.
Stuff slice.
With darning needle, use tail of red yarn to close opening across top of slice.
| Create Date : 24 กันยายน 2553 | | |
| Last Update : 24 กันยายน 2553 17:08:19 น. |
| Counter : 858 Pageviews. |
| |
|
| |
|
|
|
P-chan plushie
ไปเจอมาจาก web เมืองนอกเห็นว่าน่ารักดี แต่กลัวว่าจะลืม เลยเอามาเก็บไว้ในบล็อกดีกว่า หาง่ายสบายใจ
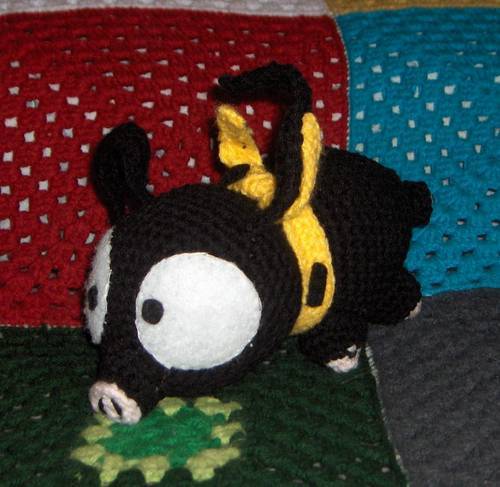
แต่โค้ดเป็นภาษาอังกฤษ ต้องไปงมกันเอาเอง อุอุ
HEAD: (in black yarn)
Rnd 1: 6 SC in magic ring (6)
Rnd 2: 2 SC in each st around (12)
Rnd 3: *sc 1, 2 sc in next st, repeat * (18)
Rnd 4: *sc 2, 2 sc in next st, repeat * (24)
Rnd 5: *sc 3, 2 sc in next st, repeat * (30)
Rnd 6: *sc 4, 2 sc in next st, repeat * (36)
Rnd 7: *sc 5, 2 sc in next st, repeat * (42)
Rnd 8 - 14: sc around (42)
Rnd 15: *sc 5, 2 dec in next st, repeat * (36)
Rnd 16: *sc 4, 2 dec in next st, repeat * (30)
Rnd 17: *sc 3, 2 dec in next st, repeat * (24) (stuff)
Rnd 18: *sc 2, 2 dec in next st, repeat * (18)
Rnd 19: *sc , 2 dec in next st, repeat * (12)
Rnd 20: *2 dec in next st, repeat * (6)
Finish off leaving thread for attaching head to body
SNOUT
In black yarn:
Rnd 1: 6 sc into magic ring (6)
Rnd 2: 2 sc in each st (12)
Rnd 3: Slit stitch around (12)
Rnd 4: CH 1, reverse your work and crochet through the front loop of the sc of row 2 (12)
Rnd 5: working normally: *sc, 2 sc in next st (18)
Finish off, leaving yarn
In pink:
Rnd 1: 6 sc into magic ring (6)
Rnd 2: 2 sc in each st (12)
Finish off, leaving yarn.
BODY: in black yarn
Rnd 1: 6 SC in magic ring (6)
Rnd 2: 2 SC in each st around (12)
Rnd 3: *sc 1, 2 sc in next st, repeat * (18)
Rnd 4: *sc 2, 2 sc in next st, repeat * (24)
Rnd 5: *sc 3, 2 sc in next st, repeat * (30)
Rnd 6: *sc 4, 2 sc in next st, repeat * (36)
Rnd 7: *sc 5, 2 sc in next st, repeat * (42)
Rnd 8 - 17: sc around (42)
Rnd 18: *sc 5, 2 dec in next st, repeat * (36)
Rnd 19: *sc 4, 2 dec in next st, repeat * (30)
We'll stuff this later. Finish off, leaving yarn.
LEGS (make 4)
(in pink)
Rnd 1: 4 sc into magic ring (4)
Rnd 2: 2 sc in each stitch around (8 )
Now switch to black yarn
Rnd 3: *sc, 2 sc in next st, repeat (12)
Rnd 4: *2sc, 2 sc in next st, repear (16)
Rnd 5-6: sc around (16)
Finish off, leaving yarn
EARS (make 2, in black yarn) This one is "flat", not in spiral.
Chain 25
Rnd 1: sc around (25)
Rnd 2: 22 sc, 1 sl st (23)
Rnd 3: 3 Sl st, 14 sc, 2 sl st (19)
Rnd 4: 4 sl st, 7 sc, 2 sl st (13)
Finnish off, leaving yarn
TAIL: (in black yarn)
10 or 12 chain
Rnd 1: 2 sc, *3 sc in next st (repeat * three times)
Finish off, leaving yarn.
BANDANA: In yellow yarn
Around 60, 70 chain
Rnd 1: sc around
Rnd 2: 3 sl st, sc till you almost reach the other end, 3 sl st
Rnd 3: same as above
To assembly it:
Stuff the body and sew it to the head. Add the legs, tail to the body, and snout (stuff a little the black part) and ears to the head. Sew the pink part of the snout. The eyes were made in felt. And also cut little rectangles of black felt and sew them to the bandana. Put the bandana around P-chan's neck.
ที่มา
//www.craftster.org/forum/index.php?topic=359896.0
| Create Date : 22 กันยายน 2553 | | |
| Last Update : 22 กันยายน 2553 9:48:53 น. |
| Counter : 911 Pageviews. |
| |
|
| |
|
|
|
เปิดตัว Pattern Kook-Kai และ How to แบบง่ายๆ
ของจับฉลาก มิตติ้งสโมสรรถไฟ วันที่ 26 ตุลาคม 2551 ค่ะ
นนี้มีจับฉลาก ไอ้เราก็ไม่รู้จะทำอะไรดี เลยมั่วๆ จดได้ ครอบครัว กุ๊กไก่ สำหรับ Pattern ลูกเจี๊ยบ เอาของ คุณครู Fozzil มาค่ะ

มีคนมาขอ Pattern ด้วย  รับปากแล้วก็ต้องทำค่ะ (ฮา) ใครถักแล้วเอามาอวดบ้างนะคะ รับปากแล้วก็ต้องทำค่ะ (ฮา) ใครถักแล้วเอามาอวดบ้างนะคะ 

| Create Date : 27 ตุลาคม 2551 | | |
| Last Update : 27 ตุลาคม 2551 10:35:10 น. |
| Counter : 954 Pageviews. |
| |
|
| |
|
|
|
|

 ฝากข้อความหลังไมค์
 ผู้ติดตามบล็อก : 1 คน [


 รับปากแล้วก็ต้องทำค่ะ (ฮา) ใครถักแล้วเอามาอวดบ้างนะคะ


