����� ����ҡ�������
|
||||
�Ѻ-�觢����ż�ҹ com port ���� java
����觢����ż�ҹ com port ���� java ����蹵�ͧ� download library "RXTXcomm" �ҡ��� //rxtx.qbang.org/wiki/index.php/Download ����ᵡ���价�� Drive C: (���� drive ��蹡����дǡ) �ҡ������Ӣ�鹵���仹��
�ҡ����������¹ code ������ package testcomport; ������������������� in = serialPort.getInputStream(); �������� code ����������ػ�ó��� com port ���ǡ� F6 ���� Run ������Ũ������� out put pane ��ҹ��ҧ �ͧ�֡������ͧ jQuery
jQuery ��á�����÷������֡��������繵�ͧ��������ҤԴ�����¹ javascript ���������Ǩз��������ҧ��� jQuery �ѹ������������ ��͵��ѧ�վѲ�������������ҡ��鹪ѡ�����¨��¹ javascript �ͧ���� ��������ͧ�֡�Ҵ٫�˹���
�ͤԴ�����ҧ������ǡ�仫���˹ѧ�������ǡѺ jQuery �������֧��˹ѧ����� (��ʧǹ����˹ѧ���) ����ҹ���Ǣ���硹������Ф���¹�����Ẻ����������ͧ��� ��������ѧ��������仡���������ա��ҹ��˹������ǡѹ ����᷺���������ҹ��´��������ҧ ���ǡ������ Tech-Exchange �ͧ�ѹ�Ծ����ͻѭ�������¹���˹ѧ���������ҹ����� ��������ͧ��� Code ��������˹ѧ������ͧ��¹��ҧ��������´�������Ҩ���¹��ա blog �֧ �������� code �˹ѧ����繻���ҳ��� (���Ѵ�ҧ��ǹ��������з���ͧ���Ժ��) $(document).ready(function(){ �� $('a[href$=.com]').addClass('mailto'); }); ��觷���ͧ���� code �������� function � jQuery ��� tag ����վ��������� href ŧ���´��� ".com" ����������ǡ������ class �� "mailto" ������¹Ẻ������ǻ�ҡ�������ӧҹ �����ͧ令鹨ҡ� google �١羺�����ǹ 'a[href$=.com]' �ѹ�繢�ͤ��� (��������� single quote) �ѧ�������ͧ���� "." ������Ҩ����� ���������� Code ������ "\\" ˹�� "." �繴ѧ��� $(document).ready(function(){ � � $('a[href$=\\.com]').addClass('mailto'); }); ���� run ���ͺ����ҹ�黡�Ԥ�Ѻ� ��� Connect �ҹ������ MySQL ���� java
��� Connection �ҹ������ MySQL ������鹨е�ͧ download J/Connector �ҡ���价�� link ��� //dev.mysql.com/downloads/ ����͵Դ������º�������������������� "C:Program FilesMySQLMySQL Connector J" ������ "mysql-connector-java-5.1.20-bin" (�Ҩ������¹��� version �ͧ MySQL)
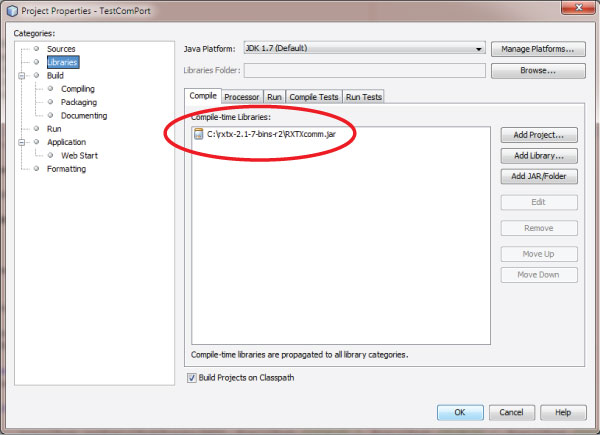
��������� Connector ����������Դ����� Netbean ���ҧ Project ���� ConnectMySQL ��� Project Panel �����顢�ҷ����� Project �������͡ Properties -> Libraries ������ "Add JAR/Folder"  ���͡��� .jar ��� download ����� "C:Program FilesMySQLMySQL Connector Jmysql-connector-java-5.1.20-bin.jar" �ҡ��鹡� OK ���˹�Ҩ;Ծ�� Source 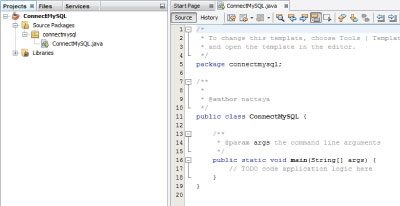 �ҡ���������ҧ Database � MySQL ����"testdb" � ����� Code ��ҹ��ҧ ���ǡ� F6 ���� Run ��������ͺ��÷ӧҹ package connectmysql; import java.sql.Connection; import java.sql.DriverManager; import java.sql.SQLException; import java.util.logging.Level; import java.util.logging.Logger; /** �* �* @author nattaya �*/ public class ConnectMySQL { ��� private Connection conn; ��� private String user; ��� private String password; ��� public ConnectMySQL() { ������� user = "root"; ������� password = "password"; ��� } ��� public void run() { ������� try { ����������� Class.forName("com.mysql.jdbc.Driver"); ����������� conn = DriverManager.getConnection("jdbc:mysql://localhost/testdb", user, password); ������� } catch (SQLException | ClassNotFoundException ex) { ����������� Logger.getLogger(ConnectMySQL.class.getName()).log(Level.SEVERE, null, ex); ������� } ��� } ��� /** ���� * @param args the command line arguments ���� */ ��� public static void main(String[] args) { ������� ConnectMySQL proj = new ConnectMySQL(); ������� proj.run(); ��� } } �����˵� �ٻẺ�ͧ url ������ method getConnection() �ѧ��� jdbc:mysql://hostname/dbname hostname ��ͪ��ͧ͢ MySQL Server ����ͧ��� Connect dbname ��ͪ��ͧ͢ Database ���ҧ Frame ���� Netbeans
�����¹�����Ẻ Windows application ���� Java ��������鹴��¡�����ҧ Frame ����ҡ� �����繷���ͧ�Ѻ�ͧ Component ����������ѧ ������ Netbean �� tool ���������������ҧ Frame ����¢�� �����繵�ͧ��¹���� code java �������������µ�͡�þѲ�������
������鹴��¡���Դ����� Netbeans ���ҧ Project ���� ����͢��˹�Ҩͧ͢ Project 㹵�����ҧ�������� "FirstApp" ���������顢�ҷ����� Package ���͡ New->JFrame� Form �ѧ�ٻ  �ҡ�����������ͧ͢ Frame 㹵�����ҧ�������� "MainFrame"  ����� Netbeans ���ʴ� Class �ͧ JFrame ���� "MainFrame" �ѧ�ٻ  �ҡ����� 2 �Ըշ��з���� Frame �ʴ������ Run ����� Ẻ�á��� copy code ��ǹ Main class �ͧ MainFrame.java ���к� FirstApp.java �¡�ä��须��� "Source" ��ҧ���� "Design" ˹�Ҩ� Design ������¹��˹�Ҩ�����Ѻ����� Source Code ����ٻ  ��� copy code ��ǹ������� method main() �ͧ FirstApp.java �ҡ��鹷��ͺ�¡�á����� F6 ���� Run ����� ������� java.awt.EventQueue.invokeLater(new Runnable() { ����������� @Override ����������� public void run() { ��������������� new MainFrame().setVisible(true); ����������� } ������� }); �ա�Ը������顢�ҷ����� Project ���͡ Properties ���͡��Ǣ�� "Run" ��������¹ Main Class �� firstapp.MainFrame �����͡�ҡ��á����� Browse  ������������������顴���� F6 ���� Run ����� Hello World ���������¹��������¨���
������ Blog �á�ͧ�����������觴��� �����¹ Hello World ���¨��ҵ������������ ����Ѻ Tool ���������Ѻ��¹��������� Netbeans IDE ��� Download ��ҡ��� //www.oracle.com/technetwork/java/javase/downloads/index.html���鹵��õԴ��駢ͧ������������������ Run �������� Download ���稡� Next ����ҧ���������Ѻ��
����͵Դ��� Netbeans ���º������������Դ�����������������͡���� File->New Project �Т��˹�Ҩʹѧ�ٻ 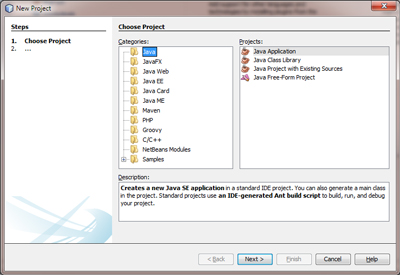 ���͡ Categories = Java, Project = Java Application �ҡ��鹡����� Next �Т��˹�Ҩ�  ��ͧ Project Name ��������� "HelloWorld" �Т��˹�Ҩʹѧ�ٻ  ��� Source code ������ HelloWorld.java �ѧ��� package helloworld; ������������������顴���� F6 ���� Run ����� �Ţͧ��������ʴ�����ҧ��ҹ��ҧ |
vrod
 ���Դ������͡ : 1 �� [?] ���Դ������͡ : 1 �� [?] �ӧҹ��ҹ���������� �����㹾ѹ�Ծ��ǹ�ҡ�����ͧ��ʹ�������ҡ� �Ҩ����繪�����������ͧ�ҹ�����ҧ����������Ό���;�ǧ��������������ҡ��駪��������Ѻ
Group Blog All Blog Friends Blog |
|||
| Pantip.com
| PantipMarket.com
| Pantown.com
| © 2004 BlogGang.com
allrights reserved.
|
||||