Group Blog
 
All blogs
 

วิธี...การใส่โค๊ดธีม...บล็อค


จขบ.อัพให้สำหรับเพื่อนๆที่เพิ่งแต่งบล็อคค่ะ กับการใส่ธีมให้กับบล็อค มีเพื่อนที่เพิ่งแต่งบล็อคเยอะเหมือนกันหลังไมล์ถาม จขบ. มาค่ะ ก็จะอธิบายแบบอย่างที่ตัวเองเข้าใจนะค่ะ เพราะว่า จขบ. ก็ใช่ว่าจะเก่งอะไร ก็ทำในแบบที่ตัวเองเข้าใจนะค่ะ อิอิ ผิดพลาดประการใด หรือว่า เพื่อนๆที่เพิ่งแต่งบล็อคแล้ว อ่านไม่เข้าใจ เนื่องจากว่า อธิบายไม่เข้าใจ ก็ขอประทานอภัย มา ณ.ที่นี้ด้วยนะคะ


รูปที่ 1
Photobucket


รูปที่ 2
Photobucket


รูปที่ 3
Photobucket


อันดับแรก
การใส่ธีม เราต้องเข้าไปลบกรอบเส้นขาว ก่อนค่ะ เพื่อจะทำให้ภาพกรอบธีมเราสวย ไม่มีเส้นสีขาว รอบกรอบ
Photobucket
โค๊ด
ลบพื้นหลังและลบกรอบสีขาว

<style>table {background-color: transparent;border-style: none;border-spacing: none;}td {border: none;border-color: none;background: none;} </style>


Photobucket

ก็อปปี้โค๊ดด้านบนไปวางที่ช่อง จัดการ Script area แล้วก็ กด Save ค่ะ


อันดับที่ 2
ไปที่ การปรับแต่งเวป Blog
Photobucket

เลือก Theme

คลิก เลือก ปุ่ม
Theme อิสระ - เมนูขวา แล้ว กด Save ค่ะ

ถ้าเพื่อนปรับเปลี่ยนไปแล้ว ครั้งแรก ครั้งต่อไปก็ไม่ต้องเปลี่ยน ค่ะ เพียงแค่เข้าไปแก้ไขโค๊ดธีมตัวใหม่ได้เลย นอกเสียจากว่าเพื่อนต้องการปรับเปลี่ยน Blog Style ค่ะ และโค๊ดลบเส้นกรอบสีขาว ก็วางโค๊ตที่ ช่อง Script area ครั้งเดียวค่ะ อัพครั้งต่อไปก็ไม่ต้องใส่ไปอีกนะค่ะ มีเพื่อนๆตอนเปลี่ยนธีม เห็นโค๊ดเราก็อปไว้ก็ใส่ไปทุกครั้งเลยค่ะ อิอิ ใส่แค่ครั้งเดียวพอค่ะ ^_^


อันดับที่ สาม
ไปที่ จัดการ Script area ด้านซ้ายมือ เราจะเอาโค๊ดแบล็คกราวน์พื้นด้านนอกไปใส่ค่ะ

Photobucket

Photobucket

ซึ่งโค๊ดแบล็คกราวน์พื้นกรอบนอก จะเป็น ใส่โค๊ดแบบ fixed background

โค๊ดสำหรับแบล็คกราวน์ค่ะ

<style type="text/css"><!--body{background:url(//รูปแบล็คกราวน์กรอบนอก) repeat fixed center top;background-color:#;}--></style>


ก็อปปี้โค๊ดทั้งหมดไปวางที่ ช่อง การจัดการ Script area ค่ะ แล้วกด Save ออกมาค่ะ


อันดับที่ สี่
เราจะเอาโค๊ดในส่วนของหัวบล็อค(รูปที่1) กับแบล็คกราวน์พื้นกรอบด้านใน ตรงกลาง ก็คือ กรอบพื้นหลังที่โชว์ตรงข้อความที่เราอัพบล็อค นะค่ะ (ตามรูปที่ 2)ซึ่งขนาดของภาพหัวบล็อคกับกรอบพื้นด้านใน ความกว้าง ในส่วนของหัวบล็อค กับส่วนของแบล็คกราวน์พื้นด้านใน จะต้องสัมพันธ์กัน จะทำให้เรามองเห็นภาพแบล็คกราวน์กรอบนอกค่ะ (รูปที่ 3) โดยความกว้างของหัวบล็อคกับ ความกว้างของแบล็คกราวน์กรอบพื้นใน ค่าต้องเท่ากัน นะค่ะ แต่ก็ขึ้นอยู่กับการออกแบบของเราด้วยค่ะ ว่าเราอยากให้ หัวบล็อค ใหญ่ หรือเล็กกว่า หรือว่าค่าเท่ากันกับกรอบแบล็คกราวน์พื้นในนะค่ะ ซึ่งปกติ จขบ.จะกำหนด ความกว้าง ของหัวบล็อค กับ กรอบแบล็คกราวนพื้นด้านใน มีค่าเท่ากันค่ะ แต่ ไม่เกิน 900 px ค่ะ

โค๊ดหัวบล็อคและพื้นกรอบตัวใน

<table border="0" cellspacing="0" cellpadding="0" width="ความกว้างรูปหัวบล็อค align="center" style="background-image: url('//รูปหัวบล็อค'); height: ความสูงรูปหัวบล็อคpx"><tbody><tr><td align="center" valign="bottom">

</td></tr></tbody></table>

ใส่โค๊ตลิ้งค์ใต้หัวบล็อค หรือ ใส่โค๊ดสำหรับข้อความวิ่งๆที่นี่ค่ะ

<table border="0" cellspacing="0" cellpadding="0" width="ความกว้างรูปพื้นกรอบในalign="center" style="background-image: url('//รูปพื้นหลังกรอบใน')"><tbody><tr><td align="center" valign="middle">
<table border="0" cellspacing="0" cellpadding="0" width="100%" align="center"><tbody><tr><td align="center" valign="middle" >


ไปที่ ปรับแต่งเว็บ Blog ด้านซ้าย คลิกที่ ตั้งชื่อ Slogan

Photobucket


Photobucket

ใส่โค๊ดลงไปในกรอบสี่เหลี่ยม ตามรูปข้างบนค่ะ แล้วก็กด Save ออกมาค่ะ


โค๊ดที่วางช่องสโลแกน เราสามารถวางโค๊ดตัวอื่นๆ เพื่อตกแต่งบล็อคของเราได้สวยงาม เช่น

โค๊ดแฟลซที่หัวบล็อค

<EMBED style="LEFT: 0px; WIDTH: ความกว้างแฟลซpx; POSITION: absolute; TOP: 0px; HEIGHT: ความสูงแฟลซpx" align=right src= //รูปแฟลซ.swf width width=ความกว้างแฟลซค่าเหมือนตัวบน height=ความสูงของแฟลซค่าเหมือนตัวบน type=application/octet-stream wmode="transparent" quality="high" ;;></EMBED>


โค๊ตห้อยดุ๊กดิ๊ก

<div id='item_accessoary' style='position:absolute; left: 200px; top:50px; width:0px; height:0px; z-index:1'><img src='..ใส่..//.ของรูป....?t=1229627411?t=1229628159?t=1229627411'></div>


โค๊ดทำตารางใส่ลิงค์เมนูใต้หัวบล็อก
Photobucket

วางโค๊ดต่อจากรูปใต้หัวบล็อคค่ะ


โค๊ดลิงค์เมนูค่ะ
<A href="ใส่..//..ของเวปที่จะเอามาทำเป็นเมนู">เขียนหัวข้อเมนู</A>
<table border="0" width="100%" align="center"><tbody><tr><td align="center" valign="bottom">
<table border="0" cellspacing="2" cellpadding="2" width="100%" align="center" style="background-image: url('ใส่..//.รูปของกรอบ')"> <tbody><tr><td align="center" valign="middle" style="background-image: url('ใส่..//..พื้นหลังของช่องตาราง')">ใส่ลิงค์เมนู</td><td align="center" valign="middle" style="background-image: url('ใส่..//..พื้นหลังของช่องตาราง')">ใส่ลิงค์เมนู</td><td align="center" valign="middle" style="background-image: url('ใส่..//..พื้นหลังของช่องตาราง')">ใส่ลิงค์เมนู</td><td align="center" valign="middle" style="background-image: url('
')">ใส่ลิงค์เมนู</td><td align="center" valign="middle" style="background-image: url('ใส่..//..พื้นหลังของช่องตาราง')">ใส่ลิงค์เมนู</td></tr></tbody></table>
</td></tr></tbody>


สรุป
โค๊ดที่ วางที่ จัดการ Script area
1 โค๊ดลบกรอบสีขาว
2 โค๊ดแบล็คกราวน์ตัวนอก

ส่วนโค๊ดตัวอื่น วางที่ ช่อง Slogan ค่ะ
การปรับค่าภาพหัวบล็อคกับภาพแบล็คกราน์ตัวใน ต้องไม่เกิน 900 เพื่อจะทำให้มองเห็น ภาพแบล็คกราวน์กรอบนอกค่ะ


Create Date : 29 พฤษภาคม 2552    
Last Update : 29 พฤษภาคม 2552 2:18:39 น.
Counter : 3539 Pageviews.  

โค้ตเปลี่ยนธีม แบบที่ 3 (กรอบแบบแสตมป์)


ขอบคุณคุณไหม สำหรับโค๊ต มา ณ. ที่นี้ด้วยค่ะ

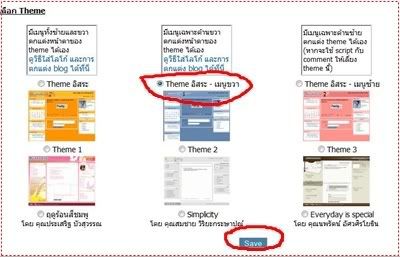
สามารถใช้ Theme อิสระ ได้ทั้ง 3 แบบ ค่ะ
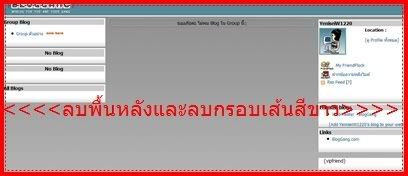
ลบเส้นกรอบสีขาว
โดยนำโค๊ตนี้ไปวางที่สคริปค่ะ
ลบพื้นหลังและลบกรอบสีขาว
<style>table {background-color: transparent;border-style: none;border-spacing: none;}td {border: none;border-color: none;background: none;}</style>

อีกตัวเป็น โค๊ต BG ด้านนอก เอาไปวางที่ สคริป ค่ะ
<style>body{background-attachment: fixed;background-image:url(//URL รูปกรอบด้านนอก);}</style>


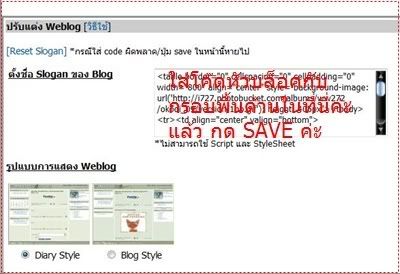
ส่วนโค๊ตทั้งหมดด้านล่างวางที่สโลแกนค่ะ
<table width="750" style="border: 2px dashed pink; background:pink; cellpadding="0" cellspacing="0" align="center">
<tr>
<td>
<table width="100%" style="border: 6px solid pink; background:pink; cellpadding="0" cellspacing="0" align="center">
<tr>
<td>
<table width="100%" style="border: 2px dashed white; background:white; cellpadding="0" cellspacing="0" align="center">
<tr>
<td>
<table width="100%" style="background:white; cellpadding="0" cellspacing="0" align="center">
<tr>
<td>
<table width="100%" style="background:white; cellpadding="0" cellspacing="0" align="center">
<tr>
<td>
<center><img src=ใส่ URL รูปที่ต้องการทำหัวบล็อคที่นี่ค่ะ> </center>

pink = สีกรอบ เปลี่ยนเป็นสีอื่นได้ค่ะ แต่ต้องเปลี่ยนทั้ง 4 ตำแหน่ง

white = สีภายในบล็อค เปลี่ยนเป็นสีอื่นได้ค่ะ เปลี่ยนทั้ง 4 ตำแหน่ง

ควรใช้สีที่ตัดกันค่ะ จะได้มองเห็นกรอบด้านนอก ได้ชัดเจน

750 = ชนาดความกว้างของบล็อค เปลี่ยนตัวเลขได้ค่ะ

border: 2, 6 และ 2px = ขนาดกรอบ เปลี่ยนตัวเลขได้ค่ะ

รูปที่ต้องการทำหัวบล็อค ใส่ไฟล์ Flash ก็ได้ค่ะ

ตัวอย่างค่ะ


Create Date : 22 มกราคม 2552    
Last Update : 1 กุมภาพันธ์ 2552 9:45:11 น.
Counter : 779 Pageviews.  

โค๊ตธีมแบบที่ 2 [ใช้รูปทำเส้นกรอบ]

ขอบคุณคุณไหม สำหรับโค๊ต มา ณ.ที่นี้ด้วยค่ะ

เส้นกรอบ สามเส้น กรอบด้านใน หัวบล็อค
เปลี่ยน Theme เป็น Theme อิสระเมนูขวา และลบเส้นกรอบสีขาว โดยวางโค๊ตตัวนี้ที่สคริปค่ะ

ลบพื้นหลังและลบกรอบสีขาว
<style>table {background-color: transparent;border-style: none;border-spacing: none;}td {border: none;border-color: none;background: none;}</style>

อีกตัวเป็น โค๊ต BG ด้านนอก เอาไปวางที่ สคริป ค่ะ
<style>body{background-attachment: fixed;background-image:url(//URL รูปกรอบด้านนอก);}</style>


ส่วนโค๊ตทั้งหมดนี้นำไปวางที่ ช่องสโลแกนค่ะ
750 = ใส่ ความยาวของบล็อคที่ต้องการ (ดูความยาวของรูปหัวบล็อค)

2, 10, 2 = ขนาดของกรอบ เปลี่ยนตัวเลขได้ค่ะ

<table width="750" style="background:none url(//รูปกรอบเส้นที่ 1); cellpadding="0" cellspacing="2" align="center">
<tr>
<td>
<table width="100%" style="background:none url(//รูปกรอบเส้นที่ 2); cellpadding="0" cellspacing="10" align="center">
<tr>
<td>
<table width="100%" style="background:none url(//รูปกรอบเส้นที่ 3); cellpadding="0" cellspacing="2" align="center">
<tr>
<td>
<table width="100%" style="background:none url(//ภาพBG ที่อยู่ด้านใน); cellpadding="0" cellspacing="0" align="center">
<tr>
<td>
<table width="100%" style="background:none; cellpadding="0" cellspacing="0" align="center">
<tr>
<td>
<table width="100%" style="background:none; cellpadding="0" cellspacing="0" align="center">
<tr>
<td>
<center><img border="0" src="ใส่ URL รูปหัวบล็อค ที่ต้องการ"></center>
หรือถ้าอยากให้ภาพหัวบล็อคกลืนไปกับพื้นหลังเหมือนตัวอย่าง เป็นโค๊ตตัวนี้ค่ะ

<center><img border="0" src="//รูปหัวบล็อค"style="filter : Alpha(opacity=100, finishopacity=0, style=3"></center>
ทำให้ภาพกลืนไปกับภาพหัวบล็อค


อธิบายเกี่ยวกับโค้ด


750 = เปลี่ยนตัวเลขเป็นพิกเซล ให้เหมาะสมกับหัวบล็อค


URL กรอบเส้นที่ 1, 2, 3 = ลบออกแล้วใส่ URL รูปที่ต้องการทำกรอบแทน


cellspacing 5 = เปลี่ยนตัวเลขได้ค่ะ ตัวเลขมากกรอบจะใหญ่


URL บีจีด้านใน = ลบออกแล้วใส่ URL รูปที่ต้องการทำบีจีแทน


URL ภาพหัวบล็อค = ลบออกแล้วใส่ URL รูปที่ต้องการทำหัวบล็อคแทน
หรือจะใส่ไฟล์ swf ก็ได้ค่ะ


สรุปง่ายๆ

ใช้โค้ดเหมือนกับ กรอบ table แต่ห้ามปิด
</tr></td></table> เท่านั้นเอง
1 เส้นจะมี
<table กำหนดรูปแบบของกรอบ>
<tr>
<td>


รูปแบบของกรอบ

1. ใช้สีทำกรอบ
<table style="background:โค้ดสี; cellpadding="0" cellspacing="2" align="center">
<tr>
<td>


2. ใช้รูปทำกรอบ
<table style="background-image: url(URL รูปที่ต้องการทำกรอบ); cellpadding="0" cellspacing="2" align="center">
<tr>
<td>


3. มีสีกรอบ + รูปที่จะทำกรอบ
<table style="border:1px solid โค้ดสีกรอบ;background-image: url(URL รูปที่ต้องการทำกรอบ); cellpadding="0" cellspacing="2" align="center">
<tr>
<td>


solid เปลี่ยนเป็นชนิดอื่นได้ค่ะ
ชนิดของกรอบจะมี
inset, outset, double, dotted, dashed, groove, ridge, solid


ตัวอย่างค่ะ


Create Date : 21 มกราคม 2552    
Last Update : 1 กุมภาพันธ์ 2552 9:39:17 น.
Counter : 1496 Pageviews.  

โค๊ตธีมแบบที่ 1 [ใช้สีทำเส้นกรอบ]

ขอบคุณคุณไหม มา ณ.ที่นี้ด้วยค่ะ
โค้ดเปลี่ยนธีมใหม่ แบบที่ 1 (ใช้สีทำกรอบ)

โค้ดนี้จะมีแค่ กรอบเส้นธรรมดา และ BG ภายในบล็อคค่ะ

<table width="750" style="border:pink 5px double; background:none; cellpadding="0" cellspacing="0" align="center">
<tr>
<td>
<table width="100%" style="background-image: url(URL บีจีด้านใน); cellpadding="0" cellspacing="0" align="center">
<tr>
<td>
<table width="100%" style="background:none; cellpadding="0" cellspacing="0" align="center">
<tr>
<td>
<table width="100%" style="background:none; cellpadding="0" cellspacing="0" align="center">
<tr>
<td>
<center><img border="0" src="ใส่ URL รูปหัวบล็อคค่ะ"></center>


750 เปลี่ยนเป็นขนาดพิกเซล ตามรูปหัวบล็อคค่ะ
pink เปลี่ยนเป็นสีกรอบที่ต้องการ
5px ขนาดของกรอบ ตัวเลขมาก กรอบจะใหญ่
double เปลี่ยนชนิดของกรอบที่ต้องการ จะมี
solid, inset, outset, groove, ridge, dashed, dotted,

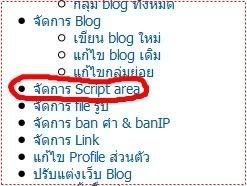
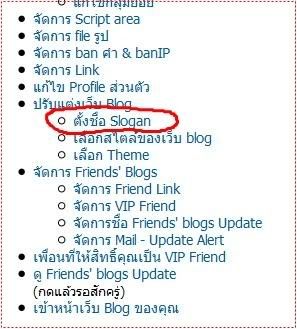
เอาโค้ดไปวางไว้ที่ ปรับแต่งเว็บ Blog ตั้งชื่อ Slogan ของ Blog
แล้วเลือก Theme อิสระ เมนูขวา ,
Theme อิสระ เมนูซ้าย,
หรือ Theme อิสระ ค่ะ
และก็ลบกรอบเส้นสีขาวออกก่อนวางโค๊ตค่ะ
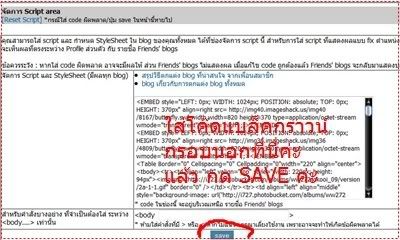
โค๊ตลบกรอบ ให้วางที่สคริป

โค๊ตลบพื้นหลังและลบกรอบสีขาว
<style>table {background-color: transparent;border-style: none;border-spacing: none;}td {border: none;border-color: none;background: none;}</style>


อีกตัว เป็นกรอบด้านนอกค่ะ
นำโค๊ตกรอบด้านนอกวางที่ สคริปค่ะ

<style>body {background-image:url("……ใส่ URLแบล็คกราวน์ตัวนอก……") ;background-repeat : repeat-x ;background-attachment : fixed; background-color: "……ใส่สีพื้นหลัง……";}</style>


ตัวอย่าง
เป็น เส้นสีแดงสองเส้น


Create Date : 21 มกราคม 2552    
Last Update : 1 กุมภาพันธ์ 2552 9:52:21 น.
Counter : 828 Pageviews.  

โค๊ต Background ค่ะ

โค๊ตทั้งหมดได้จากการรวบรวมมาจากเวปต่างๆค่ะ
1.ใส่ bg แบบ tile<style>body{background-image:url(XXX);} </style>


2.ใส่ bg แบบ fixed ไม่ให้ bg เลื่อนลงตาม scroll
bar
<style>body{background-attachment: fixed;background-image:url(XXX);} </style>


3.ใส่ bg เป็นรูปภาพเดียวทั้งหน้า<style>Body{background-image:url(http:XXX);background-position: center (bottom left..etc..);background-repeat: no-repeat;background-attachment: fixed;background-color:color code;} </style>


4.ใส่ bg โดยใช้สี<style>body{background:color code}></style>


5. ใส่ bg โดยไล่เฉดสี (gradient) <body style="filter:progid:DXImageTransform.Microsoft.Gradient(endColorstr='color code 1', startColorstr='color code 2', gradienttype=0);">
gradienttype 0 ไล่สีตามแนวนอน
gradienttype 1 ไล่สีตามแนวตั้ง


6.ให้ภาพอยู่ - กลางบล็อก<style>Body {background-image:url("……ใส่ URLของภาพที่จะใช้……");background-position:center;background-repeat: no-repeat;background-attachment: fixed;background-color: "……ใส่สีพื้นหลัง……";}</style>


7. ให้ภาพอยู่ - มุมซ้ายบน<style>Body {background-image:url("……ใส่ URLของภาพที่จะใช้……");background-position: left top;background-repeat: no-repeat;background-attachment: fixed;background-color: "……ใส่สีพื้นหลัง……";}</style>


8. ให้ภาพอยู่ - มุมซ้ายกลาง<style>Body {background-image:url("……ใส่ URLของภาพที่จะใช้……");background-position: left center;background-repeat: no-repeat;background-attachment: fixed;background-color: "……ใส่สีพื้นหลัง……";}</style>


9. ให้ภาพอยู่ - มุมซ้ายล่าง <style>Body {background-image:url("……ใส่ URLของภาพที่จะใช้……");background-position: left bottom;background-repeat: no-repeat;background-attachment: fixed;background-color: "……ใส่สีพื้นหลัง……";}</style>


10. ให้ภาพอยู่ - มุมขวาบน<style>Body {background-image:url("……ใส่ URLของภาพที่จะใช้……");background-position: right top;background-repeat: no-repeat;background-attachment: fixed;background-color: "……ใส่สีพื้นหลัง……";}</style>


11. ให้ภาพอยู่ - มุมขวากลาง<style>Body {background-image:url("……ใส่ URLของภาพที่จะใช้……");background-position: right center;background-repeat: no-repeat;background-attachment: fixed;background-color: "……ใส่สีพื้นหลัง……";}</style>


12. ให้ภาพอยู่ - มุมขวาล่าง<style>Body {background-image:url("……ใส่ URLของภาพที่จะใช้……");background-position: right bottom;background-repeat: no-repeat;background-attachment: fixed;background-color: "……ใส่สีพื้นหลัง……";}</style>


13. ให้ภาพอยู่ - เรียงแนวยาวด้านบน
<style>body {background-image:url("……ใส่ URLของภาพที่จะใช้……") ;background-repeat : repeat-x ;background-attachment : fixed; background-color: "……ใส่สีพื้นหลัง……";}</style>


14. ให้ภาพอยู่ - เรียงแนวยาวด้านล่าง<style>body {background-image:url("……ใส่ URLของภาพที่จะใช้……") ; background-position:bottom ;background-repeat : repeat-x;background-attachment: fixed;background-color: "……ใส่สีพื้นหลัง……";}</style>


15. ให้ภาพอยู่ - เรียงแนวตั้งด้านซ้าย<style>body {background-image:url("……ใส่ URLของภาพที่จะใช้……") ;background-position:left ;background-repeat:repeat-y ;background-attachment : fixed;background-color: "……ใส่สีพื้นหลัง……";}</style>


16. ให้ภาพอยู่ - เรียงแนวตั้งด้านขวา<style>body {background-image:url("……ใส่ URLของภาพที่จะใช้……") ;background-position:right;background-repeat : repeat-y;background-attachment : fixed;background-color: "……ใส่สีพื้นหลัง……";}</style>


Create Date : 09 กรกฎาคม 2551    
Last Update : 9 กรกฎาคม 2551 21:07:17 น.
Counter : 1836 Pageviews.  


Hawaii_Havaii
Location :

Thailand

United States

[Profile ทั้งหมด]

ฝากข้อความหลังไมค์
Rss Feed

ผู้ติดตามบล็อก : 50 คน [?]


Friends' blogs
[Add Hawaii_Havaii's blog to your web]
Links
 

 Pantip.com | PantipMarket.com | Pantown.com | © 2004 BlogGang.com allrights reserved.