


| |
st = stitch
sc = single crochet
2tog = 2 stitches together
ch1 = chain one� sl st = slip stitch
For video tutorial click here
HEAD:
1) magic circle with 6st� (6)
2) 2sc in each st ������� �� (12)
3) 1sc then 2sc in next st� (18)4) 3sc in first st, 1sc in next 8st, 3sc in next st, 1sc in last 8st (22)
5) 1sc in each st (22)
6) 2sc in first st, 1sc in next 10st, 2sc in next st, 1sc in last 10st (24)
7-10) 1sc in each st for 4 rows (24)
11) 1sc in next 2st then 2tog (18)
12)1sc then 2tog (12)
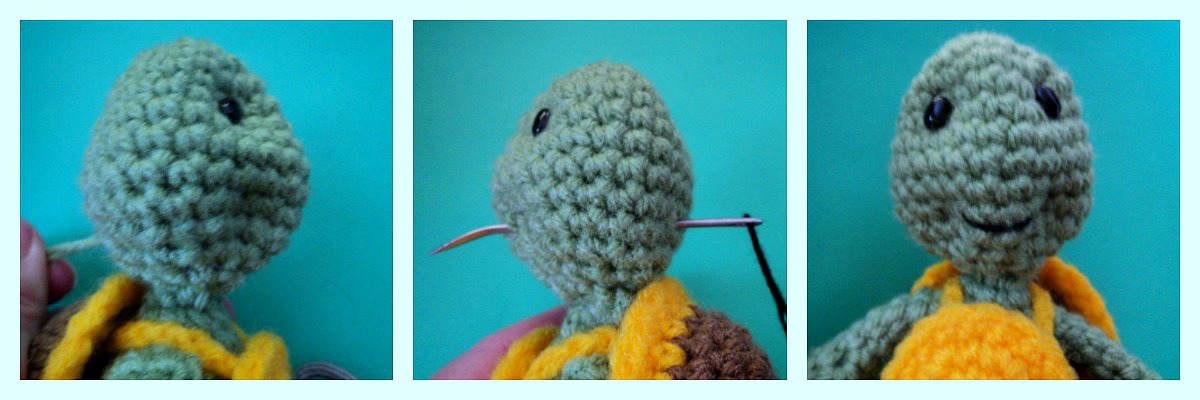
***before continuing on to row 13 stop and shape the face.
Shape the face by pinching the nose area together, once you are happy with the look� insert the same color yarn you used for the head and weave back and forth from one eye area to the other eye area then knot the yarn off inside the head cavity to hold the shape. If you use safety eyes you can also put those in now. See pictures

13) 2tog until you close the gap.� Finish off and hide yarn tail inside the head
*I made 2 turtles, one with a neck and one without a neck. I'll include instructions for both
BODY without the neck:
1) magic circle with 6st (6)
1) magic circle with 6st (6)
2) 2sc in each st ������� � (12)
3) 1sc in next st,�� 2sc in next st� � (18)
4) 1sc in next 2st, 2sc in next st � � (24)5-7) 1sc in each st for 3 rows�� (24)
8) 1sc in next 2st then 2tog���� (18)9) 1sc in each st��� (18)
10) 1sc then 2tog�� (12)
**stuff body
11) 2tog 6 times, sl st into next st and finish off leaving a long tail for sewing
Sew head and body together
BODY with the neck:
follow steps as instructed above for rows 1-10
follow steps as instructed above for rows 1-10
**stuff body
�
11) 1sc in next 2st then 2tog (9)
12-13) 1sc in each for 2 rows (9)
14) sl st into next st and finish off. leave long tail for sewing
**stuff neck then sew head and body together careful to maintain the length and shape of neck
LEGS:
1) Magic circle with 6 st (6)
2) 2sc in each st (12)
3) 1sc then 2sc in next st� (18)4-6) 1sc in each for 3 rows (18)
7) 2tog 4 times, 1sc in next 10st (14)
8) 2tog 5 times, 1sc in last 4st���� (9)
*** stuff foot. No need to stuff legs
9-13) 1sc in each for 5 rows (9) sl st into next st and finish off. Leave long tail for sewing�
TIP *** stuff the foot only to give it shape, if you over stuff the foot it will look like a ball instead of a foot. No need to stuff the legs
You can add toes by inserting brown yarn as pictured and just as you would make a whip stitch, stitch in some toes. Once done, bring the yarn tail back through the foot and out the same hole you went into. Knot the tails off, and hide knot inside foot.

ARMS:�
1) magic circle with 6 st (6)
2) 2sc in each st � � (12)
3-4) 1sc in each st for 2 rows� (12)�
5) 2tog 3 times, 1sc in last 6st (9)
6) 2tog 3 times, 1sc in last 3st (6)
�***stuff hand
7-10) 1sc in each st for 4 rows. No need to stuff arms. sl st into next st and finish off, leave long tail for sewing. Sew to body just under the head OR if you make a turtle with a neck, sew the arms a bit lower than the head. See photos for reference
OUTER SHELL:
1) magic circle with 6st (6)
2) 2sc in each st ������� � (12)
3) 1sc in next st,�� 2sc in next st� � (18)
4) 1sc in next 2st, 2sc in next st � � (24)5-6) 1sc in each st for 2 rows�� (24)
7) sl st into next st and finish offINNER SHELL:
1) magic circle with 6st (6)
2) 2sc in each st ������� � (12)
3) 1sc in next st,�� 2sc in next st� � (18)
4) 1sc in next 2st, 2sc in next st � � (24)
5) sl st into next st and finish off leaving a long tail for sewing
place the inner piece inside the outer and sew them together as pictured. Just before you sew the hole closed stuff the shell
4) 1sc in next 2st, 2sc in next st � � (24)
5) sl st into next st and finish off leaving a long tail for sewing
place the inner piece inside the outer and sew them together as pictured. Just before you sew the hole closed stuff the shell


1) magic circle with 6st (6)
2) 2sc in each st ������� � (12)
3) 1sc in next st,�� 2sc in next st� � (18)
4) 1sc in next 2st, 2sc in next st � � (24)5) sl st into next st and finish off. Weave yarn tail around the edge to hide it
make 4 chains that will hold your shell and tummy piece together. Hold the tummy and shell in place to see what length of chains you need. Sew the bottom chains on first, put the turtle inside the shell, then sew in the top chains as pictured. Once you have the whole thing together you can also sew the shell and tummy piece right to the body of the turtle to make sure it's all firmly in place. I would do this if your turtle is going to a small child.

Now for that cute smile! Pinch the bottom of the face together just as you did for the nose area. Once you are happy with the cheek size, insert yarn through the back of the head and out through one cheek, weave through to the other cheek and back out the same hole you went into. Pull the yarn tails until you have the shape you want. knot the tails off and hide them inside the head. I used black embroidery thread and make the actual smile, inserting the thread just as I did for the cheeks.

�ôԵ����Ҿ��¤�� ^^


 �ҡ��ͤ�����ѧ����
 ���Դ������͡ : 1 �� [
