|
มือใหม่หัดแปลแพทเทิร์นเสื้อนิตติ้ง

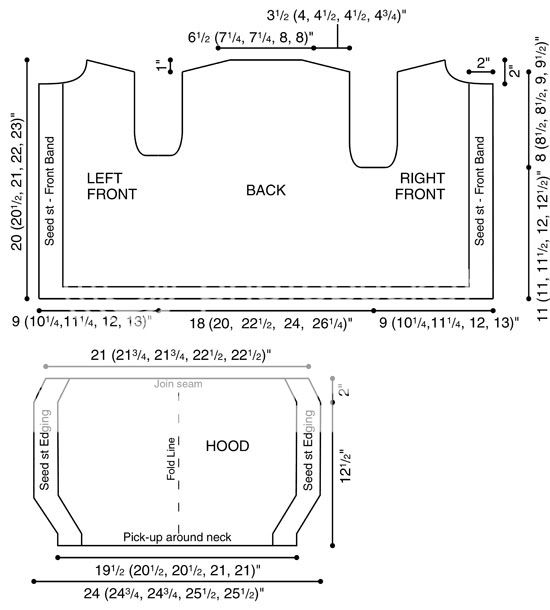
SIZES
Small (Medium, Large, 1X, 2X)
FINISHED MEASUREMENTS:
Bust 36 (40 1/2, 45, 48, 52 1/4)"/91.5 (102.5, 114, 122, 132.5) cm
Length 20 (20 1/2, 21, 22, 23)" /51 (52, 53.5, 56, 58.5) cm
MATERIALS
Caron International's Simply Soft Shadows
(100% acrylic; 3 oz/85g, 150 yds/137m ball): 18 (21, 24, 24, 27) oz
Shown in: #0004 Autumn
Note: Yarn is used double throughout.
One circular needle size 11 (8 mm), 24 - 36"/60 – 90 cm long, or size to obtain gauge
One each circular needle size US 10 (6 mm), 16 and 24 – 36 "/40 and 60 – 90 cm long, or size to obtain gauge
Note: Circular needles are used to accommodate large number of sts; work back and forth in rows; optional instructions are given for working the armhole edging in-the-round on the shorter needle.
Stitch markers
Stitch holders or waste yarn
Yarn needle
Jacket zipper – approximately 16 (16, 17, 18, 19)"/40.5 (40.5, 43, 46, 48) cm long, in color to match yarn
Row counter (optional)
Additional needle, size 11 (8 mm), if working the optional 3-Needle Bind-Off on Hood (optional)
Decorative zipper pull (optional)
SPECIAL TECHNIQUE
3-Needle Bind Off (Optional joining method for top of Hood)
Place the stitches of the pieces to be joined on separate needles, (or each end of circular needle), held one behind the other with right-sides facing each other, in left hand; with a third needle, (the same size or 1 size larger than used for knitting the pieces), k2tog [1 from the front needle, 1 from the back needle—1 stitch on right-hand needle], *K2tog [2 stitches on right-hand needle], bind off 1 stitch in usual manner; repeat from * to end.
GAUGE
In Stockinette stitch, 11 sts and 16 rows = 4"/10 cm, using larger needle and 2 strands of yarn held together
STITCHES USED
Stockinette stitch (St st): Knit on RS, purl on WS.
Seed Stitch (multiple of 2 sts)
Row/Round 1 (RS): * K1, p1; repeat from * across.
Row/Round 2: Knit the purl sts and purl the knit sts as they face you.
Repeat Row/Round 2 for Seed st.
NOTES
Vest is worked in one piece to underarm, including Seed st Front bands, then divided into Back and 2 Fronts; Seed st bands continue to the Neck edge.
Hood is picked up around neck shaping and from sts on holders (Front bands and Back neck), then worked up to the top; optional instructions are given for joining the top with 3-Needle Bind-Off.
Yarn is used doubled throughout.
BACK
Using smaller circular needle and 2 strands of yarn, cast on 100 (112, 124, 132, 144) sts.
(RS) Begin Seed st; work even for 6 rows, end with a WS row.
Change to larger circular needle.
Establish Pattern: (RS) Work 6 sts in Seed st as established (right Front band), pm; k19 (22, 25, 27, 30) for right Front, pm for side 'seam'; k50 (56, 62, 66, 72) for Back, pm for side 'seam'; k19 (22, 25, 27, 30) for left Front, pm; work remaining 6 sts in Seed st as established (left Front band). Cont as established, working 6 sts each side in Seed st for Front bands, remaining sts in St st; work even until piece measures 11 (11, 11 1/2, 12, 12 1/2)" from beginning, or desired length to underarm, end with a WS row.
Dividing Row
(RS) Cont in patt as established, work across right Front * to 3 (3, 4, 4, 5) sts before side 'seam' marker; bind off 6 (6, 8, 8, 10) sts for underarm *; work across Back, repeating from * to * for underarm; work to end in patt—22 (25, 27, 29, 31) sts rem each Front, including Front bands; 44 (50, 54, 58, 62) sts remain for Back. Place Back and right Front sts on holders.
LEFT FRONT
(WS) Working on left Front sts only, work 1 row even, maintaining Front band sts in Seed st.
Shape Armhole
(RS) At armhole edge, bind off 2 (2, 3, 3, 4) sts every other row once, then 1 (2, 2, 3, 3) sts once—19 (21, 22, 23, 24) sts remain.
Work even until armhole measures 6 (6 1/2, 6 1/2, 7, 7 1/2)" from dividing row, end with a WS row.
Shape Neck
(RS) Work across to Front band marker, turn; place band sts on holder—13 (15, 16, 17, 18) sts rem.
(WS) Beginning this row, at neck edge, dec 1 st every row 2 (2, 2, 3, 3) times, every other row 1 (2, 2, 2, 2) times—10 (11, 12, 12, 13) sts remain for shoulder. Work even until armhole measures 8 (8 1/2, 8 1/2, 9, 9 1/2" from dividing row, end with a WS row.
Shape Shoulder
(RS) At armhole edge, bind off 5 (6, 6, 6, 7) sts—5 (5, 6, 6, 6) sts remain.
Work 1 row even.
Bind off remaining sts.
RIGHT FRONT
With WS facing, place sts from holder on needle, ready to work a WS row; join double stand of yarn at underarm.
(WS) Beginning this row, work as for left Front, reversing shaping by working armhole and shoulder shaping at beginning of WS rows, neck shaping at beginning of RS rows.
BACK
With WS facing, place sts from holder on needle, ready to work a WS row; join double stand of yarn at underarm—44 (50, 54, 58, 62) sts.
(WS) Work 1 row even.
Shape Armholes
(RS) Bind off 2 (2, 3, 3, 4) sts at beginning of next 2 rows, then 1 (2, 2, 3, 3) sts at beginning of next 2 rows—38 (42, 44, 46, 48) sts remain.
Work even until armhole measures 8 (8 1/2, 8 1/2, 9, 9 1/2" from dividing row, end with a WS row.
Shape Shoulder
(RS) Bind off 5 (6, 6, 6, 7) sts at beginning of next 2 rows, then 5 (5, 6, 6, 6) sts at beginning of next 2 rows—18 (20, 20, 22, 22) sts remain for Back neck; place sts on holder.
HOOD
Sew shoulder seams.
With RS facing, using larger needle, beginning at right Front neck edge, join double stand of yarn; work 6 sts from holder in Seed st; pick up and knit 42 (44, 44, 46, 46) sts evenly around neck shaping, including sts on holder across to left Front band; work 6 sts in Seed st from holder—54 (56, 56, 58, 58) sts. Cont as established, working 6 sts each side in Seed st, remaining sts in St st, work even for 3 rows, end with a WS row.
Shape Hood
(RS) * Work 6 sts in Seed st; knit across center 42 (44, 44, 46, 46) sts, inc 4 sts evenly across; work 6 sts in Seed st.
Work 3 rows even in patt.
Repeat from * twice—66 (68, 68, 70, 70) sts.
Work even until piece measures 12 1/2" from pick-up row, end with a WS row.
Shape Hood Top
(RS) * Cont in pattern, dec 4 sts evenly across center sts.
Work 3 rows even.
Repeat from * once, end after working 3 rows even—58 (60, 60, 62, 62) sts.
Bind off all sts.
Fold Hood in half, with RS's facing. Sew seam.
Optional Join
Do not bind off sts.
Fold Hood in half, with RS's facing. Join seam using 3-Needle Bind-Off (see Special Techniques).
FINISHING
Block to measurements, if necessary.
Armhole Edging
Note: Armhole edging may be worked in-the round, using shorter circular needle, or back and forth in rows.
With RS facing, using smaller, shorter circular needle, beginning at underarm, pick up and knit 45 (47, 47, 51, 55) sts.
Begin Seed st; work even for 6 rows/rounds.
Bind off all sts loosely in patt.
Sew armband seams, if worked back and forth in rows.
Using yarn needle, weave in ends.
Baste zipper in place at center Front, leaving lower Seed st edge free and stopping approx 1" from beginning of neck shaping. Sew neatly in place.
แปล
FINISHED MEASUREMENTS:
หน้าอก 36 (40 1/2, 45, 48, 52 1/4)นิ้ว หรือ 91.5 (102.5, 114, 122, 132.5) cm
ยาว 20 (20 1/2, 21, 22, 23)นิ้ว หรือ 51 (52, 53.5, 56, 58.5) cm
อุปกรณ์
ไหม Caron International's Simply Soft Shadows
(100% acrylic; 3 oz/85g, 150 yds/137m ball): 18 (21, 24, 24, 27) oz
ไม้นิตวงกลม size 11 (8 mm) ยาว 60 – 90 cm
ไม้นิตวงกลม size US 10 (6 mm)ยาว 40 and 60 – 90 cm
Stitch markers
Stitch holders or waste yarn
Yarn needle
ซิป ยาว 16 (16, 17, 18, 19)นิ้ว หรือ 40.5 (40.5, 43, 46, 48) cm
SPECIAL TECHNIQUE
ใช้เทคนิก 3-Needle Bind Off สำหรับ bind off ฮูด
ดูวิธีทำได้ที่ https://www.youtube.com/watch?v=SJbMT_4NOpM
GAUGE ขนาดถัก
ลาย Stockinette stitch ถัก 11 ห่วง 16 แถว จะได้ขนาด 4 นิ้ว หรือ 10 cm โดยใช้ไม้นิตขนาดใหญ่ 8mm และถัก 2 เส้นควบ
ลายถักที่ใช้
ลายสต๊อกกิ้ง คือ ถักนิตด้านถูก ถักเพิลด้านผิด จำนวนหาร 2 ลงตัว
ลาย Seed Stitch ดูวิธีถักได้ที่ https://www.youtube.com/watch?v=xR2-23rOi0I
ลายลูกฟูก คือ ถัก k1p1 สลับกันไป
หมายเหตุ
จะถักเสื้อเป็นชิ้นเดียวจนถึงใต้รักแร้ทั้งชิ้นหน้าและหลัง แล้วจึงมาแยกชิ้นหน้าซ้ายขวา
ส่วนหมวกจะมาเก็บห่วงรอบคอแล้วถักตามแบบ
ทั้งหมดถัก 2 เส้นควบ
ชิ้นหลัง(รวมชิ้นหน้าซ้ายขวาด้วย)
ใช้ไม้นิตขนาดเล็กกว่าคือ 6mm ถัก 2 เส้นควบ ขึ้นต้น 100 (112, 124, 132, 144) ห่วง
เริ่มถัก Seed Stitch ไป 6 แถว จบด้วยด้านผิดแล้วเปลี่ยนไม้นิตเป็นขนาด 8มิล
จากนั้นถักตามนี้ไป
ด้าน ถูก ถัก Seed Stitch ไป 6 ห่วง (เป็นชิ้นหน้าทางขวา) แล้ววางตัว marker ถักนิต 19 (22, 25, 27, 30) ห่วง สำหรับชิ้นหน้าขวา วางตัว marker ถักนิต 50 (56, 62, 66, 72) ห่วง เป็นชิ้นหลัง วางตัว marker ถักนิต 19 (22, 25, 27, 30) ห่วงเป็นชิ้นหน้าซ้าย วางตัว marker ถักอีก 6 ห่วงที่เหลือด้วย Seed Stitch เป็นขอบชิ้นหน้าซ้าย
ถักตามนี้ไปจนวัดจากล่างขึ้นมาได้ขนาด 11 (11, 11 1/2, 12, 12 1/2) นิ้ว หรือตามความต้องการและให้จบด้วยด้านผิด
เริ่มแบ่งแถว (ตรงนี้จะถักแถวแรกของแต่ละชิ้นแยกกันค่ะ ถักแค่ 1 แถว ถ้าเข้าใจไม่ผิดนะคะ)
ด้าน ถูก ให้ถักต่อตามแพทเทิร์นเดิม เป็นชิ้นหน้าขวา ไปถึง 3 (3, 4, 4, 5) ห่วงก่อน marker แล้ว bind off 6 (6, 8, 8, 10) ห่วงเป็นใต้รักแร้ ถักตามแพทเทิร์นเดิมเป็นชิ้นหลังจน ไปถึง 3 (3, 4, 4, 5) ห่วงก่อน marker แล้ว bind off 6 (6, 8, 8, 10) เป็นใต้รักแร้ จะได้ 22 (25, 27, 29, 31) ห่วงในชิ้นหน้าทั้ง 2 ชิ้น รวมขอบเสื้อด้วย และ 44 (50, 54, 58, 62) ห่วง เป็นชิ้นหลัง แล้วหาตัวพักห่วงมาพักชิ้นหน้าทั้ง 2 ไว้
ชิ้นหน้าซ้าย (เริ่มถักต่อแต่ละชิ้นค่ะ)
ด้านผิด ให้ถักตามแพทเทิร์นไปโดยให้มีขอบด้วยคือ ถัก Seed Stitch ไป 6 ห่วงตรงใต้รักแร้ด้วย
ด้าน ถูก ตรงขอบใต้รักแร้ ให้ bind off 2 (2, 3, 3, 4) ห่วง แถวต่อไปตรงใต้รักแร้ให้ bind off 1 (2, 2, 3, 3) ห่วง จะเหลือ 19 (21, 22, 23, 24) ห่วง
ทำเช่นนี้ไปจนวัดขนาดได้ 6 (6 1/2, 6 1/2, 7, 7 1/2) นิ้ว จากที่แบ่งไว้ และให้จบด้วยด้านผิด
มาถึงช่วงคอของชิ้นหน้าซ้าย
ด้านถูก ถักนิตไปจนถึง marker แล้วพักห่วงที่เป็นขอบไว้ที่ตัวพัก จะเหลือ 13 (15, 16, 17, 18) ห่วง คือแยกขอบเสื้ออกมาอีกที
ด้าน ผิด ถักตามแพทเทิร์นไปจนถึงริมแล้วลดห่วง 1 ห่วง ทุกแถว 2 (2, 2, 3, 3) ครั้ง (ที่เป็นด้านผิด) และด้านถูกให้ลดห่วง 1 (2, 2, 2, 2)ครั้ง จะเหลือห่วง 10 (11, 12, 12, 13)
ถักไปจนวัดได้ 8 (8 1/2, 8 1/2, 9, 9 1/2) นิ้วจากที่แบ่งไว้ และจบด้วยด้านผิด
สำหรับช่วงไหล่ซ้าย
ด้านถูก ตรงฝั่งรักแร้ ให้ bind off 5 (6, 6, 6, 7) จะเหลือ 5 (5, 6, 6, 6) ห่วง
ถักไปอีก 1 แถวแล้ว bind off
ชิ้นหน้าขวา
เริ่มด้านผิด ใส่ห่วงเข้ากับไม้นิต แล้วเอาไหมใหม่มาต่อ
เริ่มถักเหมือนกับชิ้นหน้าซ้ายแต่กลับด้านกัน ไปจนถึงช่วงคอ
ชิ้นหลัง
หันด้านผิดมา แล้วใส่ไม้นิตลงไป จะได้ทั้งหมด 44 (50, 54, 58, 62) ห่วง ถักตามแพทเทิร์นไป 1 แถว
ช่วงใต้รักแร้
ด้าน ถูก bind off 2 (2, 3, 3, 4) ห่วง จากเริ่มต้น และแถวด้านถูกไปอีก 2 แถว (คือ ถักไป พอกลับมาด้านผิดก็ไม่ต้องลด แล้วมาลดด้านผิด) และ 1 (2, 2, 3, 3) ห่วงที่แถวถักจากเริ่มต้นมา 2 แถว จะเหลือ 38 (42, 44, 46, 48) ห่วง (***ตรงนี้งง เหมือนกันต้องลองถักดู)
ถักไปจนได้ความยาว 8 (8 1/2, 8 1/2, 9, 9 1/2) นิ้วจากที่แบ่งชิ้นมา และจบด้วยด้านผิด
ช่วงไหล่ของชิ้นหลัง
ด้าน ถูก bind off 5 (6, 6, 6, 7) ห่วง ที่จุดเริ่มต้น และอีก 5 (5, 6, 6, 6) ห่วง ไปอีก 2 แถว จนเหลือ 18 (20, 20, 22, 22) ห่วงสำหรับชิ้นหลัง (ตรงนี้คิดว่าพอหันมาด้านผิดก็ bind off ด้วย)
มาถึงตอนนี้จะได้
ชิ้นหน้าซ้าย มีที่พักห่วงตรง Seed Stitch
ชิ้นหน้าขวา มีที่พักห่วงตรง Seed Stitch
ชิ้นหลัง
Hood ส่วนหมวก
เย็บไหล่เข้ากับชิ้นหลัง
หัน ด้านถูกออกมา เปลี่ยนไม้นิตมาใช้ 8mm เริ่มจากชิ้นหน้าขวาที่เป็น Seed Stitch ต่อไหมแล้วถัก Seed Stitch ไป 6 ห่วง แล้วถักนิตไป 42 (44, 44, 46, 46) ห่วง ให้รอบคอพอดีจะรวมมาถึงชิ้นหน้าซ้ายด้วย แล้วถักจนจบ Seed Stitch 6 ห่วง ของชิ้นหน้าซ้าย รวม Seed Stitch 2 ฝั่งจะได้ทั้งหมด 54 (56, 56, 58, 58) ห่วง
เริ่มถักส่วนหมวก
ด้านถูก ถัก Seed Stitch ไป 6 ห่วงถักนิตไปตลอดแถว 42 (44, 44, 46, 46) ห่วง เพิ่ม 4 ห่วงตรงช่วงกลาง แล้วถัก Seed Stitch ไป 6 ห่วง
ถัก ไป 3 ชุด โดยเพิ่ม 4 ห่วงทุกแถว (คือรวมด้านผิดเป็น 6 แถว) จะได้สุดท้ายเป็น 66 (68, 68, 70, 70) ห่วง แล้วถักไปอีก 2 แถวโดยไม่ต้องเพิ่มห่วง
ถักไปจนวัดได้ขนาด 12 1/2 นิ้ว จากคอ จบด้วยด้านผิด
Hood Top
ด้านถูก ให้ถักตามแพทเทิร์นมา โดยลด 4 ห่วง ตรงช่วงกลาง
ถัก มา 3 ชุด (คือรวมด้านผิดเป็น 6 แถว) โดยไม่ต้องลดห่วง แล้วถักตามแพทเทิร์นมา โดยลด 4 ห่วง ตรงช่วงกลางอีกครั้งหนึ่ง จะเหลือ 58 (60, 60, 62, 62)
bind off จนจบ ถ้าไม่ bind off จะต้องขบด้วย 3-Needle Bind-Off โดยพับหมวกครึ่งหนึ่งโดยเอาด้านถูกออก
ถ้าไม่ใช้ 3-Needle Bind-Off ก็ให้พับหมวกครึ่งหนึ่งโดยเอาด้านถูกออก แล้วเย็บ
จบงาน
ช่วง วงแขน อาจจะไม่ถักตามแพทเทิร์น อาจจะเว้นขอบเสื้อมาถักโดยการเก็บห่วงโดยใช้ไม้นิต 6mm จำนวน 45 (47, 47, 51, 55) ห่วง แล้วถักนิตโดยเริ่มจากใต้รักแร้ จากนั้นถัก Seed Stitch 6 แถว แล้ว bind off
ติดซิปตรงกลางด้านหน้าให้สวยงาม
จบ
| Create Date : 07 สิงหาคม 2552 |
|
3 comments |
| Last Update : 2 กันยายน 2552 11:37:45 น. |
| Counter : 6167 Pageviews. |
|
 |
|


 ฝากข้อความหลังไมค์
 ผู้ติดตามบล็อก : 4 คน [