|
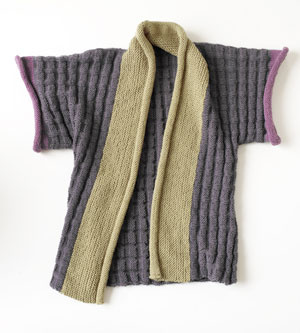
Knitted DROPS jacket
Knitted DROPS jacket : By //www.garnstudio.com/lang/en/visoppskrift.php?d_nr=120&d_id=12&lang=us

Knitted DROPS jacket with rib in 2 threads Alpaca. Size S - XXXL.
" - ... classic elegance for cooler days ..."
DROPS design: Pattern no Z-500
---------------------------------------------------------
Size: S - M - L - XL - XXL - XXXL
Finished measurements:
Bust: 82-88-98-108-120-132 cm / 32 1/4"-34 5/8"-38½"-42½"-47 1/4"-52"
Full length: 71-74-77-80-83-85 cm / 28''-29 1/8''-30 3/8''-31½''-32¾''-33½''
Materials: DROPS ALPACA from Garnstudio
color no 2922, deep pink: 600-650-700-800-850-950 g
DROPS POINTED NEEDLES size 5 mm / US 8 or size needed to get 17 sts x 22 rows in stockinette st with 2 threads Alpaca = 10 x 10 cm / 4'' x 4''.
DROPS CIRCULAR NEEDLE (80 cm / 32'') size 4.5 mm/US 7 for rib.
DROPS MOTHER OF PEARL BUTTON no 522: 2 pcs.
Max prices as of 11.04.2011:
DROPS ALPACA - 5.95 USD per 50 gr skein
Note: This pattern is written in American English.
All measurements in charts are in cm. For conversion from cm to inch - click here.
There are different terms for crocheting in British and American English.
If this pattern includes crochet, click for "crochet terms" here.
GARTER ST (back and forth on needle): K all rows.
PATTERN: See diagram M.1. Diagram shows the pattern from RS.
MEASUREMENT TIP:
Because of the weight of the yarn make all measurements while the garment is hanging, otherwise it will be too long when worn.
BUTTONHOLES:
Make 2 buttonholes on right front band approx 33-35-37-39-43-46 cm/ 13"-13 3/4"-14½"-15 1/4"-17"-18" and 41-43-45-48-52-55 cm / 16 1/8"-17"-17 3/4"-19"-20½"-21 5/8" from shoulder (or where you prefer the buttons).
1 BUTTONHOLE = bind off 1 st and cast on 1 new st on next row (for neatest result make buttonhole in P section from RS).
---------------------------------------------------------
---------------------------------------------------------
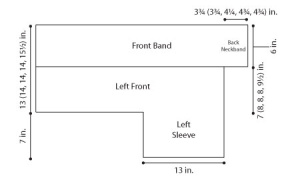
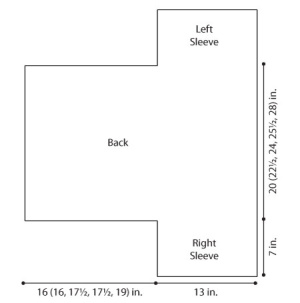
BACK PIECE:
Cast on 153-162-180-198-216-234 sts (includes 1 edge st each side) on circular needle size 4.5 mm / US 7 with 2 threads Alpaca. Work first row as follows from RS: 1 edge st in GARTER ST - see above, M.1A (= 9 sts) until 8 sts remain, finish with M.1B (= 7 sts) and 1 edge st in GARTER ST. Continue in pattern like this. After M.1 there are 85-90-100-110-120-130 sts left on needle. Change to needle size 5 mm / US 8 and continue in stockinette st with 1 garter st each side. REMEMBER THE GAUGE! When piece measures 6 cm / 2 3/8'' dec 1 st each side and repeat the dec on every 5.5-5.5-6-5-5-5.5 cm / 2 1/4"-2 1/4"-2 3/8"-2"-2"-2 1/4" a total of 7-7-7-8-8-8 times = 71-76-86-94-104-114 sts.
When piece measures 52-54-56-58-60-61 cm / 20½"-21 1/4"-22"-22 3/4"-23 5/8"-24" - see MEASUREMENT TIP bind off for armhole each side at beg of every row: 3 sts 1-1-1-1-2-2 times, 2 sts 0-1-2-3-3-5 times and 1 st 2-1-3-4-5-5 times = 61-64-66-68-70-72 sts. When piece measures 69-72-75-78-81-83 cm / 27 1/8''-28 3/8''-29½''-30¾''-32''-32¾'' bind off the middle 21-22-22-22-24-26 sts for neck and complete each shoulder separately. Bind off 1 st on neckline on next row = 19-20-21-22-22-22 sts left on shoulder. Bind off when piece measures 71-74-77-80-83-85 cm / 28''-29 1/8''-30 3/8''-31½''-32¾''-33½''.
RIGHT FRONT PIECE:
Cast on 56-65-74-83-83-92 sts (includes 1 edge st each side) on circular needle size 4.5 mm / US 7 with 2 threads Alpaca. Work first row as follows from RS: 1 edge st in garter st, M.1A (= 9 sts) until 1 st remain, finish with 1 edge st in garter st. Continue in pattern like this. After M.1 there are 32-37-42-47-47-52 sts left on needle. Change to needle size 5 mm / US 8 and continue in stockinette st with 1 garter st each side, AT THE SAME TIME on first row dec 1-4-4-4-0-1 sts evenly = 31-33-38-43-47-51 sts. When piece measures 6 cm / 2 3/8'' dec at the side as described for back piece = 24-26-31-35-39-43 sts. When piece measures 52-54-56-58-60-61 cm / 20½"-21 1/4"-22"-22 3/4"-23 5/8"-24" - REMEMBER MEASUREMENT TIP bind off for armhole at the beg of every row from the side as described for back piece = 19-20-21-22-22-22 sts left on needle. Bind off when piece measures 71-74-77-80-83-85 cm / 28''-29 1/8''-30 3/8''-31½''-32¾''-33½''.
LEFT FRONT PIECE:
Like right front piece, but mirrored.
SLEEVE:
Worked back and forth on needle. Cast on 36-38-40-42-44-46 sts (includes 1 edge st each side) on circular needle size 4.5 mm / US 7 with 2 threads Alpaca.
Work 4 rows garter st. Change to needle size 5 mm / US 8 and continue in stockinette st with 1 edge st in garter st each side. When piece measures 5-6-6-6-6-8 cm / 2"-2 3/8"-2 3/8"-2 3/8"-2 3/8"-3 1/8" inc 1 st each side and repeat the inc on every 4-3.5-3-3-2.5-2 cm / 1½"1 1/4"-1 1/8"-1 1/8"-7/8"-3/4" a total of 11-12-13-14-16-17 times = 58-62-66-70-76-80 sts.
When piece measures 48-48-47-47-46-45 cm / 19"-19"-18½"-18½"-18"-17 3/4" NOTE: Less for the larger sizes because of longer sleeve cap and wider shoulder- bind off for sleeve cap each side at the beg of every row: 3 sts 1 time, 2 sts 3-3-3-2-2-2 times, 1 st 2-2-3-4-5-6 times, then 2 sts each side until piece measures 55-55-55-56-57-57 cm / 21 5/8"-21 5/8"-21 5/8"-22"-22½"-22½", now bind off 3 sts 1 time each side and bind off remaining sts. Piece measures approx 56-56-56-57-58-58 cm / 22"-22"-22"-22½"-22 3/4"-22 3/4".
ASSEMBLY:
Sew shoulder seams. Set in sleeves. Sew sleeve and side seams inside 1 edge st.
FRONT BAND/COLLAR:
Pick up from RS: 161-167-173-179-185-191 sts along right front piece from bottom edge to mid back on circular needle size 4.5 mm / US 7 with 2 threads Alpaca. Work rib as follows with start mid back (= WS): 2 garter sts, rib K3/P3 until 3 sts remain, work these in garter st. Continue in rib like this with K over K, P over P and garter st over garter st. When front band measures 4-4-4-4-4-3 cm /
1½"-1½"-1½"-1½"-1½"-1 1/8" insert a marker after 32-32-32-38-38-38 sts from mid back.
Continue in rib as before, AT THE SAME TIME inc 1 st in each P-section (as seen from RS) on the 32-32-32-38-38-38 sts = 5-5-5-6-6-6 inc sts (to make collar sit nicely on neckline).
When front band measures 7 cm / 2¾'' for all sizes inc 1 st in each K-section on the same 37-37-37-44-44-44 sts. Repeat the inc in each P-section when front band measures 10-10-10-10-10-11 cm / 4"-4"-4"-4"-4"-4 3/8" and in each K-section when front band measures 13-13-13-13-14-15 cm / 5 1/8"-5 1/8"-5 1/8"-5 1/8"-5½"-6".
AT THE SAME TIME when front band measures 13-13-13-13-14-15 cm / 5 1/8"-5 1/8"-5 1/8"-5 1/8"-5½"-6" make 2 buttonholes SEE ABOVE.
When front band measures 14-14-14-14-15-16 cm / 5 1/8"-5 1/8"-5 1/8"-5 1/8"-6"-6 1/4" bind off all sts with K over K and P over P.
Repeat along left front piece as follows: pick up sts from RS from mid back and down along front piece and work first row from WS as follows: 3 garter sts, rib P3/K3 until 2 sts remain and work these in garter st. NOTE: do not make buttonholes.
Sew front bands tog mid back in outer loops of sts and sew collar to neckline. NOTE: When folding front band/collar over back piece there will be 4 garter sts mid back with K3 each side. Sew buttons to left front band.
DROPS Tutorial Videos: Garter stitch
//vimeo.com/4961980
DROPS Tutorial Videos: Pick up sts along edge
//vimeo.com/6434026
DROPS Tutorial Videos: Pick upp stitches sideways
//vimeo.com/6433675
If you do not find the video you need, click here to go to DROPS Video Index.
If you still don't find any relevant videos, please send us an email to design@garnstudio.com
Explanation to pattern diagram
= K from RS, P from WS
= P from RS, K from WS
= slip 1 st as if to K, K1, psso
= K2 tog
Diagram
All measurements in charts are in cm. All measures are from side to side. For conversion from cm to inch - click here.
//www.garnstudio.com/lang/en/includes/pinnestr.php

DROPS number 120-12
For pattern help, please contact the store where you bought the yarn. Having bought DROPS yarn, you are guaranteed to receive qualified help from a store specializing in the DROPS patterns.
All patterns are carefully reviewed, but we must make reservation for possible mistakes. All patterns are translated from Norwegian and you can always check the original pattern for measurements and calculations.
Go to original pattern for design 120-12.
If you think you have found an error in the pattern, please post your remark in our "Pattern Blog"
| Create Date : 11 เมษายน 2554 | | |
| Last Update : 11 เมษายน 2554 11:58:25 น. |
| Counter : 845 Pageviews. |
| |
|
 |
|
|
|
Berkeley Cardigan
Berkeley Cardigan
link: //cache.lionbrand.com/cgi-bin/patternFinder.fcgi?search=1&searchText=cardigan&Go.x=1&Go.y=1&Go=1&start=45&pageLength=15
Skill Level: Intermediate
Size: Varies
Craft: Knit
Corrections: None
Pattern #: 80788AD
Customer Rating: ****
4.0 (based on 1 review)
Write your own review Materials:
· 6 balls 484-106 LB Collection Silk Mohair: Azure
· 1 Lion Brand Knitting Needles - Size 7 [4.5 mm]
· 1 Lion Brand Split Ring Stitch Markers
· 1 Large-Eye Blunt Needles (Set of 6)
Lion Brand® LB Collection® Silk Mohair
GAUGE:
18 sts + 24 rows = 4 in. (10 cm) in St st (k on RS, p on WS). BE SURE TO CHECK YOUR GAUGE. When you match the gauge in a pattern, your project will be the size specified in the pattern and the materials specified in the pattern will be sufficient. If it takes you fewer stitches and rows to make a 4 in. [10 cm] square, try using a smaller size hook or needles; if more stitches and rows, try a larger size hook or needles.
STITCH EXPLANATION:
M1 as if to purl (make 1 st as if to purl) An increase worked by lifting the horizontal thread lying between the needles and placing it onto the left needle. Purl this new stitch through the back loop.
ssk (slip, slip, knit) Sl next 2 sts as if to knit, one at a time, to right needle; insert left needle into fronts of these 2 sts and knit them tog.
sk2p Sl 1 as if to knit, k2tog, pass slipped st over—2 sts dec.
NOTES:
PATTERN STITCH
Spider Lace Pattern (multiple of 6 + 1 sts)
Row 1 and all WS rows: Purl.
Rows 2, 4 and 6: K1, *yo, ssk, k1, k2tog, yo, k1; rep from *.
Row 8: K2, yo, sk2p, yo, *k3, yo, sk2p, yo; rep from * to last 2 sts, k2.
Row 10: K1, *k2tog, yo, k1, yo, ssk, k1; rep from *.
Row 12: K2tog, yo, *k3, yo, sk2p, yo; rep from * to last 5 sts, k3, yo, ssk.
Rep Rows 1–12 for Spider Lace pattern.
CARDIGAN
BACK
Cast on 102 (122) sts.
Knit 4 rows.
Beg with knit row, work in St st (k on RS, p on WS) until Back measures 20 (21) in. (51 (53.5) cm) from beg, end with a WS row.
Shape Armhole
Bind off 20 (25) sts at beg of next 2 rows – 62 (72) sts remain after armhole bind offs have been completed.
Work even in St st until armhole measures 9 1/2 (10 1/2) in. (24 (26.5) cm) from beg, end with a WS row.
Shoulder Shaping
Bind off 5 (6) sts at beg of next 6 rows. Bind off.
LEFT FRONT
Cast on 77 (87) sts.
Knit 4 rows.
Row 5 (RS): K50 (60) sts, place marker, k25, place marker, k2.
Row 6: K2, work Row 1 of Spider Lace pattern to next marker, purl to end.
Row 7: K to first marker, work Row 2 of Spider Lace pattern to next marker, k2.
Rep last 2 rows, continuing Spider Lace pattern as established between markers, until Front measures 18 1/2 (19) in. (47 (48.5) cm) from beg, end with a WS row.
Next (Dec) Row: K to 2 sts before marker, ssk, work in Spider Lace pattern to next marker, k2 – 76 (86) sts at end of row.
Continue as established, rep Dec Row every 4th row until piece measures same as Back to armhole, end with a WS row.
Shape Armhole
Bind off 20 (25) sts at beg of next row. Continue to rep Dec Row every 4th row until 42 (45) sts remain.
Work even until armhole measures same as Back to shoulder, end with a WS row.
Shape Shoulder
Bind off 5 (6) sts at beg of next 3 RS rows – 27 (27) sts when all bind offs have been completed. Continue in Spider Lace pattern and Garter st edge for 3 1/2 (3 3/4) in. (9 (9.5) cm). Bind off.
RIGHT FRONT
Work as for Left Front, reversing all shaping.
SLEEVE (make 2)
Cast on 58 (62) sts.
Knit 4 rows.
Row 5: Knit.
Row 6: Purl.
Row 7: Knit.
Rows 8 and 9: Rep Rows 6 and 7.
Row 10 (Inc): P1, M1 as if to purl, purl to last 2 sts, M1 as if to purl, p1 – 60 (64) sts at end of row.
Rep last 6 rows 20 (23) more times – 100 (110) sts when all incs have been completed.
Work even until Sleeve measures 25 (27) in. (63.5 (68.5) cm). Bind off.
FINISHING
Sew shoulder seams. Sew bound off edges of Spider Lace collar together. Sew lower edge of Spider Lace collar to back neck. Sew Sleeves to Fronts and Back, sewing top 4 (5) in. (10 (12.5) cm) of side of Sleeve to bound-off sts on Front and Back. Sew side and Sleeve seams. Weave in ends.
Click here to download this pattern for free!
ABBREVIATIONS / REFERENCES
Click for explanation and illustration
beg = begin(s)(ning) dec = decreas(e)(s)(ing)
inc = increas(e)(s)(ing) k = knit
k2tog = knit 2 together p = purl
rep = repeat(s)(ing) RS = right side
sl = slip St st = Stockinette stitch
st(s) = stitch(es) tog = together
WS = wrong side yo = yarn over
| Create Date : 31 มีนาคม 2554 | | |
| Last Update : 31 มีนาคม 2554 21:21:39 น. |
| Counter : 318 Pageviews. |
| |
|
| |
|
|
|
pattern cinamonrol


| Create Date : 04 กุมภาพันธ์ 2554 | | |
| Last Update : 4 กุมภาพันธ์ 2554 18:39:20 น. |
| Counter : 319 Pageviews. |
| |
|
| |
|
|
|
แพท.เสื้อคาร์ดิแกน
นำแพทเทิร์นมาเก็บไว้ก่อน เจอแล้วแบบที่อยากได้ แต่ต้องโม.อีกนิดหน่อย
แล้วมาดูกันค่ะ..
Lion Brand® Vanna's Choice®
GAUGE:
15 sts + 23 rows = 4 in. (10 cm) in Checks pattern with larger needle. BE SURE TO CHECK YOUR GAUGE. When you match the gauge in a pattern, your project will be the size specified in the pattern and the materials specified in the pattern will be sufficient. If it takes you fewer stitches and rows to make a 4 in. [10 cm] square, try using a smaller size hook or needles; if more stitches and rows, try a larger size hook or needles.
STITCH EXPLANATION:
PATTERN STITCH
Checks Pattern (multiple of 6 sts + 2)
Row 1 (RS): Knit.
Row 2 : Purl.
Rows 3 and 4: Rep Rows 1 and 2.
Row 5: K2, *p4, k2; rep from * across.
Row 6: P2, *k4, p2; rep from * across.
Rows 7 and 8: Rep Rows 5 and 6.
Rep Rows 1-8 for Checks pattern.
NOTES:
1. Circular needle is used to accommodate large number of sts. Work back and forth on circular needle as if working on straight needles.
2. Cardigan is worked in three pieces: Back, Left Front, and Right Front. The Back includes the back halves of the sleeves. The Left Front includes the front half of the left sleeve, and the Right Front includes the front half of the right sleeve.
3. The Back begins at the right sleeve and is worked across to the left sleeve. The Fronts begin at the sleeve and are worked across to the center front.
BACK
Right Sleeve
With larger needle and C, cast on 50 sts.
Beg with a WS row, work in St st (k on RS, p on WS), for 15 rows.
Change to A.
Work Rows 1-8 of Checks pattern 3 times, then Row 1 once more.
Back Next Row (WS): Cast on 60 (60, 66, 66, 72) sts.
Work Row 2 of Checks pattern over cast on sts, then continue to end of row - 110 (110, 116, 116, 122) sts at the end of this row.
Continue in Checks pattern as established until Row 8 has been completed, then rep Rows 1-8 of Checks pattern 13 (15, 16, 17, 19) more times.
Work Rows 1-3 of Checks pattern.
Left Sleeve Next Row (WS): Bind off 60 (60, 66, 66, 72) sts, p to end - 50 sts at the end of this row.
Continue in Checks pattern as established until Row 8 has been completed, then rep Rows 1-8 of Checks pattern 2 more times.
Work Rows 1-4 of Checks pattern.
Change to C and work in St st for 15 rows.
Bind off.
LEFT FRONT
Left Sleeve
With larger needle and C, cast on 50 sts.
Beg with a WS row, work in St st for 15 rows.
Change to A, and rep Rows 1-8 of Checks pattern 3 times, then Row 1 once more.
Left Front
Next Row (WS): Cast on 60 (60, 66, 66, 72) sts.
Work Row 2 of Checks pattern over cast on sts, then continue to end of row - 110 (110, 116, 116, 122) sts at the end of this row.
Continue in Checks pattern as established until Row 8 has been completed, then rep Rows 1-8 of Checks pattern 4 (5, 5, 5, 6) more times.
Front Band
Change to smaller needle and B.
Cast on 14 (14, 16, 18, 18) sts for back neckband, knit across cast on sts, then k to end of row - 124 (124, 132, 134, 140) sts.
Work in Garter st (k every row) for 29 rows.
Change to larger needle and beg with a RS row, work in St st for 14 rows.
Bind off.
RIGHT FRONT
Right Sleeve
With larger needle and C, cast on 50 sts.
Beg with a WS row, work in St st for 15 rows.
Change to A and rep Rows 1-8 of Checks pattern 3 times.
Right Front Next Row (RS): Cast on 60 (60, 66, 66, 72) sts.
Work Row 1 of Checks pattern over cast on sts, then continue to end of row - 110 (110, 116, 116, 122) sts at the end of this row.
Continue in Checks pattern as established until Row 8 has been completed, then rep Rows 1-8 of Checks pattern 4 (5, 5, 5, 6) more times.
Front Band
Change to smaller needle and B.
Next Row (RS): Knit.
Next Row: Cast on 14 (14, 16, 18, 18) sts for back neckband, knit across cast on sts, then k to end of row - 124 (124, 132, 134, 140) sts.
Work in Garter st for 28 rows.
Change to larger needle and beg with a RS row, work in St st for 14 rows.
Bind off.
FINISHING
Sew shoulder seams including tops of sleeves. Sew side and lower sleeve seams. Seam ends of back neckband, then sew neckband to back neck.
Weave in ends.
ABBREVIATIONS / REFERENCES
Click for explanation and illustration
k = knit p = purl
rep = repeat(s)(ing) RS = right side
St st = Stockinette stitch st(s) = stitch(es)
WS = wrong side
credit patt.by Learn to Knit instructions: //learnToKnit.LionBrand.com
มาลองแปลดู
การวัด:
15 ห่วง+23 แถว = 4 นิ้ว ( 10 เซน.)
| Create Date : 04 กุมภาพันธ์ 2554 | | |
| Last Update : 30 มีนาคม 2554 11:04:57 น. |
| Counter : 777 Pageviews. |
| |
|
| |
|
|
|
ฝีมือ..งานผ้า..
แธ่น...แธน....แธ๊นนน...
ผลงานชิ้นแรกที่แตะงานผ้าก็คือกระเป๋า
จากงานมิตติ้ง กะ ครูพี่ตั๋น..
แต่ทำไม่สำเร็จ ฮ่ะๆ ฮ่าๆ
(ยังมีหน้ามาหัวเราะอีก..ชิ)
..
ชิ้นที่สองก้อคือกระเป๋าใบเน้...
..ไม่กล้าโชว์อีกตามเคย...
..ก๊อมันขี้เหร่นินา..หุหุ...
ชิ้นที่สามเป็น กระเป๋าปิ๊กแป๊ก....
สูตรเด็ดเคล็ดลับจากป้ามด...
....คุณป้าทำสวยค่ะ..แต่ศิษย์ทำ
ออกมาได้แย่...ไม่ได้เรื่องเลย...
แล้วก็ตามมาติด ๆ เป็นชิ้นที่สี่ด้วย กระเป๋าปิ๊กแป๊กอีก
เป็นชุดคิท ที่สมัครจากเว็บนาราดา...เป็นของสมน้ำหน้าคุณ..
เหะๆๆมะช่าย...ของปลอบใจที่เสียกะตังค์สมัครสมาชิกกะเค้าตะหากล่ะ
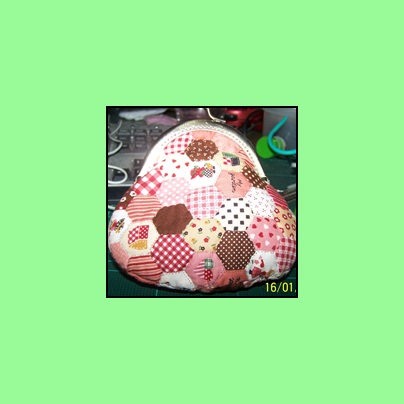
ชิ้นที่่ห้า...เป็นกระเป๋าใส่ของใช้
ของลูกสาวที่กะลังจะเกิด
อีกไม่ถึงสองอาทิตย์ข้างหน้า....
อันนี้เป็นต้นแบบ....

แต่ทำออกมาแล้วได้มาเป็นอย่างงี้...
| Create Date : 25 มกราคม 2553 | | |
| Last Update : 27 มกราคม 2553 11:33:22 น. |
| Counter : 405 Pageviews. |
| |
|
| |
|
|
|
|


 ฝากข้อความหลังไมค์
 ผู้ติดตามบล็อก : 1 คน [


