สวัสดีค๊าทุกคน
__________________________________________________
สบายดีนะคะ วันนี้หนาวๆๆ
__________________________________________________
ทุกคนที่อยู่ต่างประเทศ ช่วงนี้คงยุ่งๆกันนะคะ
__________________________________________________
แบมก็ยุ่งค่ะ คิดถึงทุกคนนะคะ
__________________________________________________
รักษาสุขภาพนะคะ อาจจะไม่ได้แวะไปเยี่ยม
__________________________________________________
ทุกคน แต่ว่า ถ้าว่า สัญญาจ้าจะแวะไปที่บล๊อกนะคะ
__________________________________________________
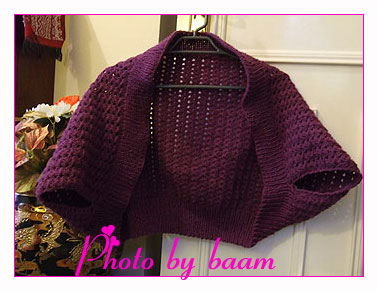
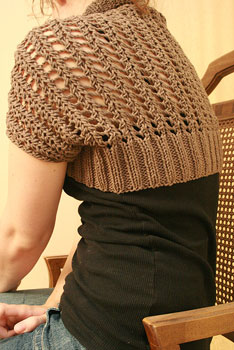
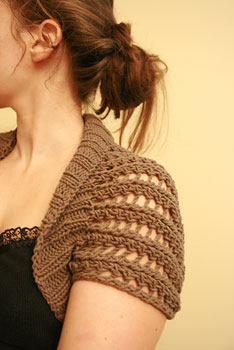
วันนี้แบมมีเสื้อคลุมไหล่ อย่างง่ายมาฝากค่ะ
__________________________________________________
สำหรับ สาวหุ่นดีนะคะ เพราะตัวนี้แบมทำมาแล้ว
__________________________________________________
ไม่เหมาะกับตัวเองค่ะ เพราะเราอ้วน
__________________________________________________
ดังนั้นขอแนะนำว่า คนผอมทำ จะแจ่มมากเลยค่ะ
__________________________________________________
ตัวนี้ทำเสร็จแล้วแบมต้องแก้ไขค่ะ เพราะไม่เหมาะ
__________________________________________________
กับตัวเองค่ะ
__________________________________________________
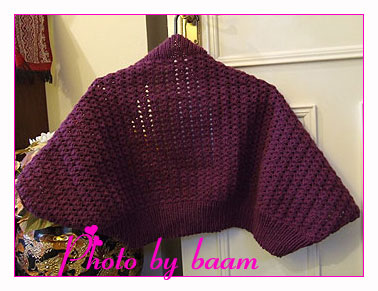
มาดูกันดีกว่าค่ะ
สิ่งที่ต้องเตรียม
ไหมพรม double knitting ไหม ดาหลา join อีเกิ้ล
ไม้นิต เบอร์ 4 mm. หรือ 6 US
ขึ้นห่วง 105, 115, 129
ขนาด S, M, L
Row 1: k1, *P1, k1 ทำซ้ำจากดอกจันจนจบแถว
Row 2 : P1, *K1, P1 ทำซ็จากดอกจันจนจบแถว
ทำซ้ำสองแถวนี้ เป็นจำนวน 18 แถว และเราจบการถัก และ เริ่มถักโครเชต์
การเริ่ม ถักโครเชต์
ต่อไหมจากมุม ขอบเสื้อ ถักโซ่ สาม และ นับข้ามโซ่ไป 3 โซ่ และ *ถัก พ1ค จำนวน 2 ครั้ง และถักโซ่ 2 ครั้ง และถัก พ1ค จำนวน 2 ครั้ง และนับข้ามโซ่ไป สามโซ่ และทำซ้ำ * ไปจนถึงโซ่ สุดท้ายให้เรา ถัก พ1ค หนึ่งครั้ง และขึ้นต้นแถวใหม่ ทำอย่างนี้ จนเราวัดได้ว่า จากกลาง หลังเราถึงต้นคือ หรือยาวกว้างต้องการ
และเราก็ดึงห่วงขึ้นมาถัก โซ่ละห่วง และถัก
Row 1: k1, *P1, k1 ทำซ้ำจากดอกจันจนจบแถว
Row 2 : P1, *K1, P1 ทำซ็จากดอกจันจนจบแถว
ทำซ้ำสองแถวนี้ เป็นจำนวน 18 แถว และเราจบการถัก
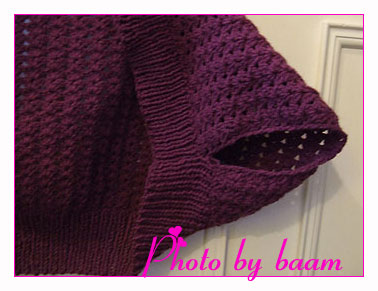
และพับมุมบนและล่าง เข้าหากัน และเย็บติดกัน ดังรูปนะคะ สังเกตดูนะคะ
จากนั้นก็เสร็จใส่ได้ค่ะ
ผังลายคล้ายอันนี้นะคะ
แต่ว่า ให้ถัก พ1ค ซ้ำ สองครั้งนะคะ ในรูปซ้ำแค่หนึ่งครั้งค่ะ
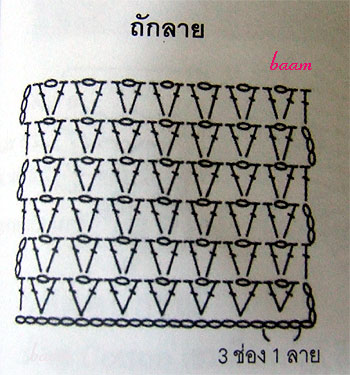
หารูปที่ตัวเองทำไม่ได้ แต่ใช้แพทเทิ้นข้างล่างนี้ก็ได้ค่ะ
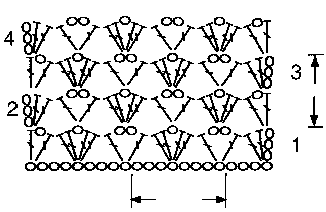
ต้นแบบคะ เป็นนิตติ้งนะคะ ทำยากก็เลยทำโครเชต์ค่ะ
แพทเทิ้นจะอ่านเข้าใจกันมั้ยน้อ เพราะแบมคิดลายเองค่ะ และ ทำขนาดเอง
แง๊วๆ ยังไงก็บอกได้นะคะ ไม่เข้าใจค่ะ
จริงแล้วแพทเทิ้นตรงลายเราจะถักลายอะไรก็ได้คะ ตามใจเราค่ัะ
แพทเทิ้นที่ทุกคนต้องการค่ะ
เสื้อตัวสีน้ำตาลคะ่ แบมแปลให้แล้วนะคะ
//kellymaher.wordpress.com/2007/07/04/ribbed-lace-bolero/
-Kelly
Yarn: Lion Brand Cotton-Ease 2 balls
Needles: US8, US10.5 (circular or straight)
Gauge: 4st/inch with in rib stretched US8
I’m including directions for a size small and easy calculations for a custom fit.
(Numbers in green you will customize for your own fit)
The first step is to measure your shoulder-span. Mine is about 17 inches. Then you add 4 inches for each sleeve (8 inches) and add that to your shoulder measurement. I got 25 inches from that, so 25 inches will be the width of my bolero. My ribbing gauge is 4 stitches per inch, so I multiply 25 by 4 to get 100. I take that number, 100, and round it down to the next number that is a multiple of 4 +2. The next number down is 98, and that will be my cast-on number. To determine the length of my bolero, I measure the width of my upper arm, right under the armpit. Mine measures 12, and I will add 6.5 inches to that (3.25 inches on either side which I will seam together) to get my length of 18.5 inches.
*Slip the first stitch of each row for easier seaming and a neat edge
Begin with US8 needles
Cast on ___ (multiple of 4 + 2)
row 1: p2 k2 to last 2 stitches, p2
row 2: k2 p2 to last 2 stitches, k2
repeat these 2 rows for 3 inches
Start lace pattern:
Switch to size 10.5 needles AFTER FIRST row of lace
row 1: k1 (k2together, yo, yo, ssk) repeat lace pattern until 1 stitch left, k1
row 2: p1 (p1, p1 into first yo, p1 into the back of the second yo, p1) repeat lace pattern until 1 stitch left, p1
Repeat these two rows until entire piece measures 3 inches from target length.
Switch to size 8 needles now
The next row will use cabling to transition from lace to ribbing, so it will mirror the other side
p1 (c1f [p into the stitch that was moved behind, k into the stitch that was moved in front], c1b [k into the stitch that was moved in front, p into the stitch that was moved behind] ) repeat cabling until 1 stitch left, p1
The next row will count as row 2 (wrong side)
row 2: k2 p2 to last 2 stitches, k2
row 1:p2 k2 to last 2 stitches, p2
Continue for 3 inches, ending with row 2. Count your rows and match the number to the rows you knit in the first set of ribbing.
Bind of using Elizabeth Zimmerman’s sewn bind-0ff.
Break off the yarn and leave a tail 4 times the width of your piece. Sew forward (right to left) through two stitches as if to purl, leave the stitches on the needle. Sew backward (left to right) through one stitch as if to knit, slip stitch off the needle. Continue in this pattern to the end.
This bind-off leaves a very stretchy edge that looks similar to the long tail cast-on.
Seam edges A to B for 3.25 inches and edges C to D for 3.25 inches, using mattress stitch (as shown in diagram)
Diagram is not to scale.
The hole created from seaming the edges is your arm hole.
Chose which edge you want to be the top of your bolero, and sew the collar down to keep it in place.
Weave in all ends, wash and block.
Fini!
Pattern & images © 2007 by Kelly Maher
Personal use ONLY. Commercial use, including selling items made from this pattern, is prohibited.
แปลแพทเทิ้น
ใช้ไหมพรม Cotton 2 ม้วน
ขนาดไม้นิต : US8, US10.5 (circular or straight)
Gauge: 4st/inch with in rib stretched US8
ไซด์ที่โชว์เป็นไซด์เล็ก.
(คุณจะเปลี่ยนขนาดก็ให้เปลี่ยน ตัวหนังสือสีเขียว )
เริ่มแรกให้วัดความกว้างของไหล่ตัวเอง. สำหรับฉันกว้าง 17 นิ้ว. และเพิ่มเข้าไปอีกข้างละ 4 นิ้วเป็นแขนเสื้อแต่ละข้าง (รวม 8 นิ้ว) และเมื่อรวมแล้วจะได้ความกว้างของไหล่และแขนเสื้อ. ฉันรวมได้ 25 นิ้วทั้งหมด , เมื่อได้ 25 นิ้วแล้ว ความกว้างของเสื้อ . ขอบเสื้อของ ฉัน วัดขนาดได้ 4 ห่วงเท่ากับหนึ่งนิ้ว , และเมื่อคูณกันแล้ว 25 คูณ 4 จะได้เท่ากับ 100. ฉันก็จะเอาเลขนี้แหล่ะ, 100, และเลขแถวลงไปข้างล่าง คือ เมื่อคิดออกมาแล้วได้ ขอบเสื้อ 4 ห่วง+และให้บวกอีก 2 ห่วง. ดังนั้นจะได้หมายเลข 98, และนี่จะเป็นหมายเลขที่เราขึ้นห่วง . และเมื่อมาคิดถึงความยาวของเสื้อแล้ว , ฉันวัดความกว้าง จาก ด้านบนขนของฉัน, ลงมาด้านขวามือถึงรักแร้ . ฉันวัดได้ 12 นิ้ว , และพิ่มไปอีก 6.5 นิ้ว (ซึ่ง จะวัดเข้าไป 3.25 นิ้ว เพื่อเย็บขอบเข้ากัน แต่ละด้าน) ความยาวทั้งหมดที่ต้องการคือ 18.5 นิ้ว.
* เลื่อนห่วง ตรงห่วงแรกทุกแถว จะง่ายในการเย็บขอบ
เริ่มต้นด้วยไม้นิตเบอร์ US8 หรือ 5มม.
ไม้นิตขนาด US8 needles
Cast on ___ (multiple of 4 + 2)
แถว 1: p2 k2 ไปจนถึง 2 ห่วงสุดท้ายแล้วถัก, p2
แถว 2: k2 p2 ไปจนถึง 2 สุดท้าายแล้วถัก, k2
ทำซ้ำ 2 แถวนี้จนวัด 3 นิ้ว
เริ่มแพทเทิ้น ตรงนี้ให้ดูวีดีโอก่อนหนึ่งรอบนะคะ lace pattern:
เปลี่ยนไม้นิตมาเป็นไซด์ 10.5 จากนั้นถักแถวแรกของ แพทเทิ้น lace
แถว 1: k1 (k2together, yo, yo, ssk) ทำซ้ำในวงเล็บจนเหลือ 1 สุดท้ายแล้วถัก, k1
แถว2: p1 (p1, p1 into first yo, p1 แทงไม้ไปหลังห่วง yo ที่สองแล้วถัก , p1) ทำซ้ำในวงเล็บไปจนถึง 1 ห่วงสุดท้ายแล้วถัก, p1
ดูวีดีโอแล้วจะเข้าใจว่าถักยังไงนะคะ
ทำซ้ำสองแถวนี้จนวัดได้ 3 นิ้ว .
แล้วเปลี่ยนไม้นิตมาเป็นไซด์ 8
จากนั้นก็ถัก ขอบนะคะ Ribbing
p1 (c1f [p ในห่วงด้านหลัง, k ในห่วงด้านหน้า], c1b [k ในห่วงด้านหน้า, p ในห่วงด้านหลัง] ) ทำซ้ำจนเหลือ1 ห่วงสุดท้ายแล้วถัก, p1
แถวต่อไปจะเป็นแถวที่ 2 (wrong side ด้านผิด)
แถว 2: k2 p2 ทำซ้ำจนถึง 2 ห่วงสุดท้ายแล้วถัก, k2
แถว1:p2 k2 ทำซ้ำจนถึง 2 ห่วงสุดท้ายแล้วถัก, p2
ถักไปจนวัดได้ 3 นิ้วจบด้วยแถวที่ 2. นับแถวให้ดีวัดให้ได้เท่ากับขอบอันแรกที่เราทำไว้.
จบห่วงแบบ Elizabeth Zimmerman’s sewn bind-0ff.
จบห่วงให้เหลือไหมยาว 4 เท่าของขนาดเสื้อที่เราถัก. เย็บประกอบจากขวา ไปซ้า สอดไหมผ่านสองห่วง ถ้าเป็นห่วงเพิล ให้ค้างห่วงบนไม้นิตแล้ว เย็บกลับไป เป็นซ้ายไปขวา จากนั้น สอดไหม ผ่านหนึ่งห่วง ถ้าห่วงนั้นเป็นนิต แล้วก็เหลื่อนห่วงออกจากไม้ แล้วทำแบบนี้ต่อไปจนจบแถว
ซึ่งจบห่วงแบบนี้จะเหมือนการขึ้นห่วงแบบ long tail cast-on.
เย็บตรงขอบ เอ กับบี เข้าหากัน และ ซีกับดี เข้าหากัน ตรงกลางที่เป็นแพทเทิ้น laceก็จะเป็นวงแขน ค่ะ
วีดีโอการถัก
https://www.youtube.com/watch?v=qhMgcbxtHDQ
วีดีโอการจบห่วง
https://www.youtube.com/watch?v=MfnavSY2Rug
Last Update : 17 ธันวาคม 2550 15:52:55 น.


 Friends


 ฝากข้อความหลังไมค์
 ผู้ติดตามบล็อก : 105 คน [


อยากถักตัวนี้บ้างจัง...