เวปดีดีสำหรับมือกราฟฟิกและช่างภาพ รวมถึงอาร์ทติสท์ทั่วไปที่ชื่นชอบPhotoshop CS
ตั้งใจจะแนะนำเวปที่เป็นประโยชน์กับเพื่อนๆมานานแล้วครับ อยากให้เพื่อนๆเข้าไปเยี่ยมทชมครับ ดีมากเลยมีLesson มากกว่าแสน และLink ไปยังเวปที่สอนแบบworkshopมากมายกว่าพันเวป ชือของเวปก็คือ //www.good-tutorials.com
Click on the "Add Layer Mask" icon at the bottom of the Layers palette.
This adds a layer mask to the "motion blur" layer:
from the Tools palette, or press B on your keyboard to quickly select it. Then press D on your keyboard to make sure black is selected as your foreground color (Note: If your layer mask was already selected when you pressed "D", your foreground color will actually become white, since white is the default foreground color for a layer mask. If that's the case, simply press X to swap the foreground and background colors, which will set your foreground color to black). Go up to the Options Bar at the top of the screen and lower the opacity of your brush to around 10%:
ครับผม สมกับชื่อจริงๆครับผม ลองดูตัวอย่างสักบทนะครับผม
การทำภาพแบบสยองๆ ผีน่ากลัว 555

หลังจากทำเอฟเฟค

Step 1: Copy The Background Layer
As always, we never want to work directly on our Background layer, since it contains our original pixel information, so the first thing I'm going to do is copy it. I'm a big fan of naming layers and you should be too, so I'm going to use the keyboard shortcut Ctrl+Alt+J (Windows) / Command+Option+J (Mac) to bring up the New Layer dialog box. I'm going to name my Background copy layer desaturated, and we'll see why in a moment:

Photoshop's New Layer dialog box. Name your layer "desaturated".
This gives me a copy of my Background layer in the Layers palette, which Photoshop has named "desaturated":

Photoshop's Layers palette now showing my Background layer and the copy above it.Step 2: Desaturate The Background Copy Layer
With my "desaturated" layer selected in the Layers palette, I'm going to, you guessed it, desaturate it to remove all the colors. To do that, I'll use the keyboard shortcut Ctrl+Shift+U (Windows) / Command+Shift+U (Mac). The image now appears black and white:
>
I need to make a copy of my "desaturated" layer at this point, so with it selected in the Layers palette, I'll use the keyboard shortcut Ctrl+Alt+J (Windows) / Command+Option+J (Mac) once again to bring up the New Layer dialog box. This time, I'll name the layer "motion blur":

Create a copy of the "desaturated" layer and this time name it "motion blur".
I now have three layers in my Layers palette, including my new "motion blur" layer at the top:

I feel like I'm giving away the endings with my layer names, but oh well. With the "motion blur" layer selected, go up to the Filter menu at the top of the screen, select Blur, and then select Motion Blur. This brings up the "Motion Blur" dialog box. Normally you'd apply a motion blur to an object that's, you know, in motion, but applying it to a stationary object tends to give it a ghost-like effect, which is what we're after. When the dialog box appears, set the Angle to zero degrees, and then drag the slider bar at the bottom to the right to increase the Distance value until your image is blurred out quite a bit. Here I've set mine to 95 pixels:

Photoshop's "Motion Blur" dialog box.
Here's my image after applying the Motion Blur filter:
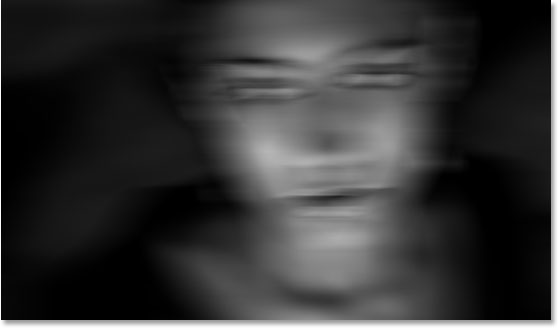
Our image already looks a little spooky with the motion blur applied, but now we're going to bring back some of her face, and we're going to do that using a layer mask. With the "motion blur" layer selected, click on the "Add Layer Mask" icon at the bottom of the Layers palette:

Add A Layer Mask To The "Motion Blur" Layer 
Lower the opacity of the brush to 10% in the Options Bar.
This will allow you to paint the face back in gradually. Click on the layer mask thumbnail in the Layers palette to select it if it's not already selected (it will have a highlight border around it if it's selected), and then with a large, soft-edged brush and black as your foreground color, paint over the middle area of the face in short, gradual strokes to bring back some of the eyes, nose and mouth, leaving the rest blurred out. Be sure to stay well within the boundaries of the face so everything blurs out nicely from the center:


ประมาณนี้ครับ เห็นไหมครับ ง่ายมากเลย ไม่ต้องเก่งภาษาอังกฤษก็ใช้ได้ครับ และจะสังเกตุเห็นมีบางเวปของไทยที่เอามาทั้งดุ้นเลยช่วยแปลให้เสร็จ ฮา555 (ไม่ขอพาดพิงครับ..แต่เวปเขาได้รางวัลด้วยนะ 555)และพวกหนังสือสอนโฟโตชอบทั้งหลาย 555 ถ้าคุณเข้าไปคลิกดูที่เวปนี้สามารถปริ้นท์แอดออกมาได้เป็น100เล่มใหญ่ๆเลยครับผม
"""""""""""""""""""""""""""""""""""""""""""""""""""""""""
object classid="clsid:D27CDB6E-AE6D-11cf-96B8-444553540000"
codebase="//download.macromedia.com/pub/shockwave/cabs/flash/swflash.cab
#version=6,0,29,0" width="210" height="147">
| Create Date : 04 มิถุนายน 2550 |
| Last Update : 4 มิถุนายน 2550 18:18:27 น. |
|
6 comments
|
| Counter : 1839 Pageviews. |
 |
|
|


 ฝากข้อความหลังไมค์
 ผู้ติดตามบล็อก : 1 คน [

