An absolute beginner
|
|||||||||||||
Carrot Cake (Hello Kitty version)
เพิ่งถอย hello kitty baking pan ของ wilton มาค่ะ คืออยากจะลองทำ Hello kitty cake และ เค้กการ์ตูนต่างๆ ซึ่งไม่เคยได้ทำมาก่อน เห็นคุณแอ (rasinee) ทำเค้ก 3D และเค้กรูปการ์ตูนต่างๆ แล้วเกิดอยากฝึกทำขึ้นมาบ้างค่ะ คุณแอ ทำสวยจริงๆเลยค่ะ น่ารักด้วยเหมาะกับเป็นเค้กวันเกิดสำหรับเด็กๆ (วันเกิดหลานชาย และลูกสาวใกล้เข้ามาแล้วค่ะ อีกไม่กี่เดือน)
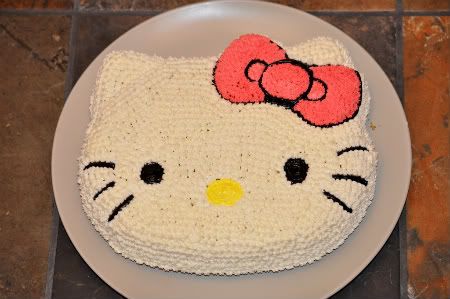 เคยลองตีบัตเตอร์ครีมมาหลายสูตร หัดบีบครีมมาหลายหนแต่ยังไม่ค่อยได้ดั่งใจค่ะ เลยหลังไมค์หาคุณแอร์ เลยได้สูตรบัตเตอร์ครีมมาค่ะ ชอบมากค่ะ อยู่ตัว หอม และไม่หวานมาก (อิ อิ สูตรตามไปขอคุณแอ เองได้เลยนะคะ) ขอบคุณคุณแอ อีกครั้งนะคะ สำหรับสูตรดีดี และมิตรภาพที่มีให้ค่ะ แล้วตัวเค้กทำเป็นแครอทเค้กค่ะ ไม่เคยกินมาก่อน ไม่เคยนึกจะทำ เพราะชอบกินเค้กนุ่มๆ ครีมนุ่มๆมากกว่า แล้วแครอทเค้กฟังดูไม่ค่อยเข้าท่า อิ อิ (อันนี้เป็นอดีตความเห็นส่วนตัว) ตั้งใจจะทำแครอทเค้กก็ต้องนั่งหสสูตรค่ะ หาจากเพื่อนๆชาวบล๊อคนี่แหละค่ะ แล้วก้ไปเจอแครอทเค้กสูตรจากบล๊อคคุณแพท งาขาว ดูจากรูปและส่วนผสมแล้วดูดีน่าสนใจมากค่ะ เลยลองเอามาทำดู แต่แอบลดน้ำตาลลงไปค่ะ แล้วเพิ่มแครนเบอรี่แห้งข้าไปด้วยค่ะ ผลออกมาเป็นที่พอใจค่ะ พ่อแม่สามีกินแล้วบอกอร่อย พ่อสามีขอเบิ้ลอีก 1 ชิ้น สามีกินไป 1 ชิ้น ลูกสาวชิมไป 3 คำ (อันนี้ไม่หวังว่าเขาจะกินเลยเพราะเธอไม่ชอบกินผักค่ะ) ให้เพื่อนชิม บอกว่าอร่อย (แต่หวานไปหน่อย อันนี้เพื่อนเราไม่ชอบหวานมากกว่าเราอีก อิ อิ) ส่วนตัวเรากินไปวันแรก 1 ชิ้นใหญ่ๆ แป็บเดียวหมด กรุปๆกรอบๆหนึบๆ อร่อยหง่ะ (รู้งี้กินไปตั้งนานแล้ว) แล้วก็กินเรื่อยๆ จนหมดชิ้นสุดท้ายในวันที่ 3 ขอขอบคุณคุณแพท งาขาวมากๆนะคะสำหรับสูตรแครอทเค้ก และรูปแครอทคัพเค้กที่สะดุดตา จนทำให้เราคิดทำแครอทเค้ก (ไม่รู้จักคุณแพทเป็นการส่วนตัว แต่ขอบคุณจากใจจริงเลยค่ะ) 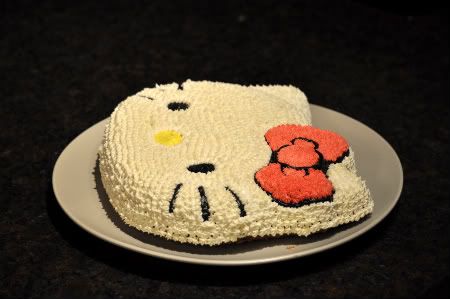 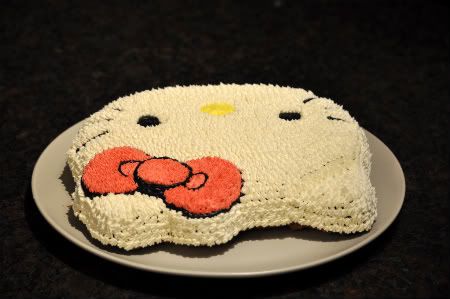 แครอทเค้กส่วนมากจะราดด้วยครีมชีสฟร้อสติ้ง อันนี้ยังไม่เคยลองทำเพราะเราเอาบัตเตอร์ครีมมาบีบให้เป็น hello kitty เราว่าถ้าเอาครีมชีสมาโปะคงอร่อยขึ้นอีกเป็นโข มาดูสูตรกันค่ะ (ปรับจากต้นฉบับของคุณแพท งาขาวนะคะ ขอบคุณอีกครั้งค่ะ) 1. แป้ง All-purpose 2 ถ้วย 2. Baking soda 2 ช้อนชา 3. ผงซินนาม่อน 1 ช้อนชา 4. เกลือ 1/4 ช้อนชา 5. น้ำตาลทราย 1 + 1/4 ถ้วย 6. น้ำมันพืช 1 ถ้วย 7. วนิลา 1 ช้อนชา 8. ไข่ขนาดใหญ่ 3 ฟอง ทิ้งไว้ที่อุณหภูมิห้อง 9. แครอทขูดแล้ว 3 ถ้วย 10. ถั่ววอลนัทสับหยาบๆ 1 ถ้วย 11. ลูกเกด 1/2 ถ้วย และแครนเบอรี่แห้ง 1/2 ถ้วย วิธีทำนะคะ (ดูรายละเอียดอย่างละเอียดที่บล๊อคคุณแพท งาขาวค่ะ //www.bloggang.com/viewdiary.php?id=joo&month=06-2007&date=20&group=18&gblog=2 1. เอาของแห้งผสมกันแล้วร่อนพักไว้ (เหลือแป้งไว้ซัก 1/3 ถ้วยค่ะ เอาไว้คลุก แครอท วอลนัท ลูกเกด และแครนเบอรรี่ 2.เอาน้ำตาลกับน้ำมันใส่โถแล้วเอาตระกร้อมือคนให้เข้ากันค่ะ จากนั้นใส่ไข่ที่ละฟองคนให้เข้ากัน ใส่นิลา จากนั้นใส่ของแห้งลงไปค่ะ คนให้เข้ากัน เบามือ อย่าคนนาน 3. เอาแป้ง 1/3 ถ้าวยมาคลุกแครอท วอลนัท ลูกเกด และแครนเบอรรี่ จากนั้นเอาส่วนผสมดังกล่าวใส่ลงไปในส่วนผสมข้อ 2 ค่ะ คนพอเข้ากัน แล้วเทใส่พิมพ์ hello kitty ค่ะ อบ 350 ฟาเรนไฮด์ นานประมาณ 45-60 นาที (ดูว่าเค้กสุก กดแล้วเด่งค่ะ หรือเอาไม้จิ้มฟันแหย่ลงไป พอขึ้นมา ไม่มีอะไรติดขึ้นมา) 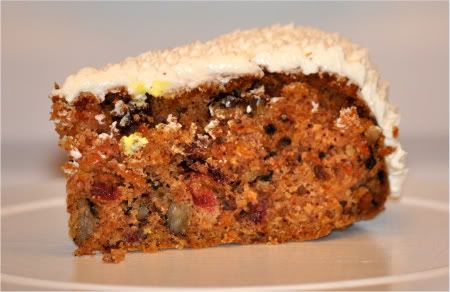 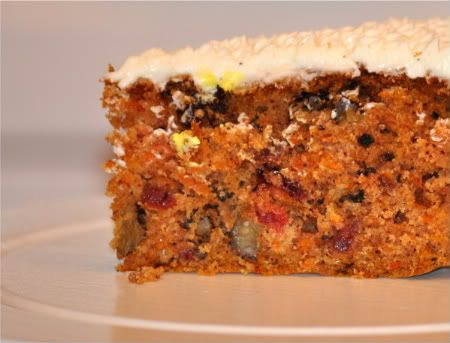 จากนั้นก็เอาเค้กออกมาพักไว้จนเย็นสนิท แล้วก็เอามาบีบเป็น hello kitty cake ค่ะ ใช้ 3 สีค่ะ ดำ ชมพู และขาวธรรมชาดของบัตเติร์ครีม ใช้หัวบีบเบอร์ 2 สำหรับลากเส้น หัวบีบเบอร์ 16 ของwilton สำหรับโบว์ และหัวบีบ 18 สำหรับหน้าทั้งหมดค่ะ เสร็จแล้วค่ะ สวัสดีค่ะ 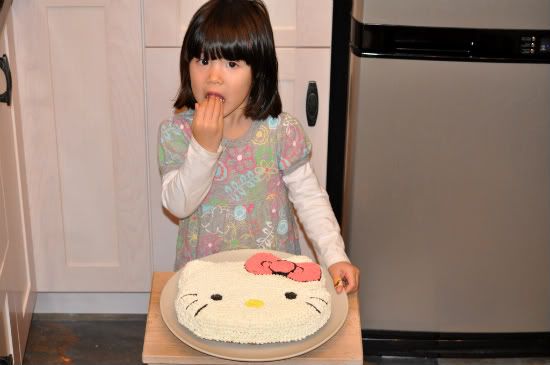
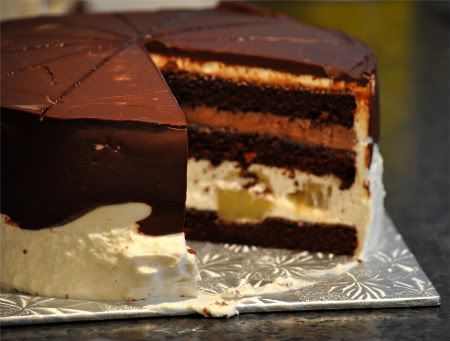
Durain cake (This one perfect)
และแล้วก็ได้ทำอีกรอบ รอบนี้เป็นรอบที่ 2 สำหรับการทำทุเรียนเค้ก แต่เป็นครั้งแรกที่ประยุคต์สูตรมาจากเค้กเผือกสูตรของคุณกิ๊บ - Gibpiko (ขอบคุณมาก นะคะ)
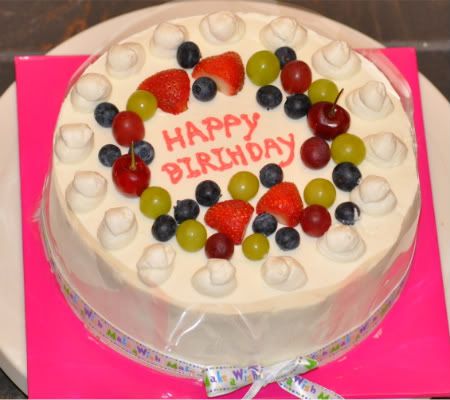 แอบสะกด birthday ผิดค่ะ รู้หลังถ่ายรูปไปแล้ว แต่ก็แก้ไขทันก่อนส่งลูกค้าค่ะ ครั้งก่อนประยุคต์สูตรมาจากเค้กกล้วยหอมแต่สงสัยจะตีนานไปหน่อยเลยได้เนื้อเค้กที่มีฟองอากาศและเหนียว แต่รสชาดทุเรียนมากๆเลยค่ะ ถ้าใครชอบนี่ต้องบอกว่ารสชาดใช่เลย แต่เนื้อเค้กยังต้องปรับปรุง สำหรับใส้เค้กประยุค์มาจากสูตรเค้กมะพร้าวอ่อนห้องก้นครัวของครูหลายๆท่านค่ะ (ขอบคุณสูตรดีดีเช่นกันค่ะ)เพียงแต่เพิ่มแป้งกวนใส้ไปอีกหน่อยเพราะถ้าไม่เพิ่มพอใส่เนื้อทุเรียนแช่แข็งที่ละลายแล้วลงไป มันจะเหลวไปหน่อย พอเพิ่มแป้ แล้วเอาวิปปิ้งครีมใส่เข้าไปด้วยนี่นุ่มลิ้น และอร่อยดีค่ะ ครั้งนี้สูตรประยุคต์จากเค้กเผือก สไลด์เนื้อเค้กโอเคเลยค่ะ แต่รสชาดไม่ทราบเหมือนกันว่อร่อยหรือเปล่า เพราะไม่ได้ชิม (ทำขายให้ลูกค้าคนเวียดนาม อิ อิ ) แต่น่าจะอร่อยนะคะ อิ อิ  มาดูสูตรกันค่ะ ใช้กับพิมพ์กลมขนาด 8 x 3นิ้วนะคะ แป้งเค้ก 120 กรัม ผงฟู 1 + 1/2 ช้อนชา เกลือ 1/3 ช้อนชา น้ำตาล 70 กรัม นม 80 กรัม น้ำมันพืช 75 กรัม ไข่แดง 5 ฟอง เนื้อทุเรียนแช่แข็งที่ละลายแล้ว 100 กรัม วนิลา 1 + 1/2 ช้อนชา ไข่ขาว 5 ฟอง น้ำตาล 70 กรัม ครีมออฟท่ทาร์ 1/3 ช้อนชา วิธีการตีก็ทำเหมือนเค้กชิฟฟ่อนทั่วไปค่ะ ผสมของแห้งร่อนรอไว้ ผสมส่วนผสมไข่แดงตีด้วยตรกร้อมือให้เข้ากัน เทลงไปในส่วนผสมของแห้ง คนรวดเร็ว แต่เบามือ ห้ามคนนาน จากนั้นก็ไปตีไข่ขาวให้เป็นเมอแรงค์ค่ะ ตั้งยอด แล้วก็เอาว่านเมอแรงค์ไปตะลอ่มเข้ากับส่วนไข่แดงผสมแป้งวตามข้างบน เทใส่พิมพ์ที่รองก้นพิมพ์ด้วยกระดาาไข อบ 350 ฟาเรนไฮด์ นานปรมาณ 45-60 นาที สำหรับใส้นะคะ แป้งข้าวโพด 35กรัม น้ำตาล 60 กรัม เกลือ 1/4 ช้อนชา นมสด 150 กรัม กะทิ 150 กรัม เนยสด 20 กรัม เนื้อทุเรียน 150 กรัม stabilized whipping cream (วิปครีมที่ผสมเจลาติน ที่ตีตั้งยอดแล้ว 1 ถ้วย วิธีทำก็เอาทุกอย่างใส่หม้อตั้งไฟอ่อน ยกเว้น เนย เนื้อทุเรียน และวิปครีม คนตลอด พอเริ่มข้นตามที่เราต้องการก้ยกออกจากเตา ใส่เนย และเนื้อทุเรียน ทิ้งไว้ให้เย็นสนิท แล้วพอจะเอามาปาดก็ตะล่อมวิปครีมลงไปค่ะ 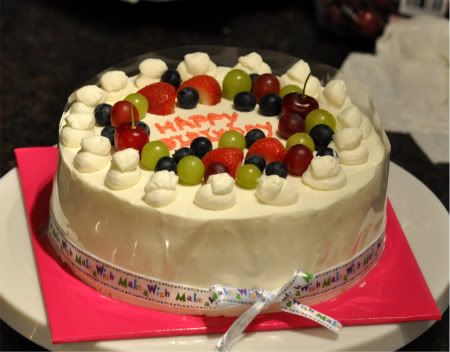 จากนั้นก้ประกอบร่างนะคะ แล้วแต่งหน้าตามใจฉันค่ะ ไม่มีรูปขั้นตอนการทำนะคะ ไม่มีเวลาถ่ายรูปตอนทำค่ะ เพราะต้องรบกับลูกสาวจอมซนไปด้วยค่ะ ไม่งั้นเค้กคุณแม่ เละ แน่ๆค่ะ เธอมือไม่อยู่นิ่งเลยค่ะะ อยากช่วยทำทุกอย่าง หาดูได้จากเพื่อนๆในบล๊อคได้เลยค่ะ เหมือนๆกัน สวัสดีค่ะ Chocolate Banana cake
Happy new year ka everyone.
 Well, I started the new year with the chocolate banana cake. I really wanted to bake this cake long time ago, but i had no time (he he!! good excute!) The picture of banana chocolate cake from khun Wan (a little catz) website really make me hungry and want to bake this cake. But i don't like to eat just banana, so, i replaced it with the caramel-banana ,the idea from Nong Bao (tiny bekery) web blog. The recipe of the chocolate-banana cake is based on the Fresh milk sponge cake. Only more ingredients are added. 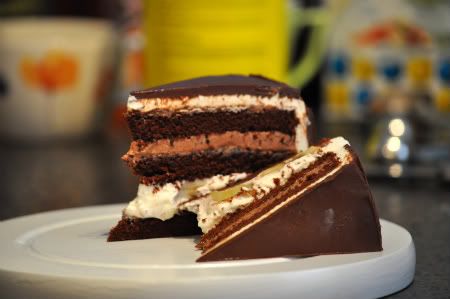 The chocolate-banana sponge cake: I use the 8' x 3' round pan to bake @ 350 F 1) Cake flour 100 g 2) Baking powder 1 tsp 3) Baking soda 1/2 tsp 4) Eggs 4 5) SP 5 g 6) Sugar 100 g 7) Cocao powder 50 g 8) Fresh milk 70 g 9) Banana 1 10) Vegetable oil 70 g 11) Vanilla 1 tsp, salt 1/3 tsp Direction: 1. Preheat oven to 350 F. Line the bottom of standard round pan (for 3 lbs cake) with parchment paper. Sift together flour, baking soda,salt and baking powder set aside. In a microwavw heat up 70 g of milk for 25 seconds, whisk in cocao powder and set aside. 2. Mash the banana and set aside 3. In the mixing bowl, with and electric mixer on high speed, whisk together the ingredients from number (1) add eggs, sugar, sp, banana until mixture white and fluffly about 5-7 minutes 4. Reduce the speed,at the lowest speed,continue add the vegetable oil into the mixture,1 tea spoon at a time until finish and continue whisk the batter untill smooth. 5. Put the batter in a round pan and bake for 45 - 60 minutes or until center is completely set and the edge is light brown. For the caramel-bananas: (use about 2 bananas, if cut into small peices) 1. In a sauce pan put together 3 tbsp of brown sugar and 3 tbsp of salted butter. Cook over low-medium heat, stirring constantly until the mixture become to boil and thickende, add banana (you can cut in a small peice or cut half-half) reduce the heat abit and cook about 2-3 minutes each side. Let it cool down completely and set aside. 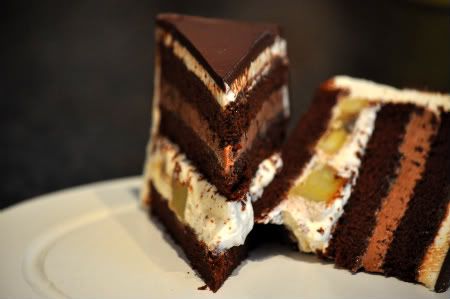 For stabilized whipping cream: 1) 3 Cups of whipping 2) 1 + 1/4 + 1/2 + 1/8 tsp of gelatin 3) 6 tbsp of icing sugar Direction: 1) In a small cup, put together gelatin and 2 tbsp of water. Let it absorbation for 1 minutes, then put the cup in a small sauce pan add abit of water and heat up over medium heat until the gelatin is melthed. 2) Take the cup out and set asid let it cool down. In the electric mixture,whisk whipping cream, icing sugar and melted gelation in high speed until stiff peaks. (take 1/3 of whipping creaam off and add 1 tbsp of cocao powder and 2 tbsp of icing sugar, whisk until combind) set aside 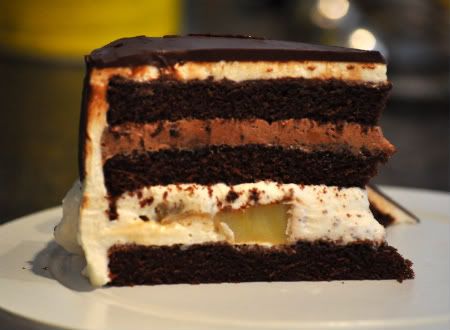 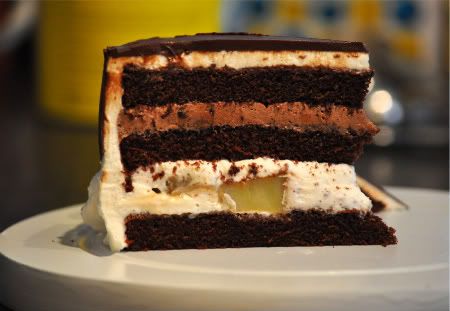 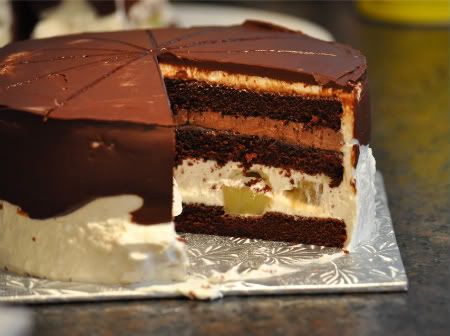 Have a nice day....msnv Double Chocolate Cheesecake
Yesterday, we did invite my parent inlaw and older sister of my husband for dinner. We had Thai foods dinner. So, I was thinking about making some easy dessert such as no bake Lychee cheesecake, but my husband wanted to eat chocolate cheesecake. I was searching for the recipie on internet and found this recipe call " Double chocolate cheesecake " It is interesting and quite easy. The idea is putting together brownie and no baked cheesecake.
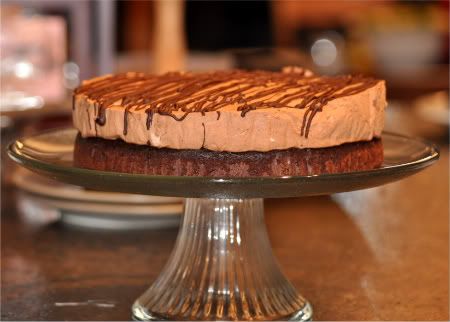 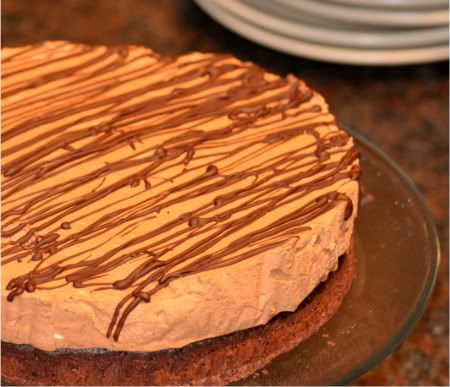 Here are the recipie (from foodnetwork canada): Ingredients Brownie Layer 1 cup unsalted butter 1 cup cocoa powder 1 3/4 cups sugar 4 large eggs at room temperature 2 teaspoons vanilla 1 1/4 cups all purpose flour 1 teaspoon baking powder 1/2 teaspoon fine salt 1/2 cup white chocolate chips 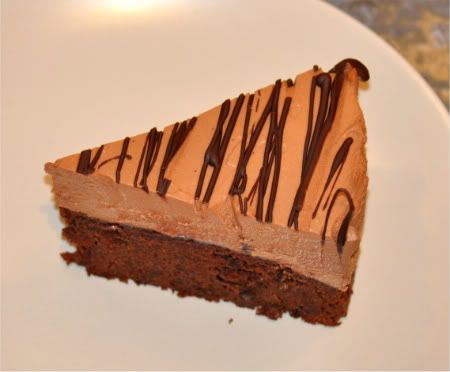 Cheesecake Layer 6 ounces semi-sweet chocolate, chopped 2x8 ounce (250 g) packages of cream cheese at room temperature 1/2 cup sugar 1 teaspoon vanilla 1 1/2 cups whipping cream 2 ounces white chocolate, melted 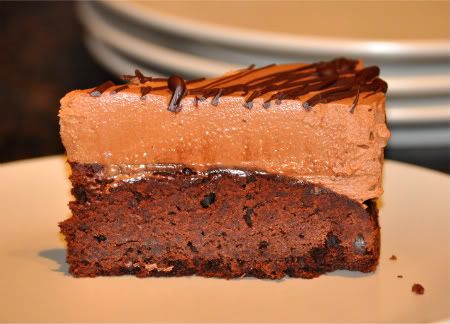 Directions Brownie Layer 1.For brownie layer, preheat oven to 350 degrees F. Grease a 10-inch springform cake pan and line bottom and sides with parchment paper. 2.Melt butter and pour into a larger bowl. Sift cocoa into butter and stir in sugar. Add eggs to mixture, blending well after each addition. Stir in vanilla. In a separate bowl, combine flour, baking powder and salt (do not sift). Add to cocoa mixture and blend. Stir in white chocolate chips. Pour into pan and bake for 35 minutes, until firm. Cool completely before filling.  Cheesecake Layer 1.For cheesecake layer, place chopped chocolate in a bowl of a pot of gently simmering water (be sure bowl does not touch the water) and stir to melt. Remove from heat. Beat cream cheese until fluffy with electric beaters or in a stand mixer with the whisk attachment on high speed. Slowly add sugar while mixing and beat in vanilla. Pour in whipping cream and whip into cream cheese on high speed, until mixture becomes firm and holds a peak. Scrape chocolate into mixture and blend quickly. Scrape filling onto brownie base and spread evenly. 2.Chill cake for at lest 2 hours before slicing. To garnish, remove springform pan and drizzle top with white chocolate. 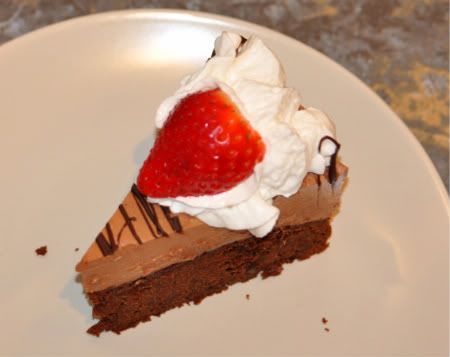 I made half of the original recipie. I did not have white chocolate, so i replaced it with semi-sweet chocolate for garnishing. I did add 1 tbsp of cocao powder into the no bake cheesecake layer to reduced the sweetness. I afriead it is gonna be too sweet, so, I took 1 tbsp of sugar out from the recipie of brownie as well as on the cheesecake recipie which that help lots (i think the recipie is already perfect, not that too sweet. It was just me ha ha!! that always reduce the sugar in the recipie). 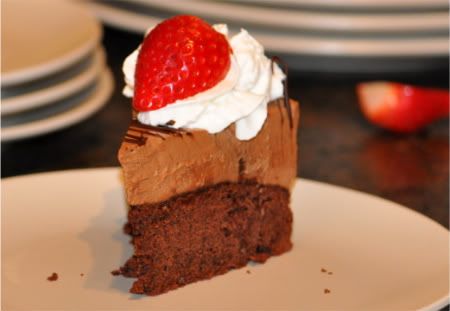 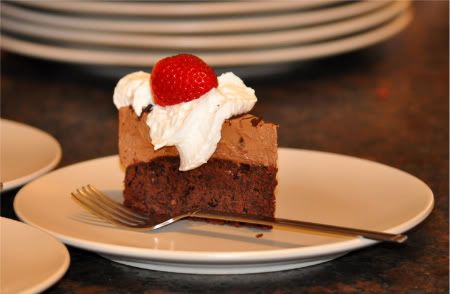 My opinion about this recipie. It is perfect, just perfect for people who love choclolate. My parent inlaw, my sister inlaw love it. My husband loves it so much. I love it too....My daughter loves only cheesecake layer and whipping cream on the top ha ha ha!!!. Greentea Cake and Orange Cupscake For Christmas
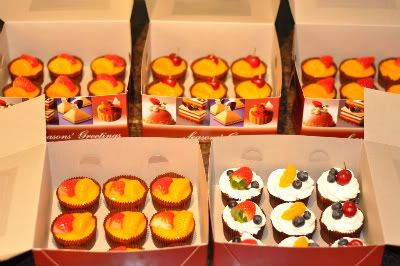  I baked lots of Orange cake cupscake for my friends for Christmas. Also Greentea cake for the customer. But i found out that the cupscake is abit dried, not moisture as before. I think it probbaly because i it was in the oven too long. The Greentea cake, the recipies as the Fresh milk spong cake, i did add 1 tbsp of grrentea powder. I love this recipie. It is very moise and soft. The recipie you can find on my blog (hu hu!! still have to learn how to put the link on this page).    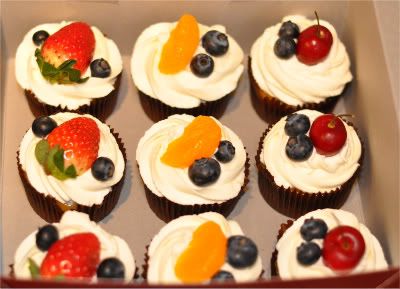 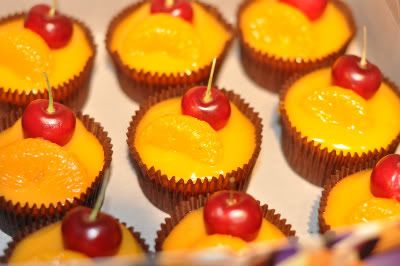  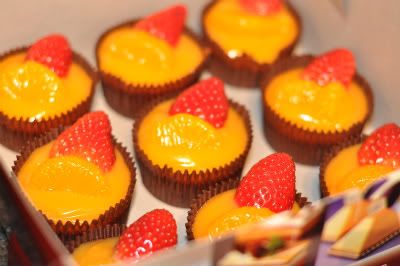 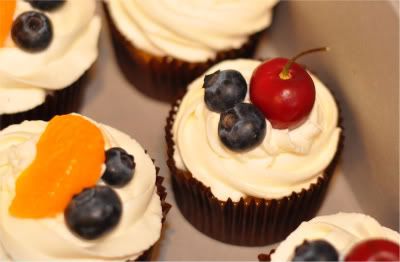 Merry Christmas everybody |
MSNV
 ผู้ติดตามบล็อก : 1 คน [?] ผู้ติดตามบล็อก : 1 คน [?] Nahathai's mom Email: aod01_p@yahoo.com Phone: 1-519-3621467 Group Blog All Blog
Link |
||||||||||||
| Pantip.com
| PantipMarket.com
| Pantown.com
| © 2004 BlogGang.com
allrights reserved.
|
|||||||||||||

